


It only took me about 40 years to learn how to really sharpen a knife. I mean really sharp… as in arm-hair shaving, paper-splitting, precision-whittling sharp. Like so many skills there’s a lot more to knife (and tool) sharpening than one might think, but it’s a skill that can be mastered with attention to detail and some basic equipment.
Anyone living in the country has to possess and maintain knives and other sharp tools. For that matter, anybody who spends time outside a cubicle in a high-rise building needs to know how to use and maintain at least a pocketknife. For someone living in a rural area, or hoping to in the future, learning how to sharpen and maintain working knives and tools is a perfect skill to add to the arsenal of self-sufficiency know-how.
What kind of tools work best when sharp? Let’s see, how about pocket knives, kitchen knives, machetes, hatchets, axes, splitting mauls, butchering knives, meat cleavers, wood chisels, lawnmower blades, garden tiller tines, putty knives, pruning saws, scissors, handsaws, chainsaws, cold chisels, and for the hunter or fisherman, let’s not forget sheath and fillet knives. Let’s face it, if you live life instead of just watching it from the couch as reported on the six o’clock news you’re going to be surrounded by things that need to be sharpened occasionally. Why not take time and learn the proper way and hone those skills now?
I started carrying a pocketknife when I was about eight years old. Back in those days, and that was not that many decades ago, most boys (and some girls) carried a pocket knife everywhere they went … even to school. It’s hard to imagine such in today’s society of justified concern about school violence. But back then a country kid was likely to be in possession of a pocket knife—either a penknife, Barlow, canoe, stockman, trapper or some other style. Even today I have a dozen or so pocketknives which I swap in and out of my pocket as the mood strikes me. I suppose it’s the same feeling my wife gets when she dumps the contents of her purse on the bed and digs out another bag from somewhere deep in her closet to carry for a while.
As I type this story there’s a yellow-handled, three-bladed knife in my left front pants pocket. The longest blade is for carving apples and cutting other foods on the go. The first short blade is for cutting twine and any utilitarian purposes. The final blade is saved for anything that requires precision sharpness. A couple of days ago, I cut up a couple of apples at lunchtime. Earlier in the week, I made an emergency repair on an extension cord that had been severed by accident, trimming the insulation from the wire ends and later slicing off the electrical tape once the repair had been made. Today, I used my pocketknife to open the seal on a gallon of antifreeze as I prepared my vehicles for the bitter days ahead. At the end of the workday, I took about 30 seconds to work the blades over a few strokes on a honing steel and they’re all razor sharp and ready to go again.
A Sharp Knife (or Tool) is the Best
The first rule of maintaining any edged tools or knives is to remember that you don’t have to sharpen them all the time. With normal use, a shop tool or kitchen or pocket knife will have to be sharpened only once or twice a year. The key is to understand the mechanics behind how a blade gets sharp, and even more importantly, how the sharp edge is maintained. You’ll spend much more time maintaining a sharp tool with a honing steel or strop than you ever will actually sharpening it with a stone or file.
I had always heard that a sharp knife is much better, and safer, than a dull one. That old rumor was confirmed by the emergency room doctor who was suturing my son’s inner thigh back together one November day last year.
While doing an outdoor task he had done a couple dozen times before, the four-inch-blade sheath knife he was using slipped, burying the fill length from tip to handle in his upper-left thigh. A half-hour later we were sitting in a hospital emergency exam room as an ER doctor swabbed out the inch-wide, four-inch deep stab wound.
“It’s a good thing that knife was sharp,” the doc told us. “It made a very clean cut.” A few stitches later and we were headed home. The potentially lethal injury left him with a less-than-impressive scar.
Just like the way a sharp knife will not push or parry off the cutting task at hand, a sharp chisel will make clean work of whatever material is being removed. A sharp lawn-mower blade will manicure the grass stems instead of beating and mangling which makes a freshly cut yard look shabby. A dull axe, adze-mattock, or maul can easily fail to bite into the wood being split and, instead, graze off to one side or another and cut a foot, lay bare a shin or break a knee. A sharp bit on an axe will find its mark and drive cleanly through the wood, coming to rest in the splitting block below.
Knife Sharpening Tools
Now that I’ve made my case for sharp edges, let’s first discuss the tools needed. For any type of knife, a sharpening stone is the first step. For an extremely dull and abused blade you might make better use of your efforts by first working the blade back into a basic shape with a metal file. But that would have to be an extreme case. Never, ever, sharpen a knife on a standard bench grinder. Most shop grinders spin way too fast and can quickly ruin the edge of a cutting tool, and even create enough heat in the blade to lessen the temper of the steel. Sometimes you might see a carver or professional knife sharpener using a bench grinder for sharpening purposes, but those machines are specialized and move much slower than the normal over-the-counter all-purpose bench grinder.
In addition to sharpening stones—a coarse grit and fine grit, oftentimes available in the same two-sided stone—you will want to purchase a good honing steel. Steels can be found at hardware stores, kitchen supplies stores, or even at flea markets and yard sales. And a steel will last forever. It’s also beneficial to get a leather strop, whether store-bought or modified from an old belt or other strip of leather. A strop is a must to maintain a razor-sharp blade.
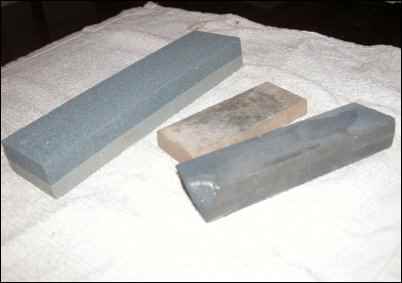
Sharpening stones come in all shapes, sizes, and qualities. However, a stone does not have to be expensive to work. The effectiveness is more in what you do with it as opposed to the price of the stone. Here are three examples including a rough and fine combination stone on left, a fine Arkansas stone in the middle, and an older rough and fine stone on the right.
These tools need not be expensive. A few days ago I purchased a brand new, quality two-sided sharpening stone at a flea market for $2.00 after talking the vendor down from his marked price of $3.00. It has now joined my half-dozen other sharpening stones. And at the same flea market, I purchased two used honing steels for $1.00 each. After I finally learned a while back that a honing steel is the real answer to sharp knives, I’ve become somewhat of a collector of used steels. I now have one with our kitchen knives, one in my outdoor gear, one in my toolbox in the shop, and a couple others just because I can’t pass up a bargain on such a handy item.
For wood chisels and scissors, the sharpening tools are the same: sharpening stones in a couple different grits, a honing steel, and a strop. Some prefer using sandpaper for chisels and other shop hand tools. Lawnmower blades, hatchets, meat cleavers, machetes, axes, splitting mauls and the like will require a medium file for routine sharpening. If the cutting edge suffers some severe abuse you might benefit from a bench grinder or four to five-inch handheld grinder to restore the shape of the cutting surface before finishing it with a file.
Making a Knife Sharp
Sharpening a knife correctly starts with understanding the geometry of an edge. Kitchen knives often have thinner blades and one-angle cutting edges. General-use sheath knives or larger folding knives used around the homestead or farm have a thicker blade and benefit from a multiple-angle edge. The most common involves a primary and secondary edge. It sounds complicated but it’s really not. Here’s how.
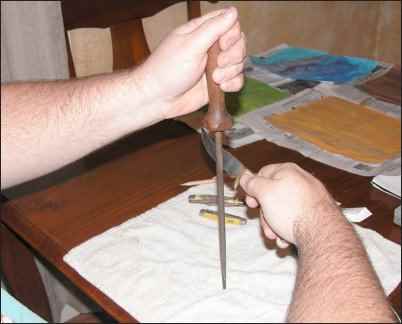
For a dual-angle edge, start with a coarse-grit stone. The primary angle should be about 22 degrees. It’s safest to set the stone on a firm surface—table or shop bench—and work the blade along its length. A good tip is to rest the stone on a washcloth, shop towel or similar surface to keep it from sliding around on the table or bench. To position the blade properly lay the blade flat on the stone facing away from you. Now raise the back edge of the blade until it forms an approximately 22-degree angle with the cutting edge still touching the stone. Angle guides can be purchased, but here’s a simple and quick way to make one from a piece of paper.
Take a Post-It note or other similar-sized square piece of paper. Fold one of the 90-degree corners in half. That gives you a 45-degree angle. Now, fold the 45-degree angle in half. There’s your 22.5-degree angle to use as a visual guide. Now try to match that angle relatively close with the distance the back of the blade is from the sharpening stone.
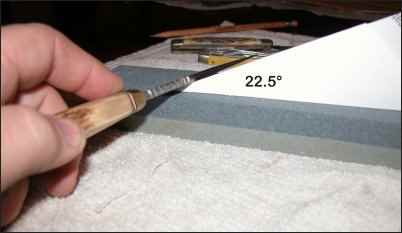
A sharpening angle guide will provide guidance when positioning the blade. But an inexpensive guide can be made by folding a piece of paper. Here a knife is positioned using a paper guide folded twice to form a 22.5-degree angle. That setting is optimal for a one-angle sharpen, or the first step of a two-angle edge
Make a half-dozen or so passes on the first side of the blade using medium pressure. Then switch to the second side of the blade and make the same number of passes. Return to the first side and repeat the entire process, always maintaining the proper angle to the stone. Now stop and look at the cutting edge closely. A trick here is to use a red permanent marker to color about an eighth to a quarter of an inch of the cutting edge prior to sharpening. After a couple of rounds of passes check the cutting edge and assure the red color has been ground away by the sharpening stone, showing you are focusing your efforts on the right part of the blade.
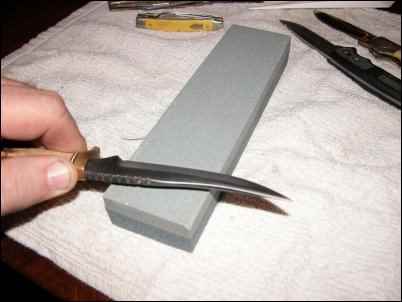
To sharpen a knife on a whetstone, also known as a sharpening stone, start with the knife near one end of the stone and “cut” into the stone as you move the blade toward the opposite end of the stone.
Knives used for utilitarian purposes can be finished at a roughly 20- to 22-degree angle. Machetes used for hacking brush, or sheath knives used for cutting rope or chopping small limbs fall into this category. In this case your should now switch to a finer grit stone but maintain the same angle from the back of the blade to the stone but slightly less pressure. Make about six passes on the first side, then switch to the second side and repeat. Now go back to the first side and make four passes, then repeat on the second side. Next time make two passes on each side while using less pressure against the stone, then end it by making a half dozen or so single passes alternating sides and using very light pressure. Again, you can use the red marker trick to assure you’re removing material from very edge of the blade. Like I said, for most utilitarian knives you’ll find this will do the trick.
How to Make a Knife VERY Sharp
For kitchen knives or other blades used for everything from butchering to fine cutting, and pocket knives sometimes fall into this category, you’ll want to take the blade to the next level… the next three levels in fact—a secondary angle with a fine stone, honing with a steel, and stropping on a piece of leather. This is what produces a razor-sharp edge that will shave hair from your arm, long considered the earmark of a finely sharpened blade.
Next comes the secondary angle. You’ll need to maintain about 10 to 12 degrees from the back of the blade to the sharpening stone surface. If you have a problem visualizing what 11 degrees looks like, take your cheap folded paper angle guide and fold the 22.5-degree corner in half one more time. There you have 11.25 degrees. Now look at that angle and visually transfer it to the angle the knife is held off the stone.

After you’ve completed the primary angle with the rough and fine sharpening stones, check the blade closely to assure there are no remaining nicks. The red marker trick provides an easy visual aid.
So with the fine surface of the sharpening stone, position the blade on the stone facing away from you and raise the back edge to approximately 10 to 12 degrees. Make about six passes using light pressure, change sides of the blade and repeat. If you know the knife you’re sharpening has an extremely hard tempered blade you might have to repeat this step a couple times before reducing the number of passes on each side. Now make four passes per side, then two passes per side, and finally alternating single passes all while maintaining the correct angle.
You can use the red marker to test your progress if preferred. You should be removing material from the blade on about half of the cutting edge surface area you sharpened at 22 degrees. Make sure you’re maintaining good contact with the blade’s full length to the tip.
One way to check for sharpness is to carefully rub the pad of your thumb lightly across the cutting edge from side to side, not lengthwise. You should be able to feel a “burr”, a nearly invisible gripping edge, on the sharp edge of the blade. While the knife might seem sharp at this point, in fact, it’s a long way from where it can be.
Using a Honing Steel
Most knives are not dulled because the sharp edge is blunted. The knife stops cutting with ease because the minuscule fine cutting edge curls over, also known as “buckling”. If you used a microscope to look at the cutting edge it would be shaped like a fish hook. A really sharp knife has a finely honed edge, which despite being a tempered steel is prone to bending under even a light pressure. That’s why a barber will realign the edge of his or her straight razor with a strop several times a day. A butcher will realign the edge of his butcher knife with a honing steel—often carried on a ring attached to his belt or apron, every few minutes while cutting meat.
With normal use, there’s no need to sharpen a knife using a stone more than a few times a year. My son worked his way through his early years in college as a cook in a couple different restaurants. The sharpening of knives was handled by a professional sharpening service… in this case, an older gentleman who has established himself as a world-class woodcarver. His self-taught sharpening skills over his lifetime of working with fine woodcarving tools eventually led to a lucrative second career as a knife sharpener for restaurants in our area. He visits each restaurant about every other month and picks up the dull knives and drops off the same number of sharpened blades. For the next several weeks the only maintenance needed for knives used daily by an assortment of kitchen hands is an occasional honing with a steel.
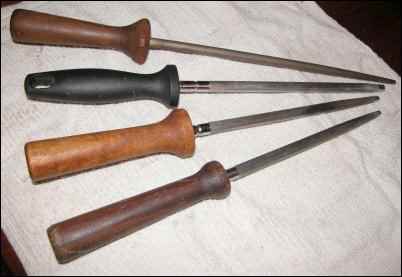
Honing steels are all generally the same, although some are larger than others and can come with ridges or smooth shafts. The purpose of a steel is not to sharpen but to straighten the cutting edge of a blade.
“Steels” come in assorted diameters and lengths, with either smooth or ridged surfaces, but all perform the same function. A honing steel does not sharpen a blade or remove material. Its sole purpose is to realign the microscopic fine tip of the cutting edge.
Some people prefer using ceramic honing rods instead of a sharpening steel. I’ve tried ceramic rods and small pocket units using miniature rods but have never warmed up to the devices. Nothing works as well for me as a steel rod. Because steels have a small diameter, and you’re only working with the very fine, thin edge of the blade you needn’t use much pressure when honing a blade.
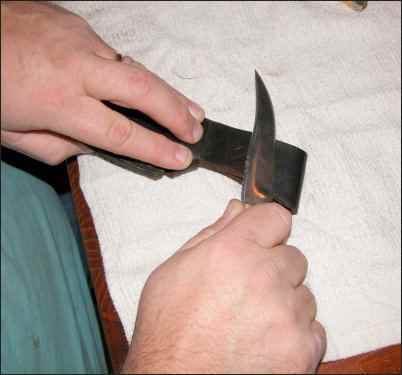
Undoubtedly we’ve all seen professional chefs or butchers wielding a large knife and honing steel together in an orchestrated fury. While that might look impressive, anyone new to working with knives should start with the beginning method of honing with a steel. Start by placing the steel point down on a surface which will not dull the blade if it comes in contact. Placing a dishtowel or other rag under the point of the honing steel will keep it from sliding around during use. Now take your newly sharpened knife, or a sharp knife which has been used and doesn’t cut as well as it did before, and hold it with the point away from you and the cutting edge pointing down.
Position a honing steel point down on a surface and make passes with the knife blade. Professional chefs and butchers hold both the knife and steel in the air while honing, but the beginner or novice should use the point down method for safety and accuracy.
Start with the blade on the right or left side of the steel rod near the handle. Lay the blade flat against the steel, then raise the back edge to about 8 to 10 degrees from the rod. Make a swipe down the rod drawing the knife toward you as you go so that the tip is honed before the blade reaches the surface the rod is resting on. Now switch the blade to the opposite side of the rod and start back near the handle and make another swipe down the blade in the same manner as the first. Repeat the process a half dozen times or more alternating sides with each pass while maintaining the proper angle. Doing so will straighten the minuscule curled edge of the blade. Now check the sharpness of the blade. Some people like to gently scrape a thumb or finger pad across the cutting edge side to side, while others will see if the knife will easily slice slivers from a piece of regular notebook paper.
I’ve found that honing a knife will often fine-tune the blade to the point of shaving hair, but with some effort. The last step in the process is what takes the edge to its final razor sharpness.
Using a Strop
A “strop” is simply a strip or piece of leather used to put a final straightening on a cutting blade. We usually associate strops with barbers. Anyone who has visited a barbershop likely recalls seeing a leather strap hanging on the wall or counter behind the barber chair. If the haircut ended with a shave of the back of your neck with a straight razor then you likely saw the barber work his folding razor against the strop a few passes before going to work. Woodworkers sometimes strop precision chisels, and woodcarvers will strop cutting and gouging tools. Rubbing a cutting blade in a reverse direction against a strop removes any unseen tiny metal burrs and does the final straightening of the curled edge.
Barber strops are often a couple foot length of leather with a ring or grip on each end. Another type is a piece of leather attached to a handheld paddle or woodblock. I usually use an untooled leather belt, but have been known to strop a blade against my leather work boot while working—but the leather must be clean of grit or the effort will be futile.

Some people prefer to add a compound to stropping leather to enhance its effectiveness. Jeweler’s rouge works well, and I’ve heard of sprays that contain diamond particles but I know of no one who uses them.
Stropping is done by drawing the blade across the piece of leather blade spine first with a light to medium pressure and at about a 5-degree angle. Make a pass, then lift the blade from the leather and flip it to the opposite side before making a pass on the opposite side of the cutting edge. Always lift the blade completely from the strop before rotating it to the opposite side at the end of a pass. At this point in the process the cutting edge is extremely thin and vulnerable to being bent out of shape.
A razor-sharp edge can be put on a knife by going the additional step of stropping the blade. Strops can be purchased, but any piece of clean leather will work nearly as well. Stropping removes microscopic burrs and straightens the minuscule point of the cutting edge.
Use of a strop on a blade is the final step of sharpening. In most cases, it’s even unnecessary. For most knife uses stopping after the honing steel will render a blade plenty sharp. Even butchers and chefs stop with a good honing. Only barbers or anyone else needing a razor edge go the extra step of stropping. But it is a good way to impress your friends by easily shaving hair from your forearm using your old pocketknife.
Maintaining sharp knives and tools makes all other tasks involving those cutting tools more enjoyable. And it takes a relatively short time to hone a blade on a steel or strop it on a strip of leather. Once you’ve familiarized yourself with the sharpening stone, honing steel and stropping methods you’ll never want to carry a dull knife again. I know I don’t.
https://www.homestead.org/machinery/how-to-buy-a-very-used-tractor/
I would love to see this supported with videos.