


Living in the country means you have to deal with fewer people. Country neighbors are few but often become like family. Oftentimes the majority of life that surrounds you is not the human kind, but rather domestic or wild animals. You have probably found that you want to attract wildlife to your property more than ever.
Learning to coexist with the natives of nature can often be one of the more rewarding parts of rural living. An early summer morning with that first cup of coffee out on the porch can become a concert when turkey gobblers begin sounding off from their perches in trees where they roosted overnight. Nothing on the television can compare to watching out the window on a snowy winter day as a wily fox makes his way along the fencerow in search of an unsuspecting rabbit or rodent. And who doesn’t like watching deer feeding in clearings just before dark?
But surrounding yourself with entertaining nature doesn’t necessarily happen automatically. When humans make inroads into rural areas they can often nudge wildlife along deeper into the woods or to the next ridge or valley over. But there are simple things a rural landowner can do to encourage wild animals to stay close and to even attract wildlife to your property. Just as city dwellers will build bird-feeding “shrines”, squirrel perches or koi ponds to have a touch of nature close, living in and near nature the rural homesteader can plant wild animal food plots, create mineral licks, and build water sources to keep their wild neighbors within viewing range.
Just as a property owner wants to maintain healthy woodlots and streams, maintaining a healthy animal population is important as well. Creating food, water, and mineral sources for wildlife is neither expensive nor exceptionally difficult. First, it’s important to have a very basic understanding of how animals live and eat. Then you simply choose the right locations on your property and set about creating some habitat enhancers.
Before you start it’s important to realize that, unlike suburban bird feeders, food and water sources for larger animals will not be located in your yard. In fact, they can be a hundred yards or more from your house or outbuildings. Animals such as turkey, deer, foxes, and smaller game will range a couple miles or more. Still, providing food and water sources will help hold more animals on your land, which equals more viewing opportunities.
Understanding the Animals
The goal is to attract wildlife to your property. There are a few basic steps you can take which will benefit a wide assortment of creatures. For instance, having deer passing through or living on your land will mean they’ll leave behind antlers each winter when the bucks shed their headgear. Discarded antlers contain calcium, which will be eaten by squirrels and other small creatures for the mineral content. Minerals found in man-made mineral licks you place on your property will be utilized by deer to grow larger and stronger bone and antlers, and by turkeys to develop stronger eggshells and healthier poults. More wild turkey, quail, and other poults of ground-nesting birds will mean necessary food for foxes. Plants grown in small food plots will increase the rabbit population, which will also benefit foxes relying on rodents and other small furbearers for food.
For years we’ve maintained food plots and mineral licks throughout our farm. Periodically throughout the year, we set up a game camera—a weatherproof digital camera triggered by movement—near the food plots to see what is stirring. It’s common to capture snapshots of any combination of songbirds, hawks, crows, quail, squirrels, opossums, rabbits, raccoons, foxes, turkeys, and deer feeding together at the same time from the same feeder, plantings, or mineral lick. To keep it simple, the best bet is to stock feeders or plant greenery, which will benefit a variety of animals. Likewise, all animals can benefit from a year-round water source.
Turkeys breed around March or April and lay a clutch of eggs that will hatch in about 28 days. Deer will mate in the fall and, following a 180 to 200 day gestation period, will give birth in May or June. Squirrels and many other small furbearers mate in late winter or early spring and give birth a month or two later. All animals can benefit from proper nutrition both during the gestation cycle and when raising newborns.
Spring and early summer can be considered the most critical time for deer. It’s during these months that bucks are sprouting and growing new antlers. Unlike cattle, which grow horns and keep the same set for a lifetime, antlered deer grow a new set of headgear each summer and shed the antlers in mid-winter. Think about growing a new set of arms or legs and how that might tax your body. Growing two sizable antlers in a matter of months can require lots of extra nutrition and minerals. At the same time, female deer, or does, impregnated in November or December will be completing their gestation period. If growing new antlers can rob you of nutrition, try growing an entirely new animal … or maybe even twins or triplets. And bucks can lose up to 25 percent of their body mass between January and April.
Where and How to Attract Wildlife to Your Property
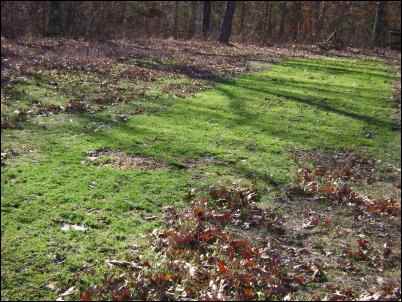
I manage my family’s hunting property. It consists of 78 acres that were once my grandfather’s working cattle and hay farm in the Missouri Ozarks. At his passing a dozen years ago, the property had about 50 acres of fields and 28 acres of woodlots. We cut and sell about 30 acres of hay each year now, with the rest rapidly diverting back to woods. I started off by putting up some homemade grain feeders. These are simple and cheap to make, and I’ll give the directions for making one a little later. The feeders, which cost about $5 to $8 a piece to make, can benefit a wide variety of animals. They are attached to a tree using wire, twine, or a bungee cord, and can be installed and removed with no damage to the tree.
My next move was to plant two food plots several years ago. Now I’m working on a couple more. With each food plot, I create I also start a mineral lick nearby. A mineral lick is every bit as important as a food plot, and I’ll explain why shortly. When choosing a site for a feeder, food plot, or mineral lick, I make sure my habitat enhancers are located near established travel lanes and plenty of escape cover. This makes the animal feel safer when dining at your food stop. If you’ve lived on or visited your property very much, chances are you’ve seen animals coming and going. Look closer and you’ll find travel paths that often lead between feeding and bedding areas. A water source nearby is a definite plus, and one can be created for cheap.
Make a Homemade Wildlife Feeder to Attract Wildlife to Your Property
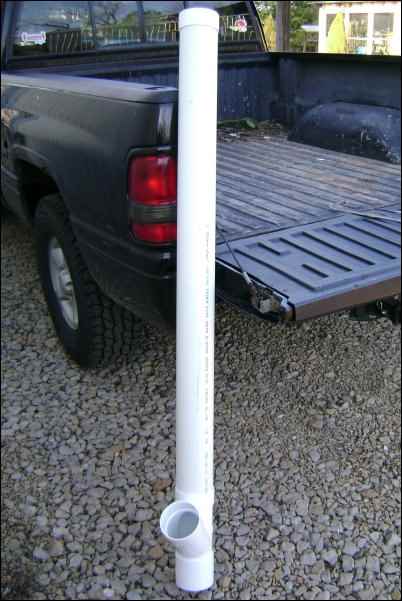
The simplest way to help feed wild animals is with homemade feeders. A basic wildlife feeder can be made with plastic sewer pipe and fittings from the nearest hardware store or lumber yard. It requires only a handsaw or some type of sharp utility knife. Gluing the pieces together is optional but suggested. Painting the feeder will help it blend into the surroundings, but the animals really don’t seem to care if you leave it white as it comes from the store.
You’ll use this type of wildlife feeder to distribute whole, cracked or crimped corn, chicken scratch, oats, birdseed, or a combination of feeds. I tend to use a mixture of cracked corn and oats. Birds tend to prefer the cracked corn, and if you use whole corn kernels the squirrels will simply gnaw a hole into a kernel and eat the meat out of the seed anyway.
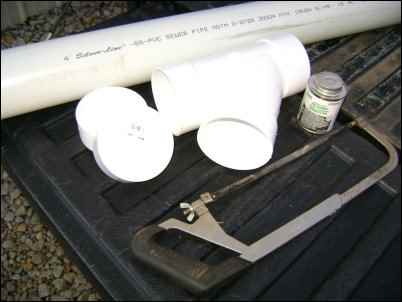
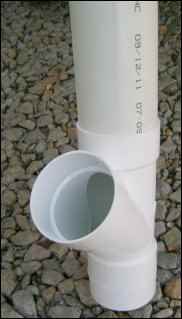
To make a feeder you’ll need a four-foot piece of thin- or thick-walled PVC (plastic) sewer or water line. I prefer a thin-walled pipe that holds up for 10 years or so before becoming brittle from sunlight and the elements. You’ll also need two end caps for the pipe, and a 45-degree three-way slip fit joint. The easiest way is to purchase an 8-foot piece of pipe, four end caps, and two 45-degree joints—which makes two feeders. It’s as easy to make two at a time as it is to make one. Doing so will only take about 15 to 30 minutes to complete.
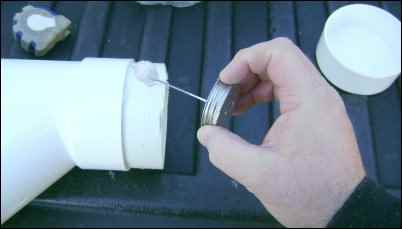
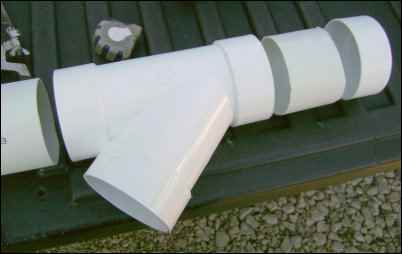
Here’s how! Cut the pipe to a four-foot length. Now cut off a four- to six-inch piece of the pipe and set it aside. On one end of the longer piece of pipe glue the 45-degree joint on with the straight run in line with the pipe and the 45 degree opening pitched back toward the length of pipe. Next insert the short piece of pipe into the opposite opening of the straight run. This creates a sleeve on which to glue one of the end caps, which will be the base of your feeder. The second cap will not be glued in place, but will serve as a removable lid for the feeder. It’s that simple. If you choose to paint the feeder now is the time. If so, paint the lid as well, but don’t put the lid on while the paint is wet, or it will stick in place.
To use the feeder all you have to do is attach it in an upright position to a tree or fence post (using wire, twine or a bungee strap) near an existing animal trail or area where you wish to view wildlife. Remove the cap and fill the length of the tube with feed. A four-foot long feeder will hold about 25 pounds of grain. When you fill the tube a small amount will spill out of the 45-degree opening, but don’t worry about it because it’s normal. During use squirrels and other animals will drag out a little feed onto the ground, but turkeys and other birds will quickly clean it up. Replace the lid cap to keep the grain in the feeder dry. When I first install a new feeder I’ll also scatter a few handfuls of grain around the feeder to initially attract animals. I have as many as a dozen homemade feeders in place on our farm throughout the year.
Here’s an important note: Some states prohibit feeding, or “baiting”, turkeys or deer during hunting seasons. If you or anyone else intends to hunt on or near your property you might want to brush up on the laws of your state to assure there’s no misunderstanding about your intention to feed wildlife. In our case our land is used for hunting, so we remove all supplemental feeders several weeks prior to hunting season. The brief interruption in feeding doesn’t seem to deter the animals from returning once the feeders are back in place.
The next step up is to plant small “plots” of grains and greens to be used by wildlife. These food plots can range from a few square yards to a quarter-acre or more each. Here again, the goal is to grow plants that multiple animals will benefit from. For example, a small patch of corn will be visited by raccoon, deer, squirrel, quail, and pheasant. Sunflowers will attract songbirds, doves, and even deer. Sorghum is popular with raccoon, deer, and other foragers.
If you really want your plantings to do well, make sure your soil is optimal. If you’ve never had your soil tested, or even if you have but it’s been a while, spring is a good time to take a soil sample to your local Soil Conservation office for a pH test. If the test reveals a need for lime, spring is the ideal time to incorporate it.
The folks at the soil office can provide specifics based on the test results, but an ideal pH level for milo and many other food plot plants is about 6.5. A rule of thumb is that it’ll take about a half-ton of crushed limestone to raise the pH on a quarter-acre plot by about a half of a point. The limestone should be added to the soil and turned under if at all possible. Either way, the lime needs to be added prior to seeding, or spring growth for existing plants. If you wish to fertilize a general suggestion would be a 12-12-12 mix of nitrogen, potassium, and phosphorus.
If you’re starting a new food plot, or adding new seed, consider corn, soybeans, vetch, milo, sorghum, clover, alfalfa, or sunflowers—all good choices for supplemental spring and summer greens, beans and grains. As for corn, I’ve planted everything from a garden variety “candy corn” to common field corn. Just because your planting this spring and want to see some immediate results, don’t overlook planning ahead for the other seasons. Some winter hardy choices include winter wheat, rye, and oats.
Sorghum offers some unique qualities of food plot seed. Deer generally won’t eat the plant at all during the summer, but the seed heads are a delicacy during late summer or fall. Since deer aren’t interested in the plant’s stem, it helps guarantee a crop planted in the spring that won’t be eaten when other options are available, and then will already be in place when fall arrives. And it doesn’t require a lot of water.
Water for Wildlife
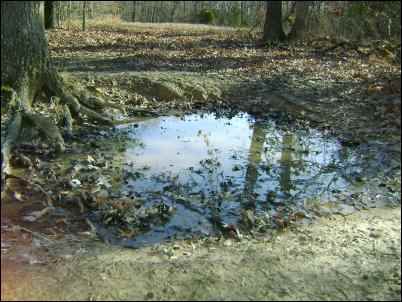
Having a water source near your food plots and mineral licks will only help draw and hold wildlife on your property. Consider it “one-stop” shopping, and who doesn’t enjoy a refreshing drink after a meal. Look at all the hoof prints around a woodlot pond and you’ll know what I’m talking about. I’m fortunate that my grandfather put in several small ponds throughout his farm back in the mid-1900s. All the ponds were dug using a drag scoop, sometimes called a slip scoop, pulled by a team of horses or one of his old Farmall tractors. Two food plots on our land sit close to a spring-fed stream that flows little more than a trickle most of the year. But a trickle is enough to keep a few puddles and bends of the little gravely creek filled with fresh water.
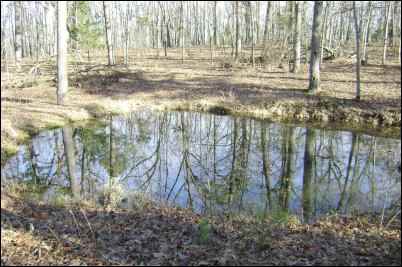
If you have a creek or stream nearby that’s ideal. Digging or using an existing pond would be the next best option. But unless you’re a farmer or own an earthmoving business, the cost of putting in ponds for animals which are not sold for income can be pretty expensive. But don’t fret, because there are other options. Consider hiring the work done by a local contractor or farmer with a backhoe, dozer, or skid steer. If that doesn’t pan out, use galvanized farm stock tanks, or build your own water tank from an old heavy equipment tire.
Setting up a small galvanized or rubber stock tank is the simplest. The main drawbacks are that galvanized tubs are metal and heat up quickly in direct sunlight or summer heat. Stagnant water that gets hot can quickly turn slimy and undesirable.
Another option is using an old equipment tire to make a water tank. Tractor tires work well, but combine or skidder tires hold a lot more water. If you decide to go this route you’ll be sealing the bottom of the tire with one of three options—plastic sheeting, concrete, or bentonite. The plastic is cheaper but has to be replaced periodically. Concrete is more permanent but also more expensive (and you’ll likely be mixing bags by hand to do this relatively small job far away from the driveway or state road). Bentonite—often used as a binding agent in sand casting, in model rocket parts manufacturing, and in winemaking to remove excessive proteins from white wine among other uses—is the third option. Since this tank will likely be filled on occasion by dumping water in from a bucket or barrel for this use we’ll stay away from the Bentonite which can be washed away with a stream of water under pressure … such as being dumped from a height.
If you opt to go this route, here are the steps for a tire tank: First, cut out one sidewall of the tire. A reciprocating saw works great for this and a chainsaw is another, albeit more dangerous, option. Leave about six inches of sidewall from the tire lugs in toward the center.
If you’re using concrete to seal the bottom, go ahead and set the tank in a place where it will sit with the intact sidewall and bead down. It works great to dig the tire partially into the ground. The other option is to mound and pack dirt in around the base on the outside. Next, fill the hole in the bottom with concrete. Use a stick to push it up under the bottom sidewall and fill until the top level extends just above the bead of the tire. Allow the concrete to dry for 24 hours or so, and the tank will be ready for use.
The other option is using a piece of plastic sheeting to line the bottom of the tire tub. In this case, you’ll want a heavy plastic about twelve inches larger in diameter than the hole in the bottom of the tire. First, fill the area within the bead of the tire with dirt to within about an inch of the bead. Now scuff the bottom outer area of the plastic sheeting with a grinder to rough it up to help with adhesion. Make sure the exposed inner portion of the bottom sidewall and bead are free of dirt and debris, then apply a layer of silicone adhesive or thick tar to the newly scuffed plastic and flip it over and press it in place. Let it dry before filling the tire with water. An extra step that helps is to screw the plastic sheeting to the tire’s sidewall with self-tapping, broad-headed screws every six inches or so.
A tire or stock tank holds far less water than even a small pond, but it’s still a way to get some water where it’s needed if digging a pond is not an option.
Supplemental Minerals for Wildlife
Growing antler, bone, and viable eggshells requires minerals. Bucks with big headgear need lots of them. It’s equally important for does to grow healthy fawns, or turkey and quail to have strong shells on eggs. A weak shell can be crushed by the weight of the sitting hen and is more prone to damage by scavengers. Investing in feeders, food plots, and water sources are great uses of your time and resources. But the triangle needed to attract wildlife to your property is not complete with talking about supplemental minerals. Animals will discover the minerals within a matter of days and it’ll become a regular stop on their travels in no time.
You can mix up your own mineral mixture using simple ingredients found at any farm and ranch or feed store. Over the years I’ve seen lots of recipes for mineral lick mixtures and am relatively sure most of them are beneficial and in no way harmful. But I was given one several years ago by a coworker that is simple, relatively inexpensive, and easy to mix and use. It uses three ingredients: trace minerals, di-calcium phosphate, and common stock salt.
All the ingredients are readily available in 50-pound bags from your local animal feed store, and you’ll be using a ratio of 2-to-1 trace mineral compared to the other two ingredients. That gives you 200 pounds of mineral mix, enough to establish two decent-sized licks and keep them “freshened up” for about two years. The day I was writing this article I checked on prices with the feed store in town and the total cost for all three ingredients was $60, only a few dollars higher than my last visit several months ago. That’s not bad for 200 pounds of antler and fawn-growing goodness.
Mix the ingredients only when you’re ready to use them. Otherwise, keep the bags separate and stored in a dry place. To start with you’ll be using about 25 pounds of mixed product per location. Find a tub or barrel big enough to hold that much and allow for easy stirring to mix the goods together. Now measure out about six pounds each of stock salt and di-calcium phosphate and 12 pounds of trace mineral. If you don’t have a scale then use a discarded coffee can which already has the weight-by-volume amount worked out and marked on it. Once enough of each ingredient is in the barrel or tub mix it thoroughly.
To create a lick you can dig a hole slightly larger than what would be necessary to hold the roughly 25 pounds of mix. Remember, your goal here is to feed the deer and not the earthworms so keep that indention wide and shallow. My mineral licks are about 10 to 15 yards away from the edge of my food plots and about 10 to 15 feet across. With a hole dug, now stir in some of the soil you just removed and some of the mineral mix and stir it in the hole. Add more soil and more minerals and stir it together until you have all the dirt and mix mounded up in the hole.
When the deer and other animals discover the lick and it won’t take too many days for them to start excavating the mineral-rich soil from the hole. By then any rain showers will have dispersed the mineral into the surrounding ground as well. The most used lick on our property is now about 20 feet across and nearly a foot deep in places. Return to the lick in three or four months and freshen it up with about half as much mixture as you started it with—about 12 pounds. Just broadcast the mixture into the hole and let nature takes its course. Repeat the process every four months or so.
Whether it be making and installing simple feeders, planting a food plot, creating a water source, or establishing a mineral lick, the time and effort invested to attract wildlife to your property will have a direct effect on the wildlife population and, subsequently, the number and diversity of animals you’ll see on your property. You’ll quickly discover that some of the most interesting new neighbors you’ll find in the country have four legs or feathers.
When my husband and I moved to our small farm in Virginia, we realized that while we were carving out a space for our home, this land was already home to local wildlife, so we made the decision to do everything we could to preserve their habitat while still meeting our own needs. Taking the time to do that made every day an adventure, We saw foxes, wild turkeys, deer, possoms, box and snapping turtles, squirrels, black bears, and 84 species of birds (yes, I kept a list). Including wildlife in your building and landscaping plans will pay you back many tims over.