


There are a lot of good reasons to have a few hives of honey bees around. For garden and orchard crops, honey bees provide the necessary pollination so there’s something to harvest at the end of the season. For a source of a natural sweetener—honey—there’s no rival, and if the other natural products of the hive—pollen or propolis—appeal to you, then a few hives are certainly useful. Plus, there’s the added benefit of having all the light you want from fragrant and clean-burning beeswax candles. Sweetness and light in the same package.
Indeed, honey bees provide all of these services to their keepers. But they could, if harnessed, provide them in surplus so you could not only produce what was needed for the homefront but use the extra for bartering or selling to be a part of the family’s income.
And taken yet a step further, honey bees themselves can be increased and sold just as bees to stock new colonies, as small nucleus colonies ready to build up during the season, or large, full-size colonies ready to produce in the current season. Queen honey bees, too, can be raised and selected to thrive in the local environment, like your open-pollinated corn, or sold to other beekeepers in the area.
A few hives of bees can do all of this for their keepers, but there’s still more. Almost nothing in the backyard continuously captures the imagination as totally as a box full of fascinating, industrious, well-behaved, and productive bugs. If you ever open the box they live in you will get just an inkling of what I mean. But open it twice, and you’re hooked.
Getting started, like many new ventures, has a learning curve to be dealt with. The most important part of that curve is assuming responsibility for the well-being of a living being under your care… not unlike family pets, chickens, cattle, or other friendly or productive animals. A beehive may appear as only a box full of bugs, but a honey bee colony has a personality and lifestyle all its own, and as its keeper you must learn its ways and wiles so you do the best you can to protect it from the dangers of the bee world, and manage it so that it is as naturally productive as it can be without the stresses of industrialized beekeeping.
Moreover, as you know full well, animals are variably susceptible to their own particular problems, and each has its own special nutritional, housing, and behavior needs. Honey bees are no different, and if you keep this in mind the recommendations to follow make perfect sense.
Before You Begin Beekeeping
Before you begin this adventure, a piece of solid advice is to, if at all possible, visit with a local beekeeper and find out what they have to say about keeping bees where you live. Not all places are created equal when it comes to bees, and every location poses its own advantages and problems. In fact, go a step further and offer some free labor in exchange for the information and experience this beekeeper can share. Help install packages, examine colonies, feed bees, harvest honey, and work in the honey house extracting the honey and handling the beeswax later. You will be rewarded far, far more than the short time you donate to the cause.

There’s an old saying in educational circles that goes: “Tell me and I may remember. Show me and I’ll probably remember. Make me do it and I’ll remember for always.” Books help, videos help, listening to speakers helps, but actually doing the work is the best way there is to learn.
That experience alone usually separates future beekeepers from those not destined to be beekeepers, so if you’re still in the game the next step is to get a few good books at the library or bookstore and find a local beekeeping association so you can meet more local beekeepers, sign up for any beekeeping classes they sponsor, and attend meetings to learn even more.
Good introductory books include:
- The Backyard Beekeeper by Kim Flottum
- Beekeeping For Dummies by Howland Blackiston, and
- The New Starting Right With Bees by Kim Flottum, Kathy Summers, & the Editorial Staff of Bee Culture Magazine
If you want continuing up-to-date information there are two beekeeping magazines: Bee Culture, published by the A.I. Root Company, which focuses on beginning and sideline beekeeping topics; and the American Bee Journal, which tends towards more advanced topics. Both offer free sample copies if you contact them.
Home Sweet Hives
Once you’ve started the process you’ll find out that the first thing you need to do is to decide where the bees are going to live. Specifically, where will the hives sit? Whether on your property or someone else’s, there are some fundamentals you should consider relative to location—exposure to the elements, prevailing wind, shade, small predators like skunks, raccoons, and even toads, and large predators like bears, vandals of a teenage nature, or nuisance animals like cattle.
If you live in tropical, or nearly so, locations, a bit of afternoon shade can be advantageous for both you and the bees. But if you are further north, no shade at all is the best place to be. Having the colony facing south or south-east is ideal, but there are other considerations.
Be a good neighbor. If you are in the country, that is, the nearest neighbor is at least a couple hundred yards from you, then colony location becomes much easier—it only has to meet your specifications. However, if you have neighbors close enough to shout at, you really need to practice good neighbor beekeeping. That means keeping bees out of their pet water dishes, swimming pool, or birdbath. You should be aware of when you work bees, so when your neighbors are outside you aren’t working your bees. And absolutely, you need to make sure that it’s legal to keep bees where you are. Sometimes it’s not.
In all cases with beehives, out of sight, out of mind is a good rule to follow. It just makes things easier, so consider putting bees behind fences, behind buildings, using living screens like evergreens or sunflowers, or some other device to keep your hives out of sight if neighbors are close.
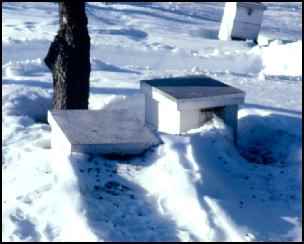
Once you’ve made provisions for water for your bees and arranged it so flight paths are high overhead because of fences and screens, plan on how your bees will sit where you want them to sit. Up off the ground is good, to keep the bottom off damp ground and to keep skunks, toads, ants, and other nasties at bay. Too, a beehive that sits up 18 inches or so off the ground (the recommended height) is easier to work because you won’t be putting heavy boxes full of honey all the way down and having to lift them all the way back up when you’re done.
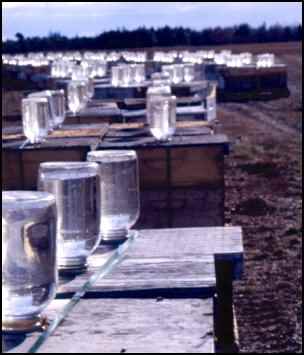
Though there are several types of hives on this hive stand, notice that there is room between them to place heavy boxes when working each hive, and that the stand is about 18” high to keep skunks, ants, and such at bay. Also, you won’t have to place heavy boxes all the way down to the ground, and then pick them up again when working any of these colonies. Material inside the hive that falls down, will fall completely out, keeping the floor inside clean, and being out from the evergreen wind block behind these hives, makes it easy to stand behind them when working the bees. Stand in front and you block the entrance, and generally irritate the bees. Off the ground makes it easier to mow or clean around too… lots of advantages to getting your bees up and off the ground. After a couple of hours examining colonies, you will be very glad for this little piece of advice. Hive stands then, should be raised a bit off the ground, and be large enough to accommodate at least one more colony that you put on them… a stand large enough for three, then, should always hold two colonies. Life gets a lot simpler when your work is easy. Be aware that by the end of the season, these hive stands will be holding as much as a thousand pounds of beehives, honey, bees, and equipment. Sturdy is as sturdy does here.
Bees live in beehives, and beekeepers need to provide those. What to get, how many, what kind, what size, what else? This is where belonging to a local club is a lifesaver. Beekeepers in different climates do use different kinds, and sizes, and styles of equipment because the environment requires or allows more or less space for bees to live in.
What Do You Need?
Sometimes a local beekeeper isn’t available to ask, so here are some very general recommendations. A honey bee colony requires two deep brood boxes for the bees to live in, store some honey and pollen in, and raise their young. A deep brood box (also called a hive-body) is one that holds eight or ten frames of comb and are 9-5/8” tall (or so… exact standards in beekeeping equipment are a bit fuzzy). This can weigh as much as 90 pounds or so when full of bees, honey, and pollen.
Your beehive also needs additional boxes, called honey-supers (super = above), that are stacked above the brood boxes for the bees to store honey in. These honey-supers can be the same size as a hive-body or, to confuse things, there are two sizes of smaller boxes—one is called a shallow honey-super because it is only 5 -11/16” tall. This will weigh about 30 pounds or so when full of honey. The other is a medium honey-super because it is 6-5/8” tall, and weighs about 50 or so pounds when full. Which box to use will depend to some degree on your ability to heft.
A beehive needs a floor, called a bottom board, that has a large, screened area so debris falls completely out of the boxes rather than accumulate inside. The beehive should also have an inner cover that sits directly on top of the top box (think of this like the ceiling in your house), and an outer cover that goes over the inner cover (much like the outside roof). Together, these two covers keep the internal environment somewhat controlled and the elements out.
You’ll need a collection like this—bottom board, brood chamber(s) for raising young, honey-supers for storing honey, and covers—for each colony you want to start. But consider this: equipment made by one company may not be perfectly suited to fit equipment from another company. Think Ford parts for a Toyota vehicle. So once you pick a supplier, pretty much stick with that supplier so your equipment always fits.
But each hive you have needs additional equipment to help it get started and to continue running. For instance, you’ll need feeders… yes, you sometimes need to feed your bees. Like free-range chickens, cattle in the field, and cats that hunt… sometimes, they still need to be fed because nature isn’t as generous some days as others.
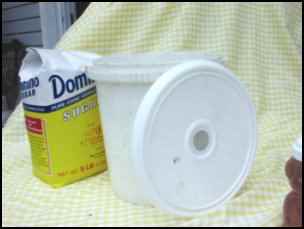
So what do bees eat? Sugar syrup… a mix of half sugar and half water, fed in a container that the bees can get to inside, or sometimes outside the hive. There are a variety of feeder styles available and each has advantages and disadvantages. Find them in the catalogs you get from the advertisers in the journals you read, on the web (see references at the end) or from local suppliers, you find out about at club meetings. And don’t hesitate to ask other beekeepers what they use… and why they use what they do.
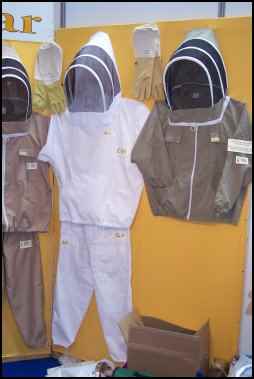
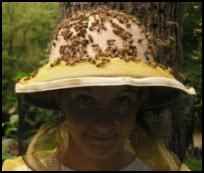
You will also need beekeeping attire—protective gear to wear when working with bees. A good veil to keep bees out of your hair, and a light-colored, lightweight protective suit to keep your clothes clean when in the hives is a good start. And beekeeping gloves. Having bees walk on your hands the first few times in a hive can be very distracting, so use beekeeping gloves until you are comfortable with this aspect of the craft.
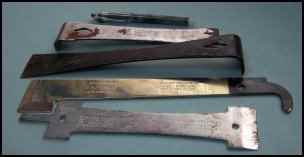
Smoking Encouraged
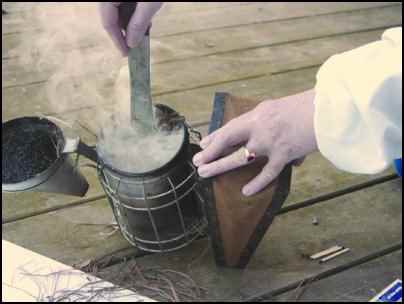
Along with the attire you get, you must have a smoker. This amazing tool lets you keep bees. When you puff a little bit of smoke across the top of an open colony the bees inside retreat down to rapidly consume honey and they stay out of your way as you do your work. Any communication between them inside is disrupted because the smoke masks all the chemical signals going on and they can’t talk… the confusion goes on for several minutes while you work. Then, when it begins to clear, they stop eating honey and start again to the top, a bit more smoke gives you a few more minutes to work undisturbed. You have maybe 15 minutes though before all this smoke simply overloads the system and they quit eating and start checking out the problem. That’s when it’s time to move to the next colony.
Spring is the best time of year to begin this adventure because it gives the bees the longest possible time to build up their population, get enough food collected and stored, and prepare for the winter to come.
So to start, you need a safe place to put your beehives, the right kinds of hives to put them in, the right gear to wear, and next, the bees to put in those hives.
What Kind of Bees?
Let me be right out front with what’s next. Honey bees are susceptible to a variety of pests and diseases. The worst of these is a tiny external mite that infests both brood and adult bees. It damages the bees, its bite injects material that compromises the bees’ immune systems, and they vector many of the lethal viruses that can, and do, kill honey bees.
The beekeeping community has spent more energy, money, time, and resources fighting this beast than any other, ever. And the success rate has been, at best, barely noticed. Varroa mites have been, and remain a formidable enemy. The frontal assault has been to throw chemicals at it, and then more chemicals at it. And the story is always the same… with only a few choices available these very adaptable mites quickly develop resistance to everything they encounter… and continue to thrive. After a time the very few choices are gone, and the mites remain. The chemical treadmill story is the same for all of modern agriculture.
Meanwhile, a few integrated pest management control techniques have been discovered that seem to be successful and new management practices have helped the problem. But still… varroa mites have not gone away. However, a proven way to deal with this type of problem is to select bees that are naturally resistant or tolerant to these mites. These bees, through behavior, psychology, or plain good luck, seem to be far less affected by these pests. You can buy strains of resistant bees or you can buy strains of bees that are partially resistant to varroa mites. Either of these will reduce your dependence on artificial controls for mites, reduce the need for chemicals in your hives, and reduce the cost of keeping bees. Russian honey bees are one type that has shown resistance, as are any of the many types that demonstrate strong hygienic behavior that helps keep colonies clean and free of these pests.
Of course, other bees are available. But your best choice seems obvious to me.
You can order any of these honey bees through the mail (bee sellers advertise in the journals) or pick them up locally if a beekeeper travels to the producer and picks them up. Once you’ve ordered and received your bees, there a thousand places to find out about installation and summer management. You’ll need to make sure they are constantly fed (see feeders, above) so they have a steady source of food, and make sure, as the population increases over the summer that you supply enough hive-bodies and honey-supers to give them plenty of room to expand. Always err on the side of just a little too much room rather than not quite enough.

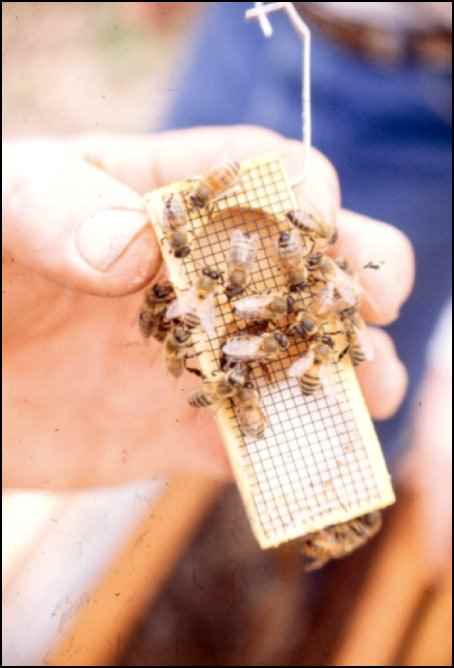
Honey bees are bought by the pound, and they come in boxes like this. They can come in the mail (your post office will call you when they come in and you will have to go get them. Don’t delay, post office people usually don’t like bees in the post office). Or, a local supplier will go and get a load for you to pick up, like this. They will schedule arrival times, and don’t delay…get those bees out of the package and into a hive as fast as you can (and the weather permits). Once installed, feed, feed, feed, feed them sugar syrup until they don’t take it anymore, which may be as much as 2 or 3 months, depending on the weather.

Installing your package of bees. Once home, take 4 or 5 frames out of your deep hive body so you have room for the bees. Carefully remove the feeder can and the queen from the package, dump the bees into the opening in the hive body, hang the queen in the hive so the screen is facing the opening between frames, not the frame next door, and she and the bees can get together (they have to feed her or she will die, and to replace her will cost you about $20.), slowly replace the frames, add the feeder you are using and close up the hive. Wait about 5 or 6 days before releasing the queen. To release her, open the hive, remove the cage she is in, and remove the cork over the candy end of the queen cage so the bees can eat the candy and open the hole and she can walk out.
Join a club, meet other beekeepers, read everything you can find on keeping bees, visit other beekeeping operations, take classes, and don’t hesitate to go out to your colonies and take a look inside as often as you feel the need. That’s the only way you’ll ever learn what’s going on inside. And have fun… there are few things in life as totally satisfying as watching a colony of honey bees develop from a tiny bunch of bees to a full-size, healthy colony producing honey for you… and for the many generations you and they will produce. Welcome to the wonderful world of being a beekeeper.

Beekeeping equipment suppliers will send free catalogs if you contact them.
Brushy Mountain Bee Supply www.brushymountainbeefarm.com
Mann Lake Supply www.mannlakeltd.com
Dadant www.dadant.com
Walter Kelley www.kelleybees.com
B&B Honey www.bbhoneyfarms.com
Root Publishing www.BeeCulture.com
Rossman Apiaries www.gabees.com
Glory Bee www.glorybeefoods.com
Betterbee www.betterbee.com
Great article! Kim, you have taught me so much over the years about beekeeping! I am glad you emphasize the importance of wearing protective clothing, so many seem to think its a good idea to START their beekeeping journey with a little protection as possible which is completely backward! One tip for new beekeepers I always try to share is, don’t skimp on your bee jacket. One thing I did and a lot of new beekeepers I see do is they either try not to get a bee suit or jacket at all and usually regret it the first time they get a dozen stings OR they (myself included) buy a cheap cotton bee jacket or even a cheap ventilated bee jacket and regret how heavy and uncomfortable they are. Then you end up spending more on a replacement way too soon. I’m cheap, so I get it, but you will save in the long run in this case if you invest a little upfront. The bee jacket I settled on after going through like 4 or 5 different types and brands is one from ComfortPro suits ( https://comfortprosuits.com ). It is breathable, cool and way lighter than all my others and of course best of all I don’t get stung through it (cotton is the worst about both heat and getting stung through). So take my advice get a quality suit from the start, stay safe AND cool. Happy Beekeeping!