


I have always wanted to raise rabbits as a healthy meat addition to our homestead. The trouble is, keeping caged rabbits does not fit in with my philosophy on natural animal care, and I didn’t feel comfortable getting rabbits without finding a solution to keeping them in the typical cages in which they are housed. On the other hand, my housing solution needed to be economical, because we can’t afford luxury accommodations for livestock intended as a food source. Enter the rabbit tractor.
Chickens can be, and are, successfully housed in mobile “tractors” that are moved frequently to fresh pasture, allowing them to stay safely confined while still enjoying the physical and mental benefits of ranging, albeit on limited terms. It occurred to me that this simple concept could easily be adapted to rabbits, which could not only resolve the issue of cages, but also provide them with access to pasture, reducing feed costs and eliminating the need to spread fertilizer—the rabbits do it for you.
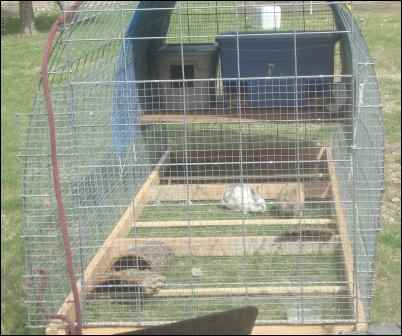
The biggest concern to address when creating a rabbit tractor is the rabbit’s instinctual need to burrow. In the wild, rabbits create burrows to live and reproduce in, so when they encounter soil—the most fascinating thing to watch when caged rabbits first see it—their instincts tell them to get to digging. Unfortunately, the next obvious step is to dig out of whatever confinement they are in, so you have to prevent total access to the ground.

The easiest way to do this is by incorporating a wire floor, but the wire spacing has to be large enough to allow the rabbits to graze. For our tractors, we used 2”x4”x4’ welded fence wire. We happened to have some left over from another project, but it is relatively inexpensive to buy and available in multiple heights.
Particular attention must be paid to the type of wire used for the walls and ceiling of the tractor. Rabbits can easily chew through chicken wire—as we quickly learned after we built the chicken-wire tractor—and if you plan to have litters in your tractor, you need to make the hole spacing too small for kits to crawl through. Those rambunctious bunnies can find even the smallest hole to escape from, and chasing after tiny kits is no fun adventure.
Hardware cloth, a thicker diameter (gauge) wire mesh, ranging in spacing from one-quarter inch to upwards of one inch, is ideal for the sides of the rabbit tractor. It is thick enough that they cannot chew through it, and the spacing is small enough to prevent little escapees from having their freedom. We used one-inch hardware cloth, and it was small enough to keep even Lionhead kits contained. Hardware cloth is also tough enough, in conjunction with a solid wall structure such as cattle panels, to keep out predators.
Because the rabbit tractor will be moveable, the basic framework needs to be made up of something lightweight. In our first tractor, we used 2″x4″ boards, but when the tractor was completed, it weighed close to 200 pounds. That particular tractor is 4’x12’, but with wheels installed on the back, still moves easily enough on solid, flat ground with a strong arm.
A better alternative, and one we used in the second tractor, is to use a combination of PVC pipe and wood cross supports. This lowered the weight considerably without sacrificing strength. It also allowed us to use less expensive wheels, because we weren’t asking as much of them.
In order for a moveable tractor to work, you need to have relatively level ground. They can go on hills, as long as they are stabilized, but pulling a 100-200 pound tractor up a hill is not a chore I would be eager to take on.
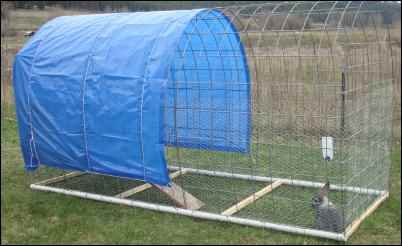
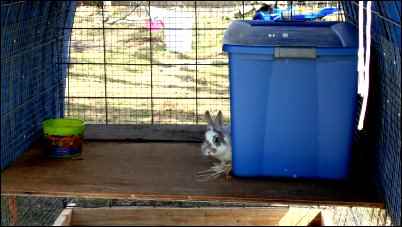
The rabbit tractor will need to be equipped with some form of shelter, but again, the weight is a big factor. For both of our tractors, we installed a plywood platform for them to rest on and tied a tarp over the top to provide shelter from rain and sun. Light duty tarps don’t work well, because they let too much light and heat in, creating a sweltering atmosphere that can quickly kill rabbits. Heavy-duty tarps are thick and durable enough to last through harsher weather. In the summer, we left it open but closed one end off in the winter to provide a three-sided shelter to keep them out of drafts.
We created two tractors this way and have been using them for about one year now with excellent results. Our first tractor was 4’x12’ and made with wood. The second tractor was 4’x10’ with a combined PVC and wood frame and is the method we will use for any subsequent tractors. We also experimented with other types, but the arched cattle panel tractor was the best for stability and longevity. It also prevents snow from accumulating, so you don’t need to engineer a strong snow roof, just watch the snow slide right off the tarp.
Here are the supplies and steps to create a tractor like ours, using cattle panels, PVC, wood, and wire to create a solid structure that will withstand weather—including several feet of snow—and predators. Each tractor cost approximately $100, give or take a bit, but can house several rabbits and can last for years.
Supplies to create one 4’x10’ rabbit tractor:
- Two 2”x10’ sticks of PVC pipe for the long side of the frame
- Four 4’ lengths of 2×2 boards to provide cross support
- 3” screws (we used deck screws)
- 2”x4”x4’ fence, 10’ long
- Four 52”x16’ cattle panels
- Heavy duty tarp
- 2.5’x4’ plywood platform, adjusted to suit your particular size preferences
- Two 10’ pieces 1”x1”x3’ hardware cloth, plus (2) pieces 4’ long (28’ total)
- Two 10’ pieces 2”x4”x3’ fence wire, plus (2) pieces 4’ long (28’ total)
- Cordless drill with ¼” drill bit for drilling into PVC
- Hammer
- Poultry staples
- Bolt cutters
- Wire ties
- Wire cutters (dykes)
- Rabbit cage J-clips
- J-clip pliers
- Two 4-8” wheels and corresponding bolts
- Wrenches to secure wheels and eye bolts
- Two 3-4” eye bolts and nuts
- Length of soft rope or other strap/chain to pull tractor
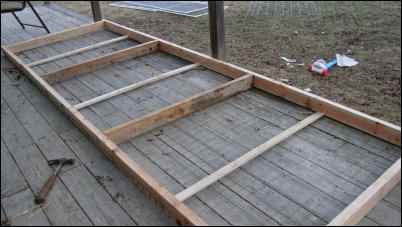
Begin by laying out the frame. You will need to space the four 2″x2″ cross pieces evenly across the length of the PVC, with one at each end and two more in between. Screw two screws per side from the outside of the PVC into the ends of the 2″x2″s, having help to hold the 2″x2″s steady if needed.
Now, affix the bottom wire to the bottom of the frame. At this point, either side can be the bottom, but the wire needs to be on the ground when the tractor is complete. Use wire ties to tie the wire to the PVC, and poultry staples to secure it to the wood cross supports. Make sure there are no gaps and that the wire is as straight and tight as possible to prevent injuries to delicate legs later.
Next, cut the cattle panels to a desired length. We cut them to 13 feet, which gives a height of about 5’6” when arched over the PVC frame. Position your cuts so you have open rods on either side – you will insert these into your PVC pipe to hold it steady, so be sure you have about 1.5” per side, which means you need to cut both ends of the panel down.
A note on cutting the cattle panels: We tried a Dremel, a jigsaw with blades for cutting metal, and a hacksaw with blades for metal. After our experiences, trust me when I say that a bolt cutter is the way to go. Save yourself the blades, the headache, and the incredible amount of time spent fussing with the cuts, and just go get a $20 pair of bolt cutters (or look for some at flea markets). They come in handy for a variety of other things too, so it is a worthwhile investment.
You can experiment with widening the frame and leaving the panels longer to find a balance between stability and a height that allows you to walk upright. If walking upright is not a concern, you can cut the panels down considerably to create a small tractor that is just tall enough for the rabbits. I wanted to be able to walk in and spend time with the breeders, since they were also pets, and the original goal was to create a tractor that could move between raised garden beds, which we have spaced four feet apart.
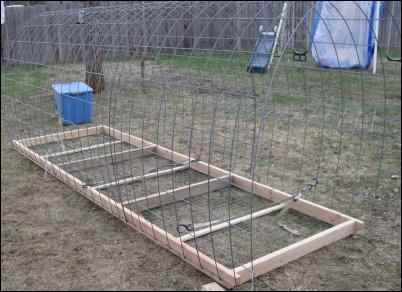
Once the cattle panels are ready, measure the distance between each rod and drill holes through the top of the PVC to accommodate each rod. It is easiest to insert one side while the panels are flat on the ground. Use wire ties to secure the panels to the PVC pipe every few inches. It is important not to skip inserting the rods into the PVC, because this is what helps the structure stay stable when the arch is created.
Before attaching the other side, tie the three panels together along their lengths using wire ties.
After one side of the cattle panels is inserted into the PVC, carefully bend them over to insert into the other side. This step goes much easier if you have help to hold things steady. Secure this side with wire ties as well, and now you can begin installing the wire on the panels.
You have two choices for wiring the cattle panels: solid hardware cloth or a combination of hardware cloth and 2″x4″ wire. It is more economical to use hardware cloth for the bottom three feet and 2″x4″wire for the top, and just as secure as going with hardware cloth all the way.
It is easier to install the wire from the inside, but if predators are a major concern and you feel it would be more secure, install it from the outside to make breaking through more difficult. Make sure there are no gaps that a rabbit or kit can get stuck in, especially if you have predators. A trapped rabbit can suffer a torturous death against the wire with a predator on the other side.
We used hardware cloth on the bottom and 2×4 wire on the top. Unroll the hardware cloth and attach it to the bottom three feet of both sides with J-clips made for creating traditional rabbit cages. These clips are strong and easy to attach, just make sure you have the solid part of the clip against the hardware cloth, because there will be a small gap in the clip when it is crimped.
Above the hardware cloth, attach 2×4 wire in the same fashion. There will be a gap at the top, but it is small enough to prevent entry by most predators. You can enclose it with more wire if you feel it leaves a vulnerability. Now you can complete the ends and create an access door.
For one end, use wire ties to attach a cattle panel, and then cut off the excess. This allows you cut a piece that completely covers the end. For rabbits, a completely enclosed tractor, from top to bottom, is necessary. I have seen a rabbit climb the vertical walls in the tractor we didn’t enclose at the top, and jump right out. Cats can jump in, too, so just enclose everything in the beginning to avoid losses. Make sure your cuts are on the inside of the arched frame, so you don’t have sharp edges poking out to grab clothes and skin when you walk by.

Another option for tying the end is to bend the long rods of the cattle panels back on themselves. This is virtually impenetrable, with no concern about the wire ties eventually rusting away. You could bend every three or four rods, cutting the others off and out of the way.
For the door side, do the same thing as with the other end, but once it is attached, cut out a space for the door. Take an extra piece of cattle panel that is just slightly larger and has long rods attached and open one on side, and bend the rods around the edge of the cut hole to create hinges. Bend every other rod back around the door frame to help keep it stabilized and free from sagging.
Both ends will need to be wired the same as the sides, but wire the door separately and carefully wrap the wire ends around to prevent snags. You can secure your door with a carabineer, and even install a spring to help it stay closed.
To provide additional shade, and a sleeping place that is off the ground, you can install a platform for your rabbits. If you also want to be able to sit there when you visit your rabbits, use another chunk of cattle panel with rods bent to create a base for the platform. Simply wrap the rods around the side walls and end of the tractor, and top with a piece of plywood that is wire tied to the panel base, and you have a strong, sturdy platform that will hold both humans and rabbits. Otherwise, holes drilled through the edges of the plywood and attached to the frame with wire ties is sufficient to hold the rabbits.
Rabbits are very sensitive to heat, so they must be provided with shade and plenty of ventilation. In the summer, we wrap a heavy duty tarp over the arched cattle panels, but only above the platform. Make sure it reaches down past the platform to keep the plywood dry and provide shelter from rain. In the winter, attach another tarp to the back end and they will stay snug and warm in cold weather.
Depending on your rabbits and your preference, you can offer a box to sleep in that is lined with shavings or straw. We cut a hole on one end of a plastic tote and gave ours a place to hide and rest. Some rabbits will see it as a big litter box, however, and there is little you can do to break them of using it that way so those rabbits just don’t get a box. For does, offer a box with a couple days of kindling to avoid the litter box issue while providing a safe place for kits.
Rabbits like a place to hide when they are scared, so you can use the outer bark from a piece of wood or create a hidey-hole that doesn’t involve a box to help them feel more secure.
The final two steps to finish your tractor are installing the wheels and the pull strap. Drill through the PVC a few inches in from the back and affix the wheels. Get wheels with inner bearings to make the job easier, and make sure they are sturdy enough to support the weight of your tractor.
In the front, affix two eye bolts to the front 2×2. Cut the ends off with bolt cutters after they are installed so the rabbits don’t gouge themselves. Attach a rope or chain to the eye bolts. We used a horse lead rope because they are soft and have a hook on one end. We tied the other end to one eye bolt and just pull the rope down and hook it in when it’s time to move. Otherwise, it rests on top of the tractor, out of the way and able to drain in wet weather.
That’s all there is to it! Two people can complete one of these in just a few hours, especially when you have the benefit of instructions.

Some Thoughts on Using the Rabbit Tractor
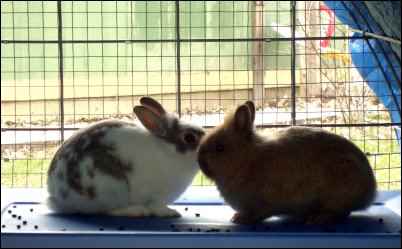
Contrary to popular belief, multiple rabbits can get along very well together, especially when they have ample room to move. We housed does together, bucks together, and does and bucks together. The does kindled and shared feeding responsibilities with no fighting or territory concerns. They also enjoyed snuggling together during nap time
Rabbits quickly learn to balance atop the 2×4 wire, but care must be taken not to catch their legs and break them. We rushed one time and injured a kit’s leg. Fortunately, he recovered quickly, but it made us much more careful in the future.
Feed cost is dramatically reduced with a tractor system. We moved the tractor every day or as needed, kept free choice alfalfa in the pens at all times, and supplemented with a handful of grain (barley, oats and black oil sunflower seeds) every other day, in addition to free choice mineral. If you want to use as little commercial inputs as possible, tractoring is ideal.

Rabbit health appears to skyrocket. Our rabbits are sleek, shiny, alert and healthy. I took two does back to the breeder to be bred and she was very impressed with how good their condition was on an all-natural diet, enough to consider implementing this type of diet for her own stock. In a year, we haven’t had a single instance of sickness or failure to thrive.
Though healthy for the rabbits, it is a hassle to move the tractor all the time, and this year we plan to bring the greens to them, but still keep them in the large tractors. I won’t keep a rabbit in a cage ever again, after the tractor experiments.
The yard where we tractored them was improved—the grass is greener and thicker, but manually spreading the fertilizer is an option too.
Selling rabbits raised this way is very hard. I would just as soon eat them than send them to a life in a cage. If you do sell them, prepare them ahead of time by putting them in a cage with a partial floor so their feet get used to the wire, and give them commercial rabbit feed for a couple of weeks to accustom them to eating that way.
Overall, the rabbit tractor experiment has been a wild success. I feel so much better knowing that I have provided them with a more natural lifestyle, and it is such an awesome experience to watch a rabbit that has been caged experience that taste of freedom for the first time. For many of the rabbits we brought home, their time in the tractor was the first time they had ever seen grass, let alone eaten it.
For our homestead, rabbit tractors are the way to go and we will continue to raise rabbits this way, in line with our natural philosophies and at the same time providing a more economical way to feed.
Excellent article. I’ll try this! Thanks.
We’d really like to try something like this. Can you please tell me how long this has been working for you and whether, since writing this article, you have any updated advice? We love the tractor idea and have been using it to raise meat chickens, but we hear and read so much negative about rabbits in a tractor. Please share any experiences, both positive and negative, you’ve had to help us in our decision making. Thanks!
How much height of the floor from the ground below do you create with your wheel placement?
Is the 2 x4″ spacing in the floor wire safe for kits (rabbit babies)?