


Summer’s bounty will soon be rolling in from the gardens, berry groves, and orchards. Those of us engaged in raising our own food will be reveling in the delight of eating food so fresh that we can taste the sunshine in it. Most of us would agree that there is nothing finer. But eventually, it will be winter. Season extenders such as greenhouses and cold frames aside, there is often not much fresh produce available when it is ten below and snowing. We can go without fruits and vegetables, which most health experts consider ill-advised—or we can buy imported food at the grocery store, which goes against our commitment to food independence. Or we can preserve our own harvest and enjoy the fruits of our homesteading labors all year round. Food preservation is hard work and time-consuming, but worth every bit we put into it. By getting ready for canning season ahead of time, it is possible to make food preservation go more smoothly.
The key is to start now. Waiting too long can put you behind the eight ball—if you are spending today doing what you wish you had done yesterday, tomorrow might steamroll over you. I must admit I have a great deal of experience at getting started on projects far too late, and hopefully, you can learn from my mistakes and make fewer of your own.
Another key reason for getting ready for canning season ahead of time is that equipment and supplies can be expensive, and it helps to spread the costs out over a longer period.
Read on for a comprehensive checklist to help you prepare for a busy season of canning, freezing, and drying your home-grown produce.
1. Check out all of your equipment.
Make sure it is in good working order—no dents, rust, or excessive wear. If you need to get repairs done or buy replacement parts, you will not want to find yourself waiting in line behind all the other people who waited until the day before it was time to make strawberry jam or put up pickled zucchini before getting ready.
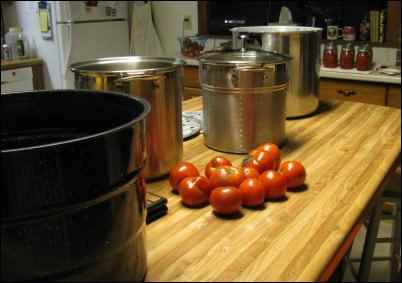
First, dig out your pressure canner. You may have been using it throughout the colder months to can meats and soups and dry beans, taking advantage of the cooler temperatures in the house to stock up on staples that can be done any time of year. Whether you have used your pressure canner recently or not, it is a great idea to give it a thorough inspection every year.
Make sure the lid fits and locks properly and there are no cracks or signs of warping on either the base or the lid. Inspect the gasket—the rubber ring that fits around the base of the lid—for cracks or wear. Check out the overpressure plug—the small rubber stopper that is designed to blow out in case of emergency—to make sure it fits perfectly and is in good condition. Also make sure the vent pipe is clean and clear of blockage, as you do every time you use the canner.
Check the handles to ensure they are tight and secure, and make sure the rack is in good shape and ready to go for the season.
If any part of your pressure canner needs to be repaired or replaced, it will be far easier to do so ahead of time. Gaskets, overpressure plugs, racks, and handles can be acquired locally at hardware stores, department stores, and sometimes even supermarkets. There are also many online dealers from which to buy pressure-canner parts. Replacement parts for certain brands of canners such as the all-American models are sometimes a little harder to find, and it may be easier to buy them directly from the manufacturer.
If you have a dial-gauge canner, it is essential to have it checked for accuracy every year. Contact your state or county’s Cooperative Extension service for information on how to get this done. Most states provide this service for free or at a nominal cost to residents. Your local Extension agent or office can tell you how to proceed but don’t wait. Like most agriculture-affiliated organizations, Extension services are often in high demand during the summer months. If your gauge is more than five pounds off, you will want to replace it.
One additional thing I do at the beginning of every season is to sit down and read through my owner’s manual. My canning mentor told me this was her practice, even after more than forty years of successful pressure canning, and I have adopted the habit as well. It may not be crucial, but a little, light refresher never hurts.
Next up for inspection: your water-bath canner. As with your pressure canner, you should inspect it for rust, corrosion, loose handles, and warpage.
As an aside about traditional enamelware canners, it has been my experience that the bottom bulges out somewhat at some point during its lifetime. I happen to use a gas range for canning, so the bulging bottom does not matter to me the way it might to someone using an electric or wood-fired stovetop. However, if your canner’s bottom is misshapen, keep a close eye on it. When it finally starts leaking due to the excessive stress of the warped metal, you don’t want it to happen right in the middle of processing a full load of chutney that took you all morning to prepare.
Mineral deposits usually build up on the inside of canners, especially water-bath types. This does not interfere with the safety or efficacy of canning projects, but it is not a bad idea to remove it at least once a season. If you did not do so in the fall before storing your canner away, now is a great time to deal with the build-up. Just add vinegar or lemon juice to a canner-full of water and set it on the stove to boil for five or ten minutes. Wash in hot soapy water as you usually would, and repeat the boiling process as necessary.
Check out other canners and racks. I have an assortment of smaller racks for use in stockpots with small batches, as well as a few spare racks I use only occasionally. You may have these incidentals, or you may own an electric model made just for jams. Whatever you have, go over it and look for damage, wear, or any other maintenance needs.
Move on to your blanch pot. If you freeze a lot of garden produce, you probably have a nice setup for blanching that includes a deep pot with a well-fitting lid and metal basket. It may be dedicated to blanching alone or you may use it year-round for a variety of tasks, but go ahead and give it a once-over now. As with your other food-preservation vessels, check for loose handles, warped surfaces, ill-fitting pieces, and particle build-up.
Take a look at your dehydrator. Whether you use a brand new model or one that has served you many years, examine it now. It may take some time to find replacements or accessories, especially if yours is more than a few years old or is an off-brand. Summertime is far too busy in most households to be scrambling for the right-size trays or getting a base leg glued back on. If you use a solar-powered food dryer, make sure that is all ready to go as well.

My advice is to be extra careful about cleanliness when it comes to dehydrators. No matter how hard I try to scrape every smidgen of dried broccoli bits off the plastic screens or use a toothpick to get all the goop from a batch of peach leather out of the seams of the tray, it is not uncommon for me to find spots I missed. I check it over for bits of dried, sticky matter every time I use it, but I like to be particularly meticulous at the beginning of the season.
Remember miscellaneous equipment. Your hand grinder or processor, such as a Squeezo, may need attention. Funnels, jar holders, headspace tools—did yours break last summer and you meant to replace it, or is it too bent or chipped to last another full season of canning? Take an inventory and replace what you need.
Do not forget items that you may not associate specifically with canning. I use a large teapot to boil water for pouring over raw-pack green beans. One spring, the teapot handle broke for the third time and I threw it out, intending to replace it before canning season and then forgetting about it. When my first batch of beans was snapped and ready to pack into jars, I remembered my missing teapot. It was not the end of the world, but it was inconvenient.
Take a look at specialty items such as jelly bags and stands, cheesecloth, and spice bags as well.
Think about the equipment used for freezing, too. After blanching and cooling my vegetables, I dry them in a salad spinner. Lightweight plastic spinners will not last forever with that kind of heavy use, and I evaluate mine every so often when it is approaching its last legs. Make sure your spinner, colander, and anything else you might need is up to snuff.
2. Get your supplies in order.
There are many small items essential to canning, freezing, and drying foods that you will need to have on hand for the summer and harvest seasons. Everyone does it differently, so you may not use or need the same supplies I do. But check out this list for starters, and jot down a few of your own additional items if necessary.
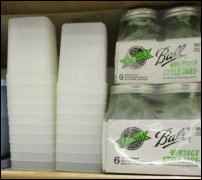
Jars. It seems obvious, but it is easy to roll into the summer season and forget that you gave away half your jelly jars as Christmas gifts, donated a case of pint jars to the community food project, or just simply canned more last year.

Lids. I watch for sales at my local hardware store and grab them by the dozen, but those sales usually happen when I am already halfway through my canning season. By doing this, I usually stay at least half a year ahead. I make up for the rest by grabbing a half dozen packages at a time whenever I happen to think about it and have the extra cash on hand, and by this time of year, I am in good shape on lids. If you are not, buy now.
If you are a fan of reusable lids, get your supply ready for the season.
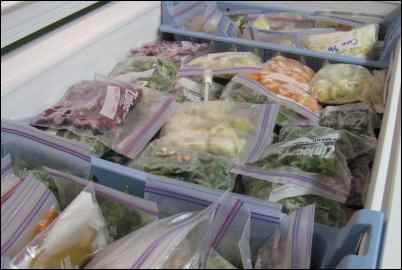
Freezer containers. They break, warp, and stain over time, even the good quality ones—especially if they get used in the microwave or otherwise abused. Do an inventory, and grab what you need to make sure you have enough to get you through the season and a few extra just in case. If you use zip-top freezer bags instead of or in addition to containers, figure up your needs for the season. My personal preference is to use brand names instead of knock-offs, but whatever works for you is great. I try to squeeze the air out of my bags headed for the freezer or suck the excess out with a straw when the contents are bulky like broccoli. I find that used zip-top bags will not seal out the air so I do not reuse them for vegetables. For items like berries, however, since the bag is opened and closed several times anyway while removing a little at a time, used bags work just great.
Paper supplies. I use waxed paper between my layers of eggplant and zucchini slices. I also use it for rolling up fruit leather.
Ice! Ice is a crucial component of preparing vegetables for the freezer. I use a lot of ice in summer for not only vegetable processing but for cheesemaking as well, and my icemaker cannot possibly keep up with my needs. I find that purchased ice does not pack the same punch—the ice cubes are hollow and melt quickly. Fortunately, my freezer has plenty of room in it this time of year, and I begin stocking it with bagsful of ice for summer. By starting now, I will have a good supply for blanching and other kitchen needs all season.
Do not forget about extra cleaning supplies. I go through a lot of dish soap in the summer season. If you do also, buy an extra refill to keep from running out. Spare mop heads, rubber gloves, and other cleanup items are good to have on hand too.
3. Stock up on the ingredients you will need.
Canning salt. You can use table salt in a pinch but run the risk of discoloring your product. Between soaking cruciferous vegetables in a salt brine and making pickles, you will go through a lot of salt, so grab an extra box next time you are at the store.
Lemon juice. There was actually a shortage of lemon juice in my region one summer. I do not remember the particular reason, but the end result was desperate home canners cleaning out the shelves of convenience stores and corner mom-and-pop places.
Vinegar. I go through what seems like gallons of vinegar in summer. It is a necessity for many food preservation projects, so have plenty on hand.
Sugar. A few batches of jams will zoom through a bag of sugar pretty quickly.
Pectin. If you use added pectin, buy it in advance so it is ready when the fruit is. The best jams and jellies are made with fruit that is just barely ripe, so you won’t want to put off jamming until you have time to make a trip to town for pectin.
Picking spices. Prepackaged mixes or individual spices, make sure you have enough of whatever you use, from turmeric to dill seed to cinnamon sticks.
Specialty ingredients. Some canned pie-filling recipes call for a modified food starch product called Clear Jel. There is no acceptable substitute, as other starches will not yield a satisfactory result. It must be bought from a catalog or online. You may have your own must-haves that are not available locally and are best bought ahead of time.
4. Do your planning and research.
Go into food-preservation season with clear goals and expectations.
Instruction books. I use trusted publications from my state’s cooperative Extension, Ball, the USDA, and the National Center for Home Food Preservation. But even those can become dated over time, so make sure your resources are up-to-date.
Recipes. A word of caution—anyone can post recipes online, whether they know what they are talking about or not. Be prudent, and when in doubt, ask an expert.
Take stock of your pantry and calculate your needs. If you have three years’ worth of canned tomatoes still uneaten, plan to take this year off from adding to your tomato stores. On the other hand, if you wistfully remember eating the very last of the hot pepper jam over the winter holidays, you will want to make more this season.
5. Bone up on skills.
No matter how much you know, there is always something new to be learned. When long-time canners attend my workshops, they always tell me at the end that they learned enough to make them glad they came. Formal education and hands-on training can be found in a variety of venues.
Look for workshops and classes. These might be offered by Extension services, adult-education departments, and community-development programs. In my area, even the local food pantry offers canning workshops. Keep your eyes open for opportunities in your neighborhood.
Look for a homesteading group, either in person or online. These groups often exchange an immense amount of useful information and personal experiences. If there is no group where you are, consider starting one.
Personal mentoring. People who preserve foods often believe strongly in the value of what they do, and they might be glad to share their knowledge with anyone who asks. If you are a first-time jelly-maker or a nervous pressure-canner newbie, look around for someone who has more confidence and would be glad to help you get started.
If this feels like an onerous list, you are in for a pleasant surprise. It will go much more quickly than you might imagine. And if you are already in the habit of doing most of these tasks every year as you prepare for a season of food preservation, you can probably do most of them in less time than it took me to write about them.
The takeaway is simply this: plan ahead, put some forethought into the upcoming season of putting up food, and incorporate as much intentionality into your harvesting activities as you can muster. Your results will be delicious.