


Mead: in the western world, the very word conjures images of warriors in leathers drinking from horns or human skulls. Despite this barbarous image, the history of mead reaches back to the dawn of human culture.
To understand mead, it is helpful to understand its origins. By current estimates, mead making started around 40,000 years ago on the African continent. To put that time frame into perspective, this means that mead was developed 30,000 years before the Neolithic Revolution, which gave rise to the development of agriculture, and 36,000 years before the brewing of beer. At this time, modern humans were developing abstract language skills, forming complex social groups, and developing creative artistic expression; evidence of such can be seen in the cave paintings of the period. Humans of the time were primarily hunters and gathers, gleaning most of their caloric intake from their natural environment.
Honey played an essential role in these hunter-gatherer societies. It was the most concentrated form of energy available. It wasn’t long before honey’s natural tendency to ferment in the presence of water drew the attention of these early cultures.

As humans migrated across the Eurasian continent, they took the making of mead with them, developing different styles and techniques as their cultures developed. As a result, mead making can be found from the Central African Republic to Norway, from Portugal to China. In Russia, mead is made with berry juice and aged up to 50 years. In Nepal, they make a mead called dandaghare, which is blended with spices from the slopes of the Himalayas. Mead making traditions can even be seen in the new world. In Mexico, balache is made by fermenting honey and water with the bark of a local tree.
Making mead is likely the oldest fermentation tradition in the world. It is a practice that has unified humanity for thousands of years, and the simplicity of the brewing process makes mead one of the most accessible and flexible fermentables to produce on your homestead.
Where to Start
Many mead resources you may find on the internet or in books recommend modern brewing techniques to produce mead. These usually involve boiling honey and water together for a certain amount of time, rapidly cooling it down, and then “pitching” (a fancy word for pouring in) a commercially isolated strain of yeast, usually one developed for champagne production. I have nothing against this process; these techniques will give you a clean, refreshing mead that you can reproduce time after time.
However, I brew mead to tap into that historic legacy of fermentation that began when humanity was still setting the foundations for its place in the world. This means a simpler, less controlled method of fermentation that can be applied to fermenting almost any liquid containing sugar. This method is cheaper, requires less equipment, and provides a complexity of flavor that is difficult to achieve using modern brewing techniques.
To begin, let’s talk a bit about honey. As we all know, bees make honey from flower nectar that is harvested throughout the spring and summer. Its primary sweetness comes from two sugars: fructose, which provides the majority of the sweet flavor; and glucose, the primary energy fuel for the human body.
The story does not end here. Honey is an incredibly diverse substance whose flavor profile is dependent on the different compounds present in the flowers used during production and the enzymatic reaction in the honey making process. This can be seen in the different varieties of honey available on the market today. When a honey claims a particular varietal, it means that the majority of the flowers used to produce that honey came from a specific type of plant. For example, orange-blossom honey is honey that was produced while using bees as pollinators for orange groves. A good orange blossom honey will reflect the unique citrus qualities of this particular type of flower. There are many types of monofloral honey, each with their own botanical flavor profile and aroma. When making mead, you can change they taste by using or blending different types of honey.
So, taking this into account, how should you choose your honey? First, I would strongly recommend avoiding anything that just says honey on the bottle (or anything that comes in the shape of a bear). This honey is of dubious origin and is often blended with high fructose corn syrup, creating a flat and tasteless substance that is almost useless for brewing mead.
Clover is the most widely available commercially produced honey on the market today. This is the standard honey available in North America. It’s easy to use when making your first batch of mead because it is available in large quantities and is generally cheaper than varietal honey. That being said, commercially produced clover honey is a highly-processed product that has been superheated to pasteurize it and prevent crystallization. This heating destroys many of the botanical compounds that contribute to the flavor of the honey. Also, recent studies have shown that a lot of the clover honey imported from India and China contain unhealthy amounts of heavy metals and pesticides, which may not affect the flavor of your final product, but cannot be good to drink.
Monofloral honey is a safer bet. While there may still be some risk of residual pesticides lingering from the harvesting process, producers of monofloral honey generally take more care in collecting and processing of their honey to preserve the unique flavor profile of the targeted botanicals. As a result, this honey can be expensive, costing between $7 and $22 per pound, depending on the variety. This makes the 15+ pounds of honey needed for a 5-gallon batch of mead very expensive to buy commercially.
For the process we will be discussing here, the best honey to use for mead making is raw wild honey. This is honey that is harvested from bees that are allowed to forage where they will and is bottled without heating to pasteurize. I love wild honey. It sings of the ancient tradition when hunter-gatherers were pulling combs out of trees and caves to harvest honey. This honey is rich, dark, and full of flavor. When locally sourced, the taste of wild honey is the taste of your countryside. It is unique to the area from which it was harvested and provides a connection to the land that is in line with the spirit of traditional mead making.
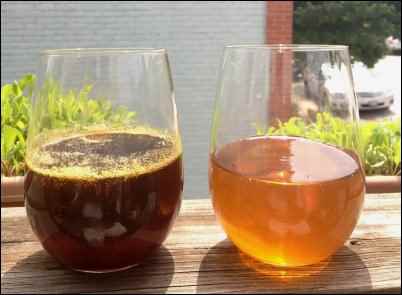
Take a look at the two glasses of honey pictured here. The honey on the right is a commercially produced clover honey. It is a light, reasonably flavored honey that will make a tasty mead but will not bring much to the table in terms of complexity. The honey on the left is a locally sourced wild honey. Notice how much darker it is. Compared to the clover honey, its flavor is strong, herbaceous, and floral. It still has little bits of pollen and propolis—resin collect from trees—which add to its flavor profile.
Another major benefit of raw wild honey is that it is full of natural yeasts. Yeast is a microscopic fungus that drives fermentation. Yeasts eat sugar, sweat out alcohol, and burp out carbon dioxide. The yeast present in wild honey is perfect for converting honey into alcohol.
Lastly, raw wild honey is easy to find locally and is cheaper than commercially processed honey. If you can find a beekeeper, you can find wild raw honey, and many people who keep bees on their property are willing to barter honey for other goods and services. In addition, since raw honey is not pasteurized, there is a lower cost in producing it and those savings are often passed on to the consumer. Many Community Supported Agriculture (CSA) operations use bees on their farms and would be willing to part with a couple of gallons for a reasonable price. The wild honey that I use in my mead making is from my CSA. They do not provide honey as part of shares, but a quick conversation with the farmer, and I had 26 pounds of the good stuff.
Once you decide what kind of honey you are going to use, the process of making mead is relatively simple.
Here is what you will need:
- A food grade plastic fermentor with airlock
- 15 pounds of honey
- 5 gallons of clean water
Here are some things that are nice to have:
- Seasonal fruit
- Lemons and/or limes
- Glass carboy with airlock
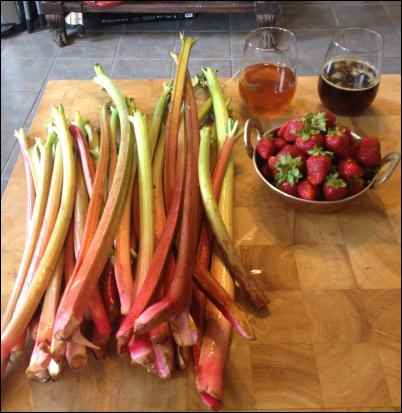
That’s it. That’s all you need to make a good mead. For this article, I decided to make a seasonal strawberry-rhubarb mead. Adding fruit to your mead is entirely a personal choice, but I find it’s a nice way to celebrate your brewing season and enjoy some of the local produce. A side note: mead brewed with fruit or fruit juice is known as melomel.
When brewing any sort of beverage, the brewer’s first job is to provide the best environment for the yeast to eat sugar, sweat alcohol, and burp carbon dioxide. The first step in the process is sanitation. Here, I make one of the few concessions to the modern times during my brewing process. Everything that will come in contact with my mead ingredients will get a spray with a bleach and water solution and a good rinse in hot water. This includes my fermentor, knives, cutting boards, spoons, measuring cups, etc. You don’t need to go crazy with it, but the process helps eliminate bacteria and other pathogens that may compete for space with your yeast.
For the first step, you will need five gallons of clean water. Chlorine kills yeast just as quickly as bacteria and viruses. If you live in an area where the tap water has a high chlorine content, I recommend letting it sit overnight in a couple of stock pots so the chlorine can evaporate out; otherwise, you can buy five gallons of water from your local grocery store.
Put two gallons of water into your fermentor. Mix in all of the honey vigorously with a slotted spoon or a whisk. It is easier to incorporate the honey into this small amount of water than the entire five gallons. In addition, the vigorous mixing will provide the aeration necessary for the yeast to ferment efficiently.
If your honey has crystallized, you can sit the container into a pot of hot water for an hour and it will liquefy enough to pour. If you are using raw honey, please do not boil it. This will kill all the wild yeast inside. Microwaving crystallized honey is also risky; besides irradiating the desired yeasts and botanical compounds in your honey, you will run the risk of honey boiling over and creating a terrible mess.
Once you have added all the honey, pour in the remaining water and stir vigorously for a few minutes to aerate the solution. Now you have a “must”. This is the term given to the solution of honey and water before fermentation has occurred.
If you decided to add fruit or spices to your mead, this is the point to introduce them. It is important to make sure that you use only the freshest, blemish-free fruits for your mead. Any bit of rot or spot on the fruit may introduce organisms that will compete with your yeast and produce off flavors. It is also important to wash all fruits well to get rid of any lingering pesticides or fertilizers that may be on the skins.
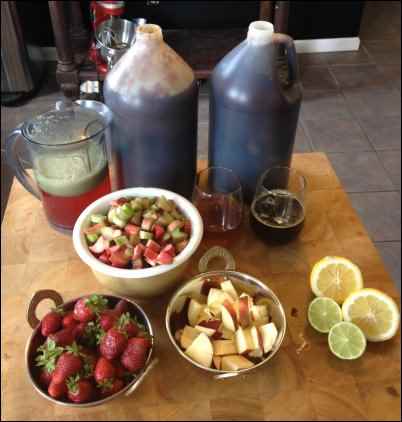
For my strawberry-rhubarb mead, I added 5 pounds of fresh rhubarb—two juiced and three chopped; and three pounds of fresh strawberries. I also cut up two medium-sized apples. Apples have large colonies of different yeasts living on their skins that can add some interesting flavors. I also like to add lemon and lime juice to my must. This serves two purposes. First, yeast converts sugar to alcohol at a more efficient rate in an acidic environment. Second, the acidity helps lend balance to the sweetness of the honey. Lastly, I added the bit of clover honey I used to compare with the wild honey because, well, waste not, want not.
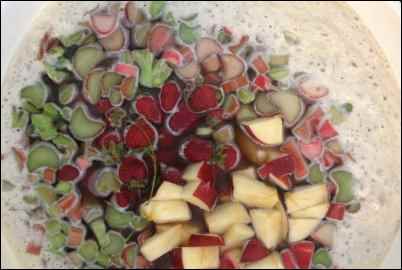
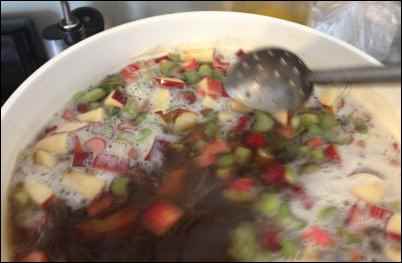
To add, you simply dump your fruit and juice into the must and stir vigorously, making sure the chopped pieces of fruit are completely covered in the must. Once the fruit has been mixed in, firmly secure the lid of your fermenter and add the airlock. This will prevent fruit flies and other pests from feasting on the buffet of honey-drenched fruit you’ve just prepared.
Now comes the waiting game. Place the fermenter in a cool dark place. Twice a day, you should remove the lid and vigorously stir the must. This aerates the must and coats the fruit in fresh solution to prevent mold growth.
This step is particularly important if you are using pasteurized honey without any fruit. This vigorous stirring will add yeast from the air to your must and encourage spontaneous fermentation. Don’t be afraid you’re mixing up a batch of poison. Honey is naturally antiseptic and the high sugar content at this stage makes it very difficult for pathogens to survive. If you have sanitized everything properly, then there is little risk of making yourself sick.
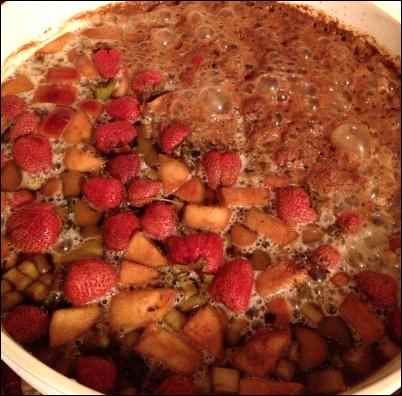
After about five days of stirring, or more depending on the temperature of your home and how much yeast was introduced into the solution, your must should be fermenting. You will be able to tell by the foamy head of carbon dioxide bubbles on the top of your must and the bubbling in your airlock:
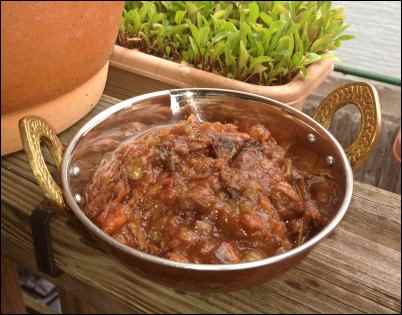
When your must reaches this stage, remove any fruit you have floating around in your fermentor. By now it has released all its flavor, and you want to pull it out before it turns sour. Don’t throw this out; you can add a little sugar to this and boil it down to a wonderful compote for lamb or pork chops. You can also add a bit of pectin and make and beautifully tangy jam or mix it into custard to make ice cream.
This is also the last time you want to remove the lid of your fermentor. At this stage, it is important to keep the air away from your developing mead.
As the alcohol content of your mead rises, so does the risk of acetobacter contamination. Just as yeast eats sugar to make alcohol, acetobacter eats alcohol to make acetic acid, or vinegar. Since the opening of the fermentor is wide, providing a broad surface area for exposure to air, the chance of acetobacter contamination is high when the lid is removed. This is not a problem during the initial fermentation stages, as there is not enough alcohol for the acetobacter to consume, but once the mead is vigorously fermenting, your five gallons of mead can quickly become five gallons of mead vinegar.
After another week of fermentation in your sealed fermentor, you will have fresh sweet mead. It is important to move it out of your primary fermentor at this point. After the initial fermentation, the bottom of your fermentor will be covered in a thick layer of yeast. While your yeast was eating and sweating and burping, it was also reproducing. When the initial fermentation subsides, the yeast is left in a drunken stupor on the bottom of your fermentor. If you allow your mead to sit on that yeast cap, it could cause harsh, burnt-rubber flavors.
You can pour this right into your mead-horns and quaff to your desire. It will be fruity, sweet, and effervescent. You can also bottle it and refrigerate for consumption over the next couple of weeks. Many people find mead at this stage to be a bit too sweet, especially if you did not introduce any acid to balance out the flavor. If you decide to bottle your mead at this stage, you must keep in mind that the fermentation is not complete.
As mentioned earlier, honey is made up of fructose and glucose. Fructose ferments quickly and represents most of the fermentation seen in the first couple of weeks. Glucose takes longer to ferment. If you bottle fresh mead too early, carbon dioxide from the glucose fermentation could build to dangerous levels and cause your bottles to explode. This is not an immediate danger, but if you are planning to let your mead sit for more than a couple of weeks, then it would be better to use a secondary fermentor.
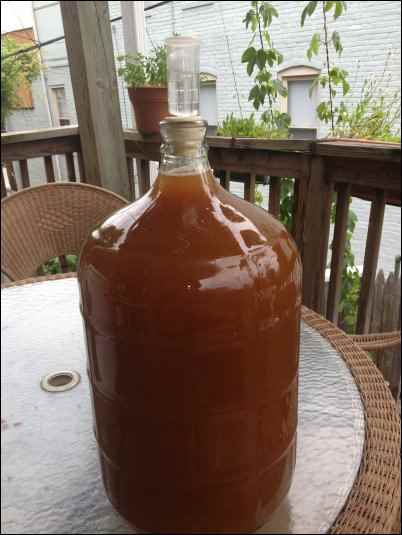
As with brewing beer, the best secondary fermentors are glass carboys. The mead can be transferred easily into these containers, and the small opening at the top reduces the risk for acetobacter contamination.

Once you plug your carboy with a bung and airlock, the mead is free to ferment and mature. You can leave it there for months.
The longer it sits, the softer the flavor will be. Where fresh mead is bright, crisp, and sweet; aged mead is subtle, fruity, and complex in flavor. Once you’ve decided the mead has sat long enough, you can transfer it to bottles—my favorite are the swing top style. For still mead, with no bubbles, you simply pour the mead into the bottle and close. For sparkling mead, you can add a little honey-water to the batch before bottling. Don’t add too much, or your bottles may explode.
Once in the bottles, store them in a cool dark place and drink at your leisure. If I plan to age a mead for a year or more, I like to open a bottle every three months or so to see how the flavors have changed. Mead is a living substance. It can taste harsh and astringent in January then transition to something soft and seductive by December.

Getting Creative
My favorite part of making mead is its endless potential for creativity. This can be seen in the many different varieties of mead that have developed around the world. Once you have your must, you have an endless variety of ingredients to add. You could throw in hot peppers to make a capsicumel. Herbs and spices added to the must give you a metheglin. A cyser is a blend of apple juice and honey. Ethiopian Tej includes hops, the spicy flower that gives bitterness and aroma to beer. Morat blends honey and mulberries. Here are a few tips to help guide your creative process:
Keep things clean. No matter what you are doing, make sure that everything you are working with is washed appropriately. This will prevent the introduction of harmful pathogens that will taint the flavor of your mead and make you sick.
Keep it fresh. Use things in season. Get them at their peak and use the best you can find. A bit of fruit that tastes musty in the hand will transfer that flavor to your mead.
Think Balance. Think about flavors that naturally complement each other. If you are adding extra honey, be sure to balance it out with something acidic or bitter to keep your mead from being cloying. If you add chili peppers, perhaps some cocoa nibs would provide a nice foil to the flavor. Look to the table for possible combinations: strawberry and rhubarb; chili and chocolate; apples and cinnamon. When looking for inspiration, crack open your cookbooks and flip through the pages.
Use your tongue. Taste your must before you add any additional ingredients. If you are using a particular honey varietal, make sure your additives do not overpower the unique qualities of your honey. When in doubt, take a small cupful of your must and add a bit of the new ingredient. That way you can get an idea of how each flavor may present itself.
Water means wet. In mead making, water is just a liquid honey is dissolved into. This does not mean you should feel limited to using water. For my very first mead, I dissolved orange-blossom honey into five gallons of watermelon juice. The resulting mead had a taste that screamed of summer. If you live near sugar maples, try mixing honey into five gallons of sugar maple sap. If you have grape vines, use five gallons of grape juice, also known as a pyment.
Don’t be afraid. Mead is a wonderfully forgiving substance. If you don’t have the balance right, pour a little out of your fermentor to make room and add a bit more of something else to see what happens. You can make adjustments to your mead like this for months. In addition, as mentioned before, you could turn you mead into mead vinegar. Pouring a bit of mead into a mason jar and covering with a bit of cheesecloth or coffee filter can produce wonderfully complex vinegar that is perfect for those summer salads.
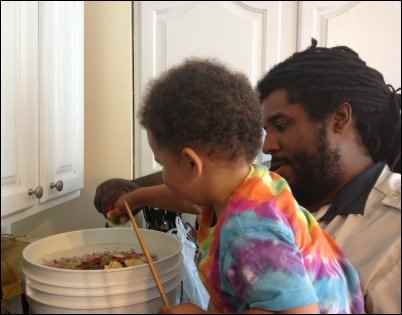
These guidelines are intended to be a starting point. As long as you have honey and water, you can make mead. As you start to explore this ancient practice, remember that fermentation is a communal tradition, intended to bring members of a group together around a common goal. I always ferment with my son. With the pace of life today, it is nice to have a time where we focus on being together and share in the journey of making mead. He loves the honey and fruit. I love the time we share getting to know each other better.
Ultimately, making mead is about connection: connection to your family, connection to your community, and connection to the natural world. It is this connection that links every person on this planet in a chain that takes us back to the dawn of human civilization. Celebrate it, and if you get a tasty beverage at the end of the process, then you’re all the luckier for it.
