


This is a simple guide for the homesteader who wishes to keep bees for the sheer joy of it without spending the earth on vast amounts of equipment. For those wishing to hear a little more about more reasons for using this sort of hive then please take a look at my earlier article “Are Bees for Me?” as I would like to keep this simple and just about the building.
These instructions are based on the Kenyan top-bar hive popularised by Phil Chandler of Biobees. This is a basic guide with a few suggestions of “upgrades” and really is a woodworking project of the simplest kind.
Build List
Sides: wooden planks or boards or 25mm thick (1”), 300mm wide (~12”) which can be formed from two 150mm or three 300mm and 1220mm long (48”). 915mm (36”) is an option but if you are in any way successful you will wish you had built a bigger one.
Ends: wooden planks or boards or 25mm thick (1”), 300mm wide (~12”, formed as above), 450mm long (~17 ¾“).
Legs (if wanted): four 100mm x 50mm (4” x 2”) at a length comfortable to you. Approx. 800mm (31 ½”) works for me.
Top bars: 430mm x 38mm x 25mm (17” x 1 ½” x 1”)
Mesh floor: Mesh with gaps of ~2 mm (8 holes per linear inch). Stainless steel options are available from custom wire-mesh suppliers specifically for top-bar hives at around £25 for 5 (~$42) already cut to size. Alternatively, aluminium craft mesh can work well at a lower cost, though it is less badger resistant. (Although a mesh is recommended some prefer just using a solid floor in which case ignore. The “ecofloor” which is growing in popularity also does not require the mesh).
Winter floor: 1220mm x 180mm x 25mm (48” x 7” x 1”)
Follower boards: three plywood or wooden boards attached to top bar. A board 890mm x 280mm (35” x 11”) will make three follower boards.
Roof: 50mm x 50mm (2” x 2″). I recommend making this on the hive so the lengths are based on what is required for a snug fit. Approximately two 505mm and two 1220mm. 25mm x 50mm (1” x 2”) is acceptable depending in preference and local weather conditions.
Sundries: Wood screws, nails, waterproof wood-glue, M8 nuts and bolts for leg attachment. Raw linseed oil and beeswax for weatherproofing.
~~~~~~~~~~
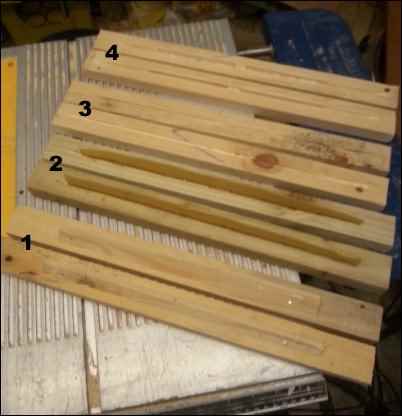
Top bars are the de facto top of the hive. When making top bars it is important to include a comb guide of some kind. This tells the bees where they should be building their comb otherwise they will build it across the top bars sticking them together and making it impossible for you to get them apart and get at the honey.
There are lots of ways to do this and I have given an example of four in the picture below:
1. My preferred method, and the one championed by Phil Chandler (of Biobees fame), is using a wooden strip either a half round or triangle. These are easily made with a table-saw or band-saw if you have one. Nail along the middle of the top bar and rub with beeswax as a primer. The bees like to attach to the lowest point so will, in theory, follow the line of the dowel.
2. The method named by Wyatt Mangum (author of 200 Top-bar Hives) as the gold standard for keeping straight comb. You buy standard wax foundation and cut into thin strips. You then melt the bottom edge of the strips to the top-bar (a soldering iron works a treat). This is made easier if you can cut a groove into the top bar first. This is a very quick way of doing lots of top-bars but has the drawback of you having to buy something! There is also a small danger that the bees will not initially reinforce the join to the top-bar making it more likely to break off if you handle it wrong.
3. The simplest method, but probably the least reliable for straight comb. Cut a groove, melt some wax, poor it in. Done!
4. A variation on 1, if you can’t/don’t want to cut dowel strips, glue some lolly-sticks (popsicle-sticks) in place and then rub beeswax on them. If you really are making this hive with minimal tools and want the lowest-tech option, McCartney Taylor (Founder of “Learning Beekeeping” on YouTube) uses pieces of string soaked in beeswax and tacked onto the top-bar in a straight line. No power tools required. I haven’t tried this myself but it seems to be successful for him. It may seem like I have spent a disproportionate amount of time on the top-bars, but, to the bees, this IS the hive. The rest is weather-proofing. This is the part the bees attach comb to and live on. If there is a problem in the rest of the hive (provided the bees survive) you can lift out the top bars with the comb and bees in place and put them in another box. Straight comb makes your life easier, and correctly spaced comb makes the bees life easier.
I have listed 38mm (1 ½“) as the top-bar width but some people use 34mm or 36mm and use 6mm spacers in honey areas so the bees can make that comb wider. This depends partially on preference and partially on type of bee. I recommend starting with 38mm (1 ½“) and working it out from there.
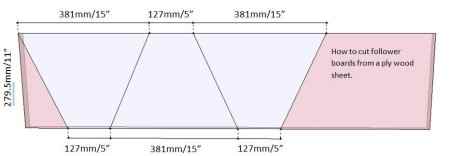
Follower boards are required to enable you to section off the colony into a smaller area of your top-bar hive. This means they do not have to heat the entire hive all the time, and it also allows you to make splits or maintain more than one colony in the same hive. Follower boards can also be used to adapt entrances, add feeders, and in a full hive, it may be the only bar you can remove. The follower board is essentially a top-bar with a board the exact internal dimensions of your hive attached. This can be made most easily by using a piece of plywood, or by fixing planks of wood together to provide a sufficiently wide board. Using an 280mm (11”) wide board/sheet, measure alternating 381mm (15”) and 127mm (5”) (see illustration below). Then cut along the diagonals and you have a board roughly the internal dimensions of your hive. This can then be attached to a top bar.
The bottom will likely need some trimming to size (especially with a mesh bottom). Depending on the boards your hive is made from (my first was reclaimed timber and not particularly straight), your follower board may or may not fit well. It is important the follower board fits snugly, but do NOT panic! There is quite often some gapping, this is normal. I make up for this by placing a tape “skirt” around the edges, helping plug the gaps. I know other horizontal-hive beekeepers who use a piece of corrugated cardboard, slightly larger than the follower board, stuck behind to deal with this issue. If you’re keeping more than one colony in a hive, it is best to have two follower boards in between them.
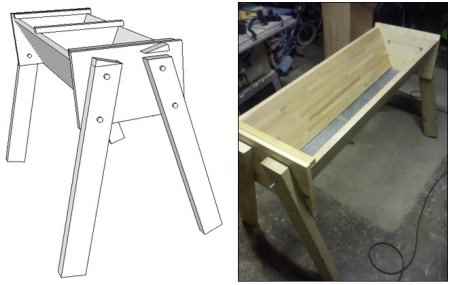
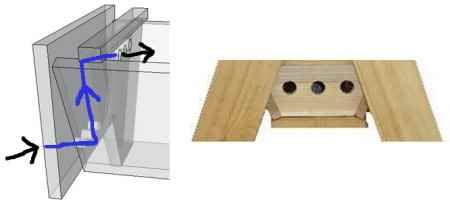
By making the follower boards first you can now flip them upside down and use them as a jig for putting together your hive. Lay your hive sides on follower boards and you have the dimensions you require. You can now place your end board in place and screw them on. This provides the correct gap for the top bars to be flush with the top of the hive end (see below).
The bottom will likely need some trimming to size (especially with a mesh bottom). Depending on the boards your hive is made from (my first was reclaimed timber and not particularly straight), your follower board may or may not fit well. It is important the follower board fits snugly, but do NOT panic! There is quite often some gapping, this is normal. I make up for this by placing a tape “skirt” around the edges, helping plug the gaps. I know other horizontal-hive beekeepers who use a piece of corrugated cardboard, slightly larger than the follower board, stuck behind to deal with this issue. If you’re keeping more than one colony in a hive, it is best to have two follower boards in between them.
By making the follower boards first you can now flip them upside down and use them as a jig for putting together your hive. Lay your hive sides on follower boards and you have the dimensions you require. You can now place your end board in place and screw them on. This provides the correct gap for the top bars to be flush with the top of the hive end (see below).
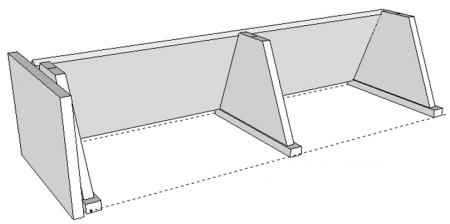
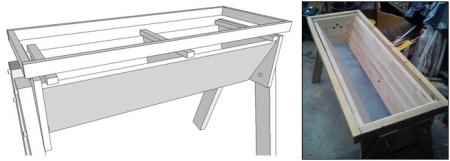
Placing hive sides onto follower boards to attach ends gives correct top-bar spacing for the ends.
Once the ends are in place you can attach your mesh bottom by simply screwing into place. The slant on the board give a convex shape to the mesh which can allow a tighter fit for the follower boards and a small air gap between the mesh and the winter bottom. If you prefer to go with the solid bottom it would be worth planning the slant to give a flat level edge to receive the solid bottom and provide a snugger fit and better heat retention.
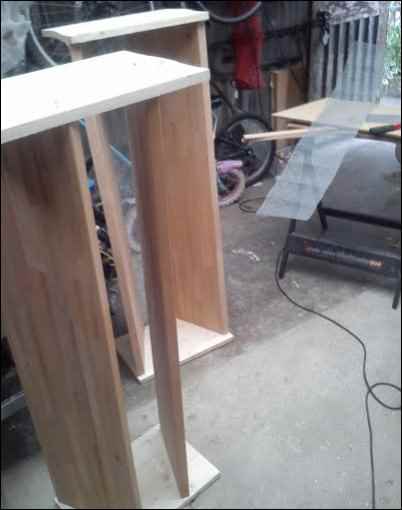
Legs are not essential and some people choose to build a hive without legs. This is useful if you are intending to build separate hive stands, allowing you to move hives between them. The aforementioned Wyatt Magnum has hive stands the height of his truck’s flatbed so he can easily slide them on or off between the stands. However, for most home-hivers who are keeping their hives in permanent locations, fitting legs is the sensible option. These can be any length that is comfortable for you. I have made them so they are the right height for a wheelchair. I generally make them around 900mm long (~35 ½“) for me (I am 6’ 1” tall), but then I have also just cut a piece of wood I had into four equals lengths. The legs also form the ledge on which the lid/roof rests, so, fitting them equally is important.
I fit the legs so that, once fitted, the ledge created to receive the roof frame is 25-30mm (1 3/16“) from the top of the hive end. This is best achieved by standing the hive on its end (as shown in the previous picture) and clamping both legs into position. Next, drill two holes for each to receive your M8 bolts. The top bolt will go through into the hive, the lower bolt will go through the hive end outside the hive (see below). Once fitted, cut the leg tops level, and its ready to receive the roof frame.
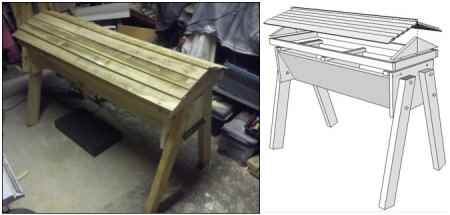
Roofing the top-bar hive is really where you can get creative, should you want to. As I said, the top bars are the de facto top of the hive. The roof is just a weather cover so can be as simple or elaborate as you want. Having said that, there are quite a few advantages to doing a little more work at this point. To make the rectangular roof frame, I measure each hive end and cut the end parts of the frame to fit, plus an additional 5mm clearance (just over 1/8“). So, the ends are 450mm (width of hive end) + 5mm = 455mm. But do put the lengths on the hive and mark the “actual” size then add 5mm. If you then flip the hive over and rest the legs on these lengths you can then easily screw the front and back of the roof frame into place. This ensures that if your wood isn’t completely straight, or your cuts aren’t square you still have a roof that a) you can get on and off of the hive, and b) will keep the weather out, but stay on when it’s windy.
At this point, if you want to, you can screw a panel to the roof frame. Either a piece of ply, political signage, or some corrugated tin. Since the legs on which the roof frame will rest is 25-30mm down (1 – 1 3/16”) using 50mm x 50mm timber (2” x 2”) gives you sufficient clearance above the top-bars to fit a piece of insulation to stop both loss of heat and heat gain.
The sun on a flat roof in hot climates may well result in comb collapse without a piece of insulation. My preference is to pitch the roof. This isn’t a lot more work and creates a much more weather proof design. The pitch provides an air gap as insulation, a place to put additional insulation in the winter, and a place for a top-bar feeder. In my part of the world it can also get very windy. A pitched roof is much less likely to blow off in the wind and will also reduce the chances of the hive blowing over (in the same way a spoiler pushes the back-end of your car down).
It is very easy to provide a pitch for your roof. All you need is a piece of 100mm x 25mm (4” x 1”), you then cut it the length of your hive end and draw two diagonal lines from the bottom corner to the top middle of the board giving you two right-angle triangles and a large isosceles triangle (see diagram). Cut along these lines you have one pitched end, and by fixing the two right-angle triangles together you get the other pitched end.
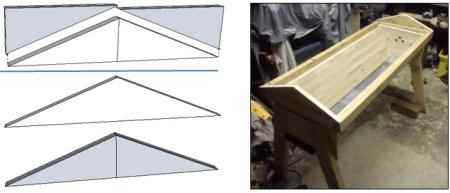
Glue and nail these to the end of the roof frame and you can use either a panel on each side, or I use feather-edge fencing strips as they are cheap and easily replaced. I now also place hinges on the roof to make things a little easier but this is another optional extra.
That is your hive finished except for one very important thing: your bees need a way in! The entrance is another part that can be as complicated or simple as you like. By far the easiest entrance is just drilling three 25mm (1”) holes in the hive body 25mm (1”) above the hive floor. These can be in the end or in the side depending on preference. I have switched entirely to end entrances as this means for my long hives I can have one colony in each end, making in-hive splits easier.
There many and more entrance variations, I mostly now use periscope entrances. This is an entrance by which the bees enter low on the outside and emerge high on the inside. This has advantages in heat retention, reducing wind cooling the hive, making the hive more defendable to wasps and the like, and potentially reducing mite-drop from brood onto entering bees. The periscope entrance can be most easily achieved by simply placing a follower board on the inside with three more drilled at the top. This has the added advantage of giving you access to the front of the colony when you want it, without having to move all the top bars along beforehand.
All that is left is a coating of weatherproofing. Many people use standard wood preservers but the preferred method by the natural beekeeping community is using raw linseed oil with beeswax melted into it (approx. 10:1 raw linseed oil to beeswax ratio). Make sure you do not add this to the inside of the hive (the bees will weatherproof that for you). A few coats of this and you are good to go, hive finished and ready to receive bees (see “Bees for Free!” for a how to).

References and Links:
Wyatt Mangum’s website: http://www.tbhsbywam.com/
Phil Chandler’s site and hive plans: http://www.biobees.com/build-a-beehive-free-plans.php
Michael Bush’s Site and hive plans: http://www.bushfarms.com/beestopbarhives.htm
McCartney Taylor’s website and youtube guides: http://learningbeekeeping.com/beekeeping-articles/top-bar-hive-design-plans/