


Having been blessed with an adventurous life, I have learned to avoid what I consider the murderer of contentment, the beginning of the end of happiness, the first phase of homestead burnout: boredom. Webster says that the definition of boredom is the condition of being weary and restless because of dullness. In my mind, restless is the keyword. Audrey Hepburn as Holly Golightly referred to it as “the mean reds” and it caused her to steal turkey eggs and run through the briar patch. In my experience, boredom snowballs into dissatisfaction, which breeds contempt, and ultimately manifests as burnout.
Boredom in adults is also very contrary to the boredom of which children complain. When I was a young girl, complaining of boredom got me extra chores and the simple solution was to stay outside and try to conquer all the trees in the yard by climbing higher than I climbed the last time. As a grown-up, chores can sometimes fill the whole day and steal away any opportunity for tree-climbing or even sitting in the tree-swing, and still, boredom can settle in the mind. To me, there are few things worse than crawling under the covers at the end of a long, productive day and feeling restless. When this has happened in the past, my typical solution was to pack up and move. Extreme, yes, but we can all agree that moving and settling into a new place is anything but boring!
I have lived in almost all settings. Small town, inner-city, suburbs, mountains, plains… you get the picture. No place has been as satisfying as my current ultra-rural-deep-backwoods farm. The work is hands-on and hard, everything we do requires planning and care, the animals and food crops need constant tending, the housework is a monster in and of itself. There is always something to do. If, for a moment, there is nothing to feed, water, weed, or clean, then surely something needs fixing. Who could be bored in a lifestyle like this? The same person that got bored living in a condo in downtown Atlanta, surrounded by culture, shopping, theater, and a million people, that’s who. That’s because of what Webster says. Boredom isn’t caused by a lack of to-do’s. It’s the condition of being weary and restless because of dullness. Having a clean kitchen is gratifying, but washing and drying the dishes three times a day is the epitome of dullness.
The antidote to boredom: fun. The key is that you have to have fun, which means you make the excitement yourself, as opposed to entertainment, which means you sit idle and watch other people have fun. This is my argument against watching television from the same perch on the sofa every evening. As a remedy to my own restless nature and to prevent myself from experiencing the expression of boredom on the faces of my loved ones, I have educated myself on all types of homespun recreational activities. An added bonus to some of these hobbies is that they produce something useful and can be used at home or sold off for extra cash.
Pressed Flowers
Scarlet O’Hara Morning Glories climb the steel posts that support my chicken-wire tomato trellises. There are stalks of Gladiolus at opposite corners of the garden, and in one of the other sunnier corners is a bed of Snapdragon. On my porch are paint pails full of Moss Roses, Cosmos, Petunias, and African Violets. Dozens of flower species grow wild in the woods behind the house as well as honeysuckle, ferns, and of course, weeds, which sometimes can be rather pretty. Delicate leaves can be pressed as well, and brilliant fall foliage makes a beautiful bouquet of muted warmth when dried and framed on the wall.

The correct way to press flowers involves purchasing blotting paper from a hobby store. I refuse to do this since every time I go to the hobby store I find hundreds of dollars worth of merchandise that I believe I truly need, which I truly don’t. Another good reason to avoid blotting paper is that I’ve found success without it.
My method is simple, taught to me by my grandma. First step is to go outside and pick flowers. Second, lay them flat between the pages of a newspaper or phone book. Lastly, set some bricks, cinder blocks, or heavy rocks on top of the top layer of paper or books. Forget about them for at least a couple of weeks and when you come back, they will be perfectly dry and flat and gorgeous.
Grandma used her dried flowers to beautify her home. She would arrange her pressed bouquet on a piece of card stock bordered with ribbon, using a small dot of plain Elmer’s glue to hold her petals in place. She would then pin her card to a scrap of the loveliest, most elegant fabric and place the whole ensemble under glass and in a frame for the wall. Your flowers can also be used to decorate boxes, stationery, bookmarks, or albums. I have used mine to embellish photo albums, candles and candle holders, and homemade paper.
Making Paper
This is one of the easiest tricks up my homemade sleeve. It is easy and offers instant gratification, plus the country craft-store in town buys bundles at a time which puts a little money in the savings account as well. My other favorite feature is that paper-making costs me nothing thanks to the free newspaper my community delivers to my mailbox every week. If you don’t get a free paper delivered, check your local grocery store. Most publishers put out at least one publication offered for free which is supported by advertising dollars. The only items that may need to be purchased are rust-resistant screen material and two square feet of felt cut in half to make two one square foot pieces.
Making your own rustic and charming paper is probably easier than you would expect, and you probably have the supplies laying around the house right now.
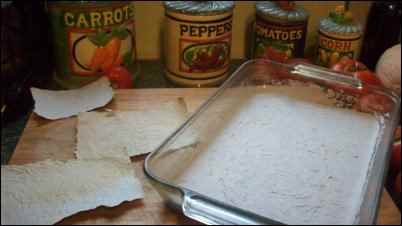
I used the screen that was discarded out of an old screen-door because it was torn in its old age. I didn’t have felt, so I cut up an old, heavy knit sweater that I wouldn’t wear anymore and that sort of reminded me of the texture of felt; it works fine. The other equipment I use is my blender, a 9×13 glass baking dish, measuring cup, a rolling pin, a sauce-pan, and various natural dyes and pressed flowers. I would advise gathering all the ingredients and equipment before you begin the process. You don’t want to have to slop paper-pulp all around the kitchen while searching for your rolling pin. Set your baking dish next to your blender, and then set a few layers of newspaper next to that. On top of the newspaper goes one of the sheets of felt or felt-like fabric. You’ll need another pile of newspaper and fabric just like that one.
I cut the screen into the size of the paper products I wanted to make because I like the rough look of the edge of the homemade paper and didn’t want to have to cut the bigger pieces into smaller sizes for cards and labels. I used a business card as a stencil for one so that I can make small cards for labeling soap, baskets, and the bundles of paper that go to the country craft store. I also cut 3×5 and 4×6 screen rectangles to make cards and invitations. Also, I made a couple standard 9×11 sheets of screen for making writing paper.
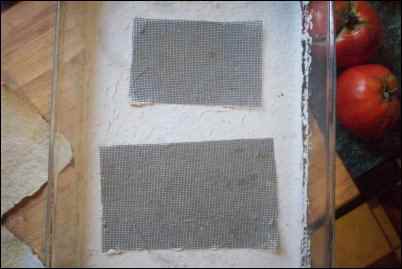
You can cut screens to make various-sized pieces for cards, gift tags, invitations, or whatever your heart desires.
To begin, you’ll need to set a cup of water on the stove-top to simmer, or warm it in the microwave to almost boiling. In the blender, you’ll add about a half a cup of newspaper, ripped up into small pieces or shreds. I think the newspaper is easier to measure when it’s ripped into pieces rather than shredded. Add the hot water to the blender and hold the lid on tight while you blend. You’ll continue blending on whichever speed you like until the material is the consistency of very thick, pulpy orange juice. Pour the paper pulp into the baking dish and wash the blender right away. You don’t want to let the pulp dry in the nooks and crannies of the blending mechanism.
When the pulp is cool enough to touch, set your screen cut-outs on top of it, then sort of fiddle with the screen until they’re covered by pulp in an even layer. The next step is the only one that requires some delicacy. You want to lift the screen straight up out of the pulp without disturbing the thin, even layer of pulp. To do this you want to get your fingers under the screen and lift up. The first few times you do this, you may find bare spots on the screen where pulp slid off. Just re-immerse the screen and fiddle with it a little more to re-distribute the pulp. Pretty soon you’ll have it down pat. When you lift your screen and find a pretty even layer of pulp, (small holes can be fixed by sort of rearranging the pulp with the tip of your finger) you want to hold it still over the baking dish to let as much of the excess water drip away from the screen. Next, you’ll gently lay the screen, pulp side up, on the first pile of newspaper and felt. You then layer the next piece of felt directly onto the top of the pile and add the second pile of newspaper on that. Roll the whole mound with the rolling pin to roll out the excess water.
At this point you have some options. You can leave the whole damp heap there to dry on its own; you’ll want to check on it in about twenty-four hours. I don’t like to leave it on the counter that long, so when I make paper I remove the top layer of newspaper and fabric at this point and shoot it for a few minutes with my hair-dryer. Then I set it in the sun for about an hour. The sun also bleaches the paper to a lighter shade of gray.
Handmade paper is easy enough to dye if pale gray doesn’t suit your style. Natural dyes can be made from onions, tea, coffee, acorns, Queen Anne’s Lace, Lily of The Valley, and various other plants and nuts. Food coloring can be used as well, sparingly. You can also use your pressed flowers in the pulp to decorate your paper. As a special gift, a pressed flower and homemade paper bookmark can be made to include hardy flower seeds. Sprinkle the seeds onto the pulp at the beginning of the speedier drying process and include instructions to plant the whole sheet when the book is finished.
Making Soap
There are as many variations on soapmaking as there are soap makers. The trick to being successful in making your own is to be very careful and very patient until you find a method that works for you. Understanding the best way to make your own system—in all areas of life as well as crafting soap—is to understand the fundamental components required of you, and to decide on how simple or complicated you like things. Entire books have been written on soapmaking, so for our intents and purposes, I will plainly explain my approach.
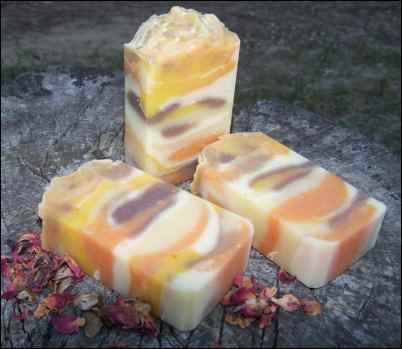
The colors, scents, and shapes of your homemade soaps can be limited only by your imagination.
Soap is comprised of lye, fat, and water. I’m a bit of a purist, and I love making useful things out of seemingly useless items, so I gather these things for free as best I can. Keeping in mind that nothing is ever truly free, of course.
My lye is potash lye, made from the wood ashes that I collect from the fireplace that heats our entire home. Lye produced this way creates a softer substance than commercial lye, which in turn makes a softer soap, which I like. I also like that potash lye is a bit less caustic than commercial lye. It’s still dangerous stuff though.
To make lye, you need a wooden barrel, cinder blocks or something to set the barrel up on, some dry straw and of course, the wood ashes. You set the barrel up on blocks and drill a hole near the bottom so the lye can drain out into a container. Because lye is caustic, it will react with plastic, aluminum, and tin. It is important for your own safety to not use containers or utensils made with these materials. The lye in the wooden barrel can safely seep into a jug made of glass, enamel, stainless steel, ceramic, or, of course, wood.
Once your barrel is properly set up so that the lye has a safe place to trickle into, you put a couple of inches worth of straw in the bottom of the barrel to act as a filter, and then add the wood ash on top. Try to get as much ash into the barrel as you can, it makes for a higher concentration of lye. Next, you add boiling water. It is imperative that you use soft water. I use a rainwater catchment system, but in a drought, you can use tap water with a bit of borax added to it. The process will take some time. Freely add more water to the top of the wood ashes when it is all gone. You can also add more wood ashes on top of the old to continue lye production.
Next, you need fat. We roast at least one pig every year, so I use pig fat. The kind of fat you use is ultimately what gives your soap its quality. This should be experimented with; different combinations of various fats and oils will give you different textures and lathering capacity. The important thing to remember is that the fat must be properly treated; rendered and clarified; to make the purest soaps.

Embed herbs or dried flowers into your soap for something really special.
To render fat, simply cut it into small pieces and melt it over low heat. Then strain it into a container, it can be refrigerated. To clarify, place the fat and an equal amount of water in your pot over heat. Add 2 tablespoons of salt and bring the mixture to a boil, then immediately remove from the fire. Cool to a simmer, and then add cold water. You want about a quart of cold water per gallon of the fat/water mixture. You will witness a separation of the components. Pure fat will rise to the top of the liquid; this is what you will spoon off for your soap.
Now you’ve got your ingredients ready, the process speeds up some, but not much. Lye is naturally hot, and the fat will be cold, and you need to bring them both to between 95 and 98 degrees. The best way to do this is by setting their containers in separate basins and adding either hot or cold water to their baths. Begin stirring the fat with a wooden spoon, then add the lye in an even stream while stirring. The lye will heat the fat. The concoction will change color from opaque to a brown, then it will lighten. You’re looking for the texture of sour cream. It will be ready when the brew can support a dollop from the spoon for a moment. At this point you can add dyes or essential oils for scents if you like, then you will pour the brew into a prepared mold.
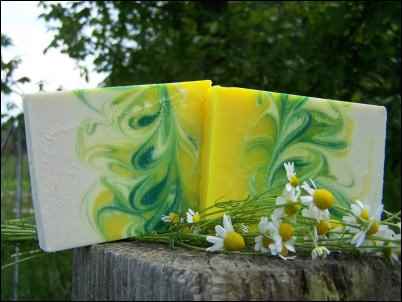
Let your environment inspire you. This chamomile-bergamot soap has colors as vibrant as it’s smell. Use a skewer or a toothpick to swirl small pools of different colored soap to make a tie-dyed look.
Anything will work as a mold as long as it can hold its shape. To make things easier on yourself in the future, you may want to line the mold with Vaseline or plastic. You can also suspend your dried flowers in the liquid at this point for color. Cover the mold with an insulating material such as newspaper, cardboard, and blankets for 24 hours. You will then remove the soap from the mold wearing rubber gloves and place it on a wooden surface to air for about a month.
Now all you need is a piece of twine and a handmade paper card to label that bar of soap!
Rhonda Piatt of Hermann, MO owns and operates Theodora Soaps. She sells her soap online and at her local farmers market. The method I’ve given you is not as fancy as hers, and the beautiful photos of soap are provided by her.
~~~~~~~~~~
https://www.homestead.org/fruits/homemade-applesauce-accept-no-substitutes/