


One of the first concerns of new homesteaders is to provide themselves with some sort of shelter. We have all heard the advice that it’s best to live on your land for a year before you build a permanent house, but most of us don’t care to camp out for a year and many of us don’t find a trailer a viable or attractive solution to the housing question.
Admit it, we all feel that nesting instinct as soon as we set foot on our raw land and immediately start to look around for a suitable home-site. The toolbox calls to us with a Siren Song and we can’t pass a lumberyard without going in, “just to see what’s on special”. But many homesteaders lament their lack of building and design skills and are afraid of messing things up. Actually, it’s not their lack of skills that’s the problem, it’s that they are thinking too big, too soon. The solution is to think small and simple. You don’t really need a full bathroom and all those plumbing skills.
Our ancestors made do with an outhouse or a potty chair and you can still get quite reasonably clean with a bowl and pitcher. You don’t have to have granite countertops and a refrigerator and that Italian farm sink. A tin dishpan and a tea kettle of hot water will wash the dishes and the food tastes just as good prepared on a plain pine table top. And there is nothing cozier than a built-in cupboard bed, piled with quilts, and a view out the window on a crisp clear November morning. So, just as an exercise in building, let’s see what the basic necessities should be and how we can most simply accommodate them.
First of all, I’m going to make a few assumptions. I’m going to assume you have some source of water. It might be a creek or spring or a fully functioning well, or you might have a generous neighbor like I do, that allows you to come over, once a day, to fill your three, five-gallon gas cans. You would be surprised how far that 15 gallons will go, if you’re careful and sensible about its use, particularly if you have to tote it home, uphill, on a blisteringly hot day in August. The second thing you will really want to have is some form of power.
I can hear you purists already clucking your tongues and I know how our ancestors made do with a hammer and saw and a good ax… blah blah blah…. And that’s fine, if you are 21, built like a Greek God, and have all the time in the world. But many of us aren’t in the prime of youth and the main idea is to build something quickly to get ourselves settled in, so we can tackle more important jobs. Building and remodeling is considered one of the most stressful events a couple can endure. Imagine how much more stressful it will be when you are trying to cut a sheet of plywood with a handsaw in the middle of the woods and the sweat is pouring down your face and the plywood keeps moving. You will NOT be whispering sweet nothings in your dear one’s ear. So, do yourself a favor, swallow your purist pride and get some electricity. I was blessed with an existing pole and hookup and I have never regretted my early relationship with the local power co-op. If permanent power isn’t a possibility, then rent, buy, or borrow a generator for the week or two that you will be working on this first shelter. Trust me it’s worth every penny. End of lecture.
The Bare Necessities
Let’s make a list of the essential activities and necessities that your little house will need:
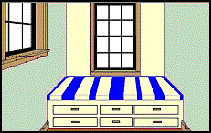
1) A PLACE TO SLEEP AND RELAX. A separate bedroom is nice, but it’s a luxury. A good comfortable bed in the corner is more than sufficient. Our first bed in Missouri was a 4×8 platform of plywood and 2x4s, nailed up in a corner and supported by one 4×4 post. It was just big enough for a full-sized mattress. With plenty of quilts, we were warm as toast in the winter and in the summertime, we slept cool as cucumbers by opening the window over the bed and leaving the front door open. Cross ventilation is your friend and it doesn’t cost a penny. And that bed piled high with cushions will do double duty as a sofa during the day. A rod and some curtains around the bed will ensure a bit of privacy and add to the winter warmth as well. Add a little shelf for your glasses, the alarm clock and a good book or two and you’re snug as a bug.
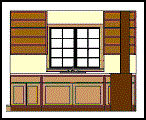
2) A PLACE TO PREPARE AND STORE FOOD. A separate kitchen is nice but, again, not a necessity. What you do want is a solid, comfortable, flat surface to work on that is handy to the stove. This can be as simple as a wide board shelf on heavy-duty metal brackets or a plain old kitchen table. The table is a good idea, as it can do double duty for dining, but let me urge you to invest in a few old kitchen cabinets. Used kitchen cabinets aren’t hard to come by and even a few new ones are not all that expensive if you buy them unfinished. A six-foot sink counter will do the trick. Adding a couple of uppers or a few open shelves will give you a basic kitchen. Remember to have some drawers for all those little kitchen things. You can get a used stainless sink for a couple bucks and it’s easy enough to set it in the counter and run a drain out through the wall or floor, or just let it drain into a slop bucket. You can also make do with a couple of dish pans. Give yourself some closed food storage as well. Two or three old upper cabinets stacked on top of one another in a corner make an excellent pantry.
3) COOKING AND HEATING. You will need a stove of course. If you don’t have power, then it will have to be propane or more likely a wood stove, that will do double duty as a heat source. Suit yourself. But if you do have power, there is nothing like a real range with an oven. At least get a microwave, a good electric skillet and crockpot, a coffee maker and a toaster. Anyone who made it through four years of college in a dorm room knows how much cooking you can do with these five basic electric appliances. Yes, I’m aware the Ingalls family didn’t have a crockpot, but the idea is to provide decent food with a minimum of trouble in that first homestead. You have better things to do than spend three hours cooking a meal, when you barely have a roof over your head. At the end of a day shingling the barn in the rain, a hot crockpot meal is going to taste mighty good at suppertime.
4) CLOTHES STORAGE. I don’t have much use for closets, particularly in a tiny shelter, where square footage is at a premium. You probably won’t have brought your Chanel evening gowns or your Versace suits, so you really don’t need hanging space. A better and simpler solution is to store your clothing in drawers or bins built in under the bed. Face it, your wardrobe is going to be fairly simple and sturdy and won’t need careful storage. If you can’t manage under-bed storage, invest in a good chest of drawers or chest on chest. They provide plenty of storage and take up a minimum of floor space. And stay away from chests or trunks. Invariably what you want will be at the bottom of the chest and the flat top will attract all kinds of stuff that has to be moved before you can open the chest and start hunting for your wooly socks. A good chest of drawers is a godsend. Why do you think so many came west on the back of a covered wagon?
5) BATHING/TOILET SPACE. Outhouses and outdoor showers are perfectly reasonable solutions to this daily need as long as the weather is pleasant, but if you can manage a little indoor space, that doesn’t require a jaunt through sub-zero weather, I urge you to do it. A space as small as 5 x 5 will give you room for a sawdust toilet and a simple washstand. A floor drain, that will send the gray water outside, will let you take a primitive bucket shower and a thick mat over the drain in winter, will keep the cold air out. If you want something a bit more upmarket, buy an invalid potty chair. It’s a rare general auction that won’t have one of these “barely used” on offer and you often see them at yard sales or at Goodwill. One size generally fits all and when you’re done, you just empty the pot into the handy slit trench you dug way out back, give the pot a rinse and return it to the potty chair. If you are the fastidious sort, you can make a slipcover for the potty chair and a matching cushion like I did and the necessaire becomes a charming piece of bedroom furniture. It’s a good thing.
6) WORKSPACE AND TOOL STORAGE. Your little house should definitely include a covered work area and a place to store all your tools and other equipment in a way that is handy but not necessarily in the living space. An attached tool shed with an outside entrance and a door into the house space will make a handy mudroom and allow you to keep your living space relatively neat. Closed and secure tool storage is a given and if you can manage some covered workspace, do so. A good wide porch or open-end dogtrot will suit the purpose. Either will make a shaded place to work and live in warm weather, as well as keep you dry and out of the cold and snow in the winter. It will give you a place to store dry firewood, hang the wash and do all the messy jobs involved in homesteading. And don’t be skimpy. There is nothing worse than a narrow porch. In my book, 8 feet wide is the minimum. Give yourself room to work and a space for a bench or rocker where you can enjoy the view and the good clean air. You’ve earned it.
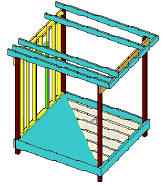
Now that we have a list of basic necessities, let me show you a few simple plans that will fill your needs. These houses can all be built using ordinary carpentry tools and require only the most basic skills. You can build on a foundation, or piers if you want to, but the easiest way will be to use a modified pole building method. Pole building is about as basic as it comes and you really have to try hard to screw it up. If you can dig a hole, set the posts, and square up the four corners, you’re pretty much home free. Pole buildings are fairly forgiving of small mistakes in laying out. The whole thing won’t come tumbling down if the corners aren’t quite square. Remember the first rule of Do-It-Yourself:
Don’t Worry… The Trim Will Hide It
The building sequence is pretty much the same for any of the plans I will show you. Essentially, you are going to build a deck supported on posts and then build conventionally framed walls between the posts. The posts and walls will support the rafters for the roof. Single sloped shed roofs are the easiest to build, but it doesn’t take much expertise to build a gable roof. Anything fancier is just showing off.
1) Lay out the building on the ground, marking the position of the corners and all the posts. Dig the holes deep enough to be below the frost line if you have one or at least deep enough to support the pole safely or until you hit the first really big rock. It really is amazing that you can stand a 14 foot, 4×4 post in a hole that is less than 3 feet deep and keep it plumb, square, and secure enough to support your building. Remember you are not building for the ages here.
2) Set the posts in concrete or dirt, whichever method you prefer. The posts should be treated unless this is a very temporary structure. 4×4 posts are the easiest to use and are sufficiently strong for most applications. 5×5 posts are nice if you are planning a second story or very high ceilings, but the larger posts are extremely heavy and hard to move without a few extra hands. Only use the big posts if you need them for structural strength.
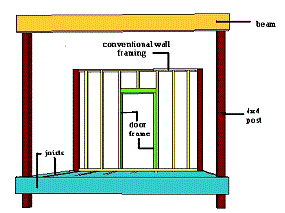
3) Attach the rim joists to the posts with lag screws or 16-penny nails, suitable for use in pressure-treated lumber. I generally use pressure-treated joists because I build close to the ground. If you build your platform more than a foot off the ground, you can probably get away with no- treated lumber, which will, of course, be cheaper. Most of these structures are so small they won’t need support beams under the floor joists. I always use 2×10 floor joists and they can usually manage a span of fewer than 14 feet without a beam underneath.
4) Hang your floor joists on two-foot centers, using standard joist hangers. I use offcuts from the 2×10 joists as blocking between the joists, at least one block every 6-8 feet, staggered for ease of nailing. The blocking keeps the joists from twisting or bouncing.
5) Lay out your plywood sub-floor; glue and nail it down securely. I always use ring-shank nails. If you are using planks, instead of sheet goods, for your sub-floor, make sure to stagger the joints and forget the glue.
6) The rest of the method is basic conventional framing. Lay out the sills and mark them for studs on 16-inch centers. Frame the wall sections to fit between the posts. Frame the usual openings for doors and windows. Sheath the exterior walls with plywood, OSB, or sheet siding. Sheath over the door and window openings and cut them out later.
7) The simplest roof structure will be a single slope shed roof. Mark out the rafter placement on the top plate with 16” centers. If you don’t plan to insulate the roof, you can use 2’ centers for your rafters. Nail the first and last rafter in place with the necessary overhang. Nail up the fascia boards on each end and use them to place the remaining rafters. If you are going to shingle the roof, sheath the roof with boards, osb, or plywood and cover it all with black roofing paper. Nail up the metal drip edge and shingle the roof in the usual manner. If you are going to use metal roofing, the method is slightly different. Once the rafters are set, nail up the 2×4 purlins across the rafters, placing the purlins on 2’ centers. Lay out the metal roofing sheets and screw them down according to the manufacturer’s instructions. You can leave the roof overhang open, if you aren’t concerned about heat loss or insects. If you need to winterize the structure, close the overhang with soffits or put blocking between each set of rafters, above the top plate of the walls. If you prefer to do a gable roof, the easiest way is with purchased pre-made trusses. They come in various sizes and are relatively inexpensive and easy to install. If you aren’t well versed in laying out and cutting rafters, trusses will save you a lot of headaches. They can also be placed on wider centers if you are using the purlin and metal roofing method. The lumberyard will help you choose the proper size, number, and placement. Once the roof is on, you are practically home free.
8) Install all doors and windows on the exterior.
9) If you have chosen to rough sheath your building and then put siding over it, now is the time to do the siding and trim work. Once the exterior is completely closed in, caulked, and ready for paint, you can go on with the interior work.
10) The interior finish can be as simple, or as elaborate, as you like. If you plan to wire the building, now is the time to do it. Keep the wiring simple. A single circuit for the lighting system should be more than adequate. A single circuit for the kitchen area will probably be sufficient if you don’t have any large electrical appliances, but it might be best to split the plugs in the kitchen area between two separate circuits, and extend each circuit into other areas of the house. If you plan on having an electric range, you will need to put it on a separate 220 circuit. A separate circuit for a full-sized refrigerator is also a good idea. Just remember to keep the electrical system as simple as possible. With care and a good book on basic wiring, you should be able to manage it all nicely. However, unless you have done it before, I suggest you hire an expert to install the panel box and hook up your circuits. The power company will naturally take care of the connection to the main line. All this is moot however, if you plan to be off-grid and use kerosene lamps or candles and cook on a wood stove. This is also the time to do any plumbing you may have in mind. You probably won’t be installing running water and the drains should be as basic as possible.
11) Insulate the building well if you plan to occupy it in cold weather. Fiberglass batts are the cheapest way to go. Two people working together can easily cut and install the batts necessary for a small structure in a day or at most two. It’s easiest if you measure and cut a number of batts first and then install them. You will be warm as toast in no time.
12) If climate or aesthetics aren’t an issue, the interior walls can be left open to the framework, but most will choose to put up some sort of finished wall surface. Conventional drywall is quick and easy, and if you rough tape the seams and use textured paint, it will have a suitably rustic look. Pine boarding is just as easy. It’s really a question of personal taste and the depth of your pockets. Once the wall surface is up, you’re down to cabinets and fixtures and before you know it, the furniture will be in and you will be hanging the curtains and making the beds.
Now let’s take a look at the plans for a few structures that you can build with this simple method. Because I was inspired by Neil Shelton’s article about his visit to a dacha in Belarus, I have named this group of designs the Dacha series.
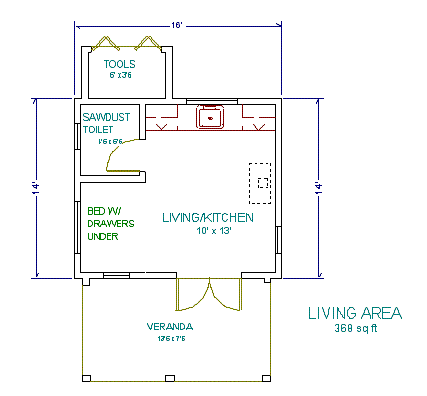
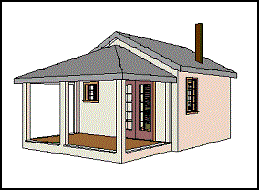
DACHA 1: This is the smallest and simplest of the designs at 368 sq.ft. It’s meant for a single person or a couple. There is a single main living space with a 10’ kitchen counter with a sink and open shelving. The sleeping platform is big enough for a queen-sized mattress and has room for built-in drawers underneath. There is a small room for a sawdust toilet or potty chair. A woodstove will provide heat and a place to cook. Double French doors open to a generous front porch. A tool house at the back provides additional storage space. Lofts can be built over the whole interior, just the bed and bath spaces or at the back. DACHA1 is shown with a gable roof and porch, but it could just as well be built with a shed roof on the main structure, the high side to the front and another shed roof on the porch. There are plenty of windows for light and ventilation.
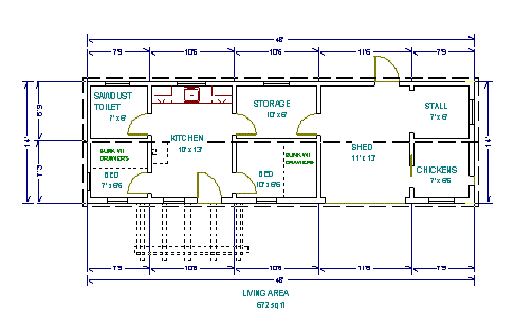
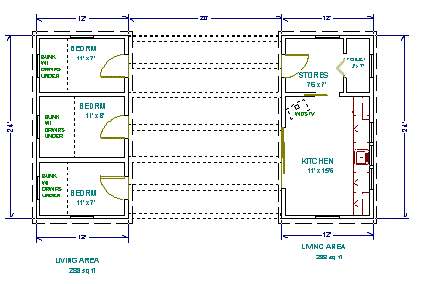
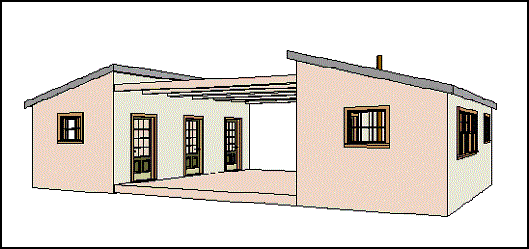
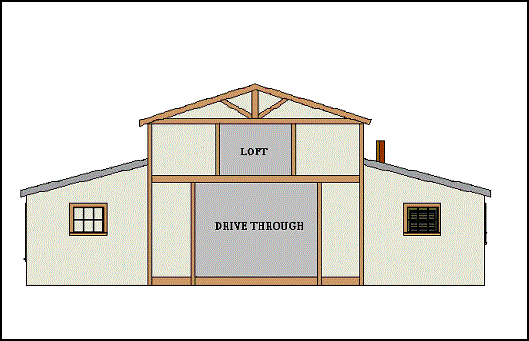
DACHA 2: THE LONGEURE.* This plan is meant for a larger household. It has 672 sq.ft. , but this includes attached work and barn space. It has two sleeping rooms. The smaller room has a single bunk, but with sufficiently high ceilings, it could have double bunks for two children. There is drawer space under the lower bunk. The larger bedroom has a platform for a double bed with drawers underneath and the room is large enough for a chest of drawers and other small furniture. The central kitchen/living room has a 10-foot kitchen counter and space for a wood stove. There is a 6’x7’ bathroom and a 6’x10’ storage room that connects to the barn area. The barn has a large workspace, a stall for a goat or cow, and a small chicken house. It isn’t a big set-up but would be sufficient for the new homesteader just starting out. The front door is sheltered by a wide arbor, which will make a shady place to sit in the summer. It would be a simple matter to extend the barn in the future and loft space could be provided over the whole structure if taller poles were used and a second floor was framed.
*NB: A longeure is a French term for a house and barn combined into one long structure. It’s a common traditional house form all over France.
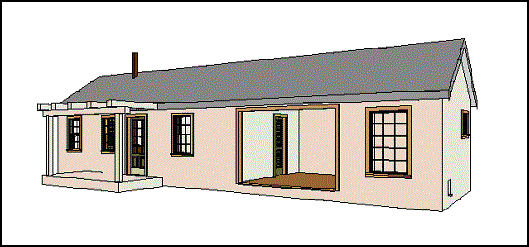
DACHA 3: THE DOUBLE DACHA. This design consists of two equal-sized, shed-roofed structures that face each other across a 20’ wide open courtyard. One structure has 3 sleeping spaces in it, two with double bunks and the usual drawers underneath for the children and the middle space, a double bed, intended for the parents. The second structure has a large kitchen living space and an adjoining storage room with a toilet closet. The central court can be fenced at either end to contain the children and keep them safe and it can be shaded by trees, an overhead arbor or a canopy strung on wires that can be opened and closed.
However, when the family has built a more permanent house, the double dacha is designed in such a way that it can be converted to a barn. The high front walls of the sheds facing the courtyard can be used to support trusses, which in turn can support a roof over the central court. The three sleeping spaces can be converted into stalls by removing the built-in bunks and the kitchen can become a workshop, summer canning kitchen or space for processing dairy goods. If the front posts on the original sheds are taller than the roof line and left to stand proud, like the false front of a store in the old west, there will be sufficient head-room when the court is roofed to allow for a hayloft. The ends of the central space can be enclosed with walls or standard sliding barn doors. The original homestead will now have a useful second life after the family has moved into a larger conventional home.
Every homesteader’s dream of a safe shelter for the family can be accomplished if they remember to keep the initial plans as simple and basic as possible. That first house should provide all the bare necessities, but few frills. It can be built easily and economically if you follow these few rules. The modified pole method will make it possible for even one person working alone to build a first home in perhaps a week’s time, if they are sensible and diligent about the work. Then the homesteader can stop and rest on the front porch in the twilight and dream about the big house they will build in the future. Meanwhile, the family is safe, warm, and secure. Supper is on the table and all is right with the world. What more could you ask for?
