

I huddled in the dark wilderness listening to howling in the distance and poking at the amber flames of the fire I’d set in the bed of an old rusty wheelbarrow. On top was a pot full of bubbling liquid that I hoped would eventually be some fine and tasty maple syrup.
Ok, the howling was from the neighbor’s dogs, and I was really just sitting on my porch steps, but it was dark because I had been trying to boil that stuff down for hours to no avail. My maple syrup ended up just being maple water.
But it was a pleasantly warm evening because I had been saving my maple sap for months in plastic coffee containers in my deep freeze. After all, I needed to have a lot before I could cook it down.
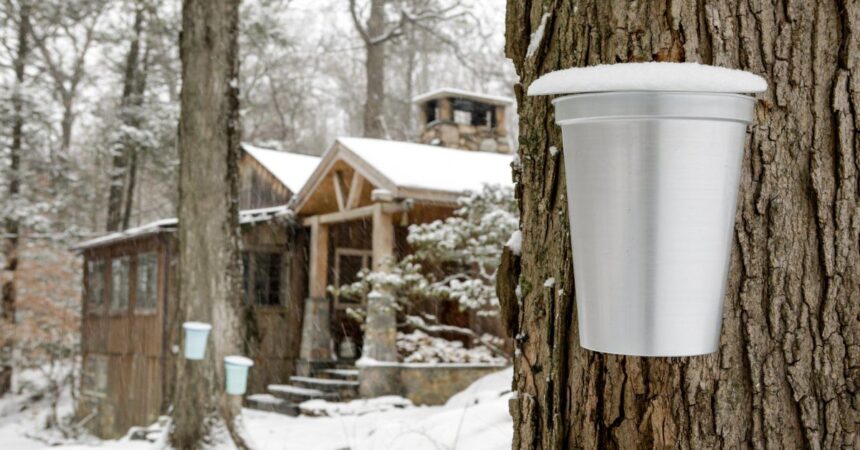
When I embarked on my maple syrup journey, I had heard of regular folks who strung up milk jugs in the trees to collect that lovely nectar, so I thought for sure I could do this, especially since I had found some fancy-looking metal buckets designed especially for the task with a spout (spile), lid, and all. I only got three buckets because I just wanted to give the process a try.
When I posted my initial efforts on Facebook with pictures of these containers hanging from the trees, I got comments obviously meant to discourage me.
“They say it takes nine gallons of sap to make one gallon of syrup,” one person said.
“I think it takes 40 gallons of sap to make a gallon of maple syrup,” another said.
And I said, “If I only make an ounce, it will be an ounce well worth it. I just need to see if I can do it!”
When I looked it up, it was indeed 40-43 gallons to a gallon, but who’s counting? I’m sure it varies, especially when some types of trees have more sugar in their sap than others.
I had done my research and learned that they didn’t necessarily have to be sugar maples; just about any kind of maple tree can be tapped. Sugar maples are said to have the highest sugar content, but red, black, and silver maples also work. Trees with less sugar would need to be boiled down longer to get a comparable sugar content.
Not only maples, but other types of trees can be tapped as well, including black walnut, which is said to have a—surprise, surprise!—nutty flavor. Birch can also be tapped, and is said to taste more like molasses; box elder can be tapped for a syrup with a milder taste. And then there is sycamore, which is supposed to taste like butterscotch. Yum! There is also hickory syrup, but it is more often made with the bark, and that makes me want to learn more. But back to tapping trees—well, I’ll stay on the bark topic long enough to mention that I once saw a movie about escaped holocaust victims who survived in the woods in the winter by cutting bark and using it as face masks to keep from getting frostbite. Such ingenuity!
Ok, so back to my maple syrup journey. Now all I needed to do was look around at the trees in the woods on my property and ask myself, what kind are they? Deciphering which trees are which isn’t very easy for some of us. I’ve tried to learn to identify trees from their leaves and bark, and I recognize the most obvious ones like oak and maple, but that is in the summer when they have leaves, and even then, some trees have leaves that are too high to see.
But maple I recognize because my yard is full of maple leaves in the fall, so maple is what I chose. I also did a Google search to identify the type of maple leaves and concluded they actually were sugar maple.
I’d also read that there is a certain time for collecting sap, so it varies from one region to another depending on when the weather warms up enough for the sap to start running in the trees. It is best to collect it in early spring from around February to March when there are freezing nights of temperatures below 32° Fahrenheit and days warm up to above freezing in the 40s. The cycle of freezing and thawing causes pressure changes that make the sap flow. This can last for four to six weeks, but you should stop collecting it when the trees begin to bud out because this can cause the sap to taste bad. I tapped my trees from Feb. 2 through April 2.
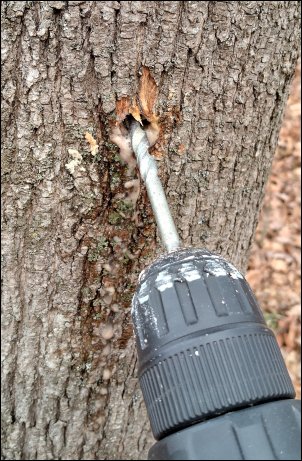
So, first, I grabbed my drill and the correct size bit for my spile. The spile is the little spout that goes into the tree. The size of the bit varies depending upon the size of your spile, usually 5/16″ or 7/16″, if you use one, or perhaps the size of a tube or something else you use to collect sap in. They even make special plastic bags designed for sap collection.
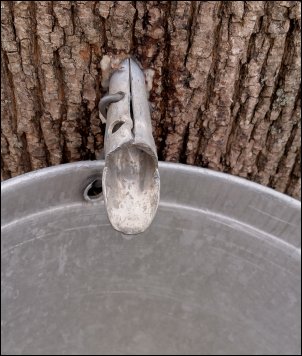
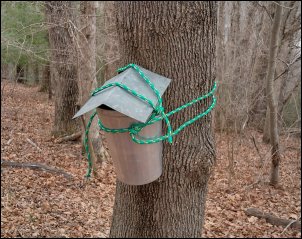
I found three trees that were large enough (at least 10-12 inches in diameter) and chose a spot about 4.5 feet from the ground (as I’d read was important) on each tree and started drilling until I made it through the outer wood and into the empty area where I presumed the sap would flow. A tiny drip came out to let me know I’d hit the right spot. Then I hammered the spout into the hole, tied my collection bucket to the tree, and put its little peaked hat on to keep bugs and rain out. In a larger tree that I tried, I didn’t get that initial drip, but it started to drip a little later. My buckets came with a hanger, but I ended up using some rope to secure them from high winds.
I went out to check the next day and found maybe a half cup of sap in each container, as well as a couple of bugs. I picked out the bugs and poured the sap into an old coffee container and put it in the freezer to be cooked down later, when I’d collected “enough.”
Of course, this was the point in time when I thought of an episode of the show Naked and Afraid where a woman found a vine in the forest that she was able to cut in half and drink from. So, it occurred to me that if I am ever lost in the woods and desperate for something to drink, and I happen to have a sharp knife with me, I might be able to cut deep enough to get some sap. Too bad I don’t normally hike with my drill.
 Okay, back to the syrup. So it went like that each day, maybe a cup or cup and a half of sap in each bucket, pouring it into my coffee cans and freezing it in hopes that I would eventually have enough to boil down for a few ounces of syrup. And when I had about 10 cans full of frozen sap (still far from the 30 gallons prescribed), I decided to pick a nice day and start trying to boil it down.
I read that when you boil it down, it will let out quite a bit of sticky steam, so it’s best to do it outside over a fire rather than coating your kitchen walls and ceiling with it, unless you just like the idea of walking into your kitchen and taking a lick at your sweet walls now and then. Hence, me with my fire in the wheelbarrow in the middle of the night because it took way longer than I thought it would. I regret to say that the cup or two of sap that I ended up with after boiling it down as long as possible was just a little bit sweet and nowhere near thicker than water.
But I did learn a few things. Like, even though making the syrup is a little more than I can handle, it’s free sugar water and might be especially useful if you are stranded in the wilderness without something to drink. I guess it might even offer a few calories to sustain you, and the protein in the bugs is a bonus. And don’t forget about covering your face with bark!
But lo and behold, about a year later, some friends invited me to go visit Moonstruck Maple on Brooks Mountain Road in Brooks, WV. Nestled in the Appalachian Mountains, on a long, windy road that made me a bit car sick, these people make gourmet maple infusions (yummy little treats) and pure maple syrup. They share the mountain with Three Rivers Avian Center, which is also a great place to visit if you are into observing big wild birds such as hawks, eagles, falcons, and owls that they have saved and nurtured back to health. The folks from both establishments have a great respect for the birds and other wildlife on that mountain and try their best to conserve it.
But back to the maple syrup. Instead of gathering syrup in containers and taking it back to be cooked, the folks at Moonstruck Maple have run lines from the trees and directly to what is called an evaporator for storage and cooking. The evaporator is housed in a small building called a sugar shack, used specifically for cooking it.
Alisha and Mike Segars are the owners of Moonstruck Maple, and Alisha answered a few questions for me.
She explained that they use food-grade tubing made specifically for the maple syrup industry. They run 15 to 20 taps from the trees onto a series of 3/16-inch lines that run from the trees and join to a lateral line of the same size, which then runs into a 1-inch line that runs into their collection tank. In addition to getting it to the collection tank more easily, tubing also creates a vacuum and pulls more sap out of the trees than might naturally drip out. And they run their lines downhill, so that helps as well.
The sap then goes through a reverse osmosis system, which uses pressure to take out 50% to 75% of the water before the sap enters the evaporator for boiling down. Now that is a big difference! Next, they still must heat the sap by keeping a wood fire burning, but the way the evaporator is designed, it is able to heat up to 700°.

Alisha said they have the largest evaporator in their main building, but they also have a few smaller evaporators positioned in different areas on the property where they tap trees. The evaporator in their main building can hold 3,000 gallons, while the two smaller evaporators can hold 500 to 600 gallons. She bought hers from a company called CDL. But I did find that some companies sell evaporators online for smaller amounts of sap, all the way down to 17.5 gallons.
An evaporator is comprised of a large shallow pan that provides a lot of surface area for evaporation and is heated from the bottom. Some are simple open pans, while others have compartments that are arranged in a serpentine manner so that the sap travels through the system as it heats and moves to the end near the spout when it is finished. Some include a filter, thermometer, and a float to manage how quickly fresh sap is allowed into the heating pan. Some are attached to a heating unit, and others are mere pans that you need to find a way to heat, either by setting them on a grill or over a fire. The main one at Moonstruck Maple includes what amounts to a woodstove underneath that comes as part of the setup.
You can also buy a separate reverse osmosis system, and depending on size and quality, those can cost anywhere from $100 up to a thousand dollars or more, and you can buy systems that filter or use UV rays to sterilize. Basically, you can spend as little or as much as you want to, depending upon whether you do it as a hobby, or hope to sell it on a larger scale, or perhaps just want to get a few dollars at the farmer’s market.
If I chose to do it over again just as a hobby, I don’t think I’d want to run a lot of lines over my property, but I would probably tap a lot more trees to get more sap at once, and use either those special bags or milk jugs (if only I bought milk in jugs)… oh, wait! Can I use plastic coffee cans? Maybe.
And I’d consider buying a small evaporator pan or finding one second hand and maybe using that old charcoal grill that I forgot I had… after I clean the wasp nests out of it.
And if I wanted to get a little more serious about making maple syrup than that, I guess I would consider finding a way to buy a cheap reverse osmosis system because that makes a really big difference. Imagine, 50% to 75% of the moisture removed before you even start cooking it!