


In a world where people are increasingly turning toward self-reliance and sustainability, many are rediscovering the value of traditional crafts. One such skill making a comeback is hide tanning. Tanning is an ancient art that allows you to preserve animal hides, transforming them into soft, durable leather for clothing, accessories, or home decor. Whether you’re looking to create your clothing, repurpose hides from butchering season, or just explore a new skill, tanning at home can help you reconnect with the natural world meaningfully.
Since 2020, there’s been a growing demand for natural fibers like wool, cotton, and fur, thanks to their sustainability and eco-friendly nature. This trend presents a fantastic opportunity for homesteaders and outdoor enthusiasts to make use of those hides that may have been accumulating in the freezer since hunting or butchering season. By learning how to tan hides at home, you can preserve them in a way that’s not only practical but also environmentally conscious.

Why Tanning Hides Matters
Tanning at home is more than just a craft—it’s a form of preservation that allows you to use what nature has provided in the most efficient way possible. Unlike store-bought leather, which often requires heavy chemicals in its processing, home tanning methods can be natural and less harmful to the environment. This growing movement towards self-sufficiency is tied to the desire to leave the land better than we found it, fostering a deeper sense of responsibility toward natural resources.
Unlike synthetic fibers such as polyester, fur will decompose and return to the land offering nutrition to the soil. It feels good owning something crafted with fur knowing it leaves a small ecological footprint.
How We Source Raw Hides
We raise rabbits to feed our family and we feel best making use of every part of the animal including their fur. We hunt for snowshoe hares in the early spring and trap (beaver, coyote, fox, muskrat, raccoon, and otter) in the late fall through winter.
If you are looking to source raw hides to work with, it pays to connect with other homesteaders or local hunters, and trappers. Before I had my rabbits, a local rabbitry (and now my friend) donated a bunch of raw rabbit hides to encourage me to learn the skill of tanning. Tell people you are interested in pursuing a new skill and they will surely point you in the right direction.
The Methods of Tanning
There are three main methods to tan fur; chrome, vegetable, and non-chrome tanning.
Chrome Tanning
This method is most commonly used in the fur-handling industry. It produces soft, workable leather ideal for crafting garments and accessories. However, chrome tanning has a higher ecological footprint, as it requires chemicals like chromium sulfate, which can be harmful to the environment and your health if not managed properly.
Vegetable Tanning
A centuries-old technique, vegetable tanning dates back to 2000 BC and uses tannin-rich materials like oak bark, willow bark, acorns, egg yolks, or even animal brains to treat the hide. It results in a strong, dark leather perfect for heavy-use items like rugs or boots. If you’re short on bark but still want to go the natural route, products like Knobloch’s Deer Hunter or Trapper’s Hide Tanning Formula use bark extracts for a more accessible option. This is the formula I use in my instructions, it works well for thin hides such as rabbits and foxes and is available at most big box stores such as Farm and Fleet.
Non-Chrome Tanning
If you’re looking for a less toxic solution than chrome tanning, this method is a great choice. Non-chrome tanning produces soft, clothing-quality leather. Non-chrome tanning is useful for thick hides such as raccoons, coyotes, or otters. One popular product for this is EZ-100, found at many fur-handling supply stores such as F&T Fur Harvester’s Trading Post.
Storing Fur in the Freezer
If you don’t have time to tan a hide immediately after skinning, you can store them in the freezer indefinitely. Fold the animal flesh to flesh and then roll it up starting with the tail end first. Put the hide in a sealed bag. If using a plastic handled bag and tying it shut, check on the hides periodically I’ve had hides partially dry out using these bags. A trash bag or gallon Ziplock works best.
Safety First
While working with hides it is advised to wear rubber gloves. Accidents happen, if you cut yourself working with hides it’s helpful to have a layer of protection. I made the rookie mistake of fleshing so many salted hides with my bare fingers that a crack formed on my finger and became infected. I became pretty sick, but I made the mistake so you don’t have to!
Preparing the Fur to be Tanned
If you want to tan a hide after skinning, begin with step one right away. If you’re tanning a hide from the freezer, pull it out a day before and allow it to thaw. Once the hide is fully thawed you can begin step one. Sometimes extra salt is needed for a freezer hide compared to a fresh one.

What You Need to Start
For the sake of my instructions, I will be discussing how to vegetable tan one rabbit hide using Deer Hunter’s and Trapper’s Hide Tanning Formula. If you want to use something else such as egg yolks you will have the option to do so when you get to step 6. I usually like to tan three hides at a time because I find it the easiest to fit into my weekly routine. Do more than three and your hands may become a bit tired when you are just getting started. These will take up space in a designated area for up to a week at a time so keep that in mind when deciding where to keep the project.
- 3 pounds of salt
- 1 gallon of white vinegar
- box of baking soda
- a bottle of “Hunter and Trapper’s Hide Tanning Formula” or another tanning medium of your choice
- large bowl
- shampoo or dish soap
- large screen or baby gate
- paintbrush
- PH test strips
Tanning Hides How-To
Fleshing the Hide.
The first task when tanning is to remove the membrane and fat from the hide. With a small animal like a rabbit, it is easiest to pick the membrane off by hand. It’s important to remove as much as possible, but don’t worry if it’s not perfect on the first try—you can always touch up later. The thinner you can get the hide, the more delicate it is to work with but you will have a softer product.
Salting the Hide.
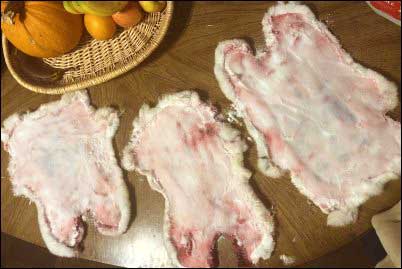
Once the majority of the fat and flesh is removed, cover the flesh side of the hide with fine salt and let it sit for about two days. After one day has passed you may need to add a bit more salt to any wet-looking spots. As the hide dehydrates and shrinks, it helps set the hair and prevents bacterial growth. After the hide is fully dry, try getting more flesh off. A rabbit is one of the only animals that can be easier to flesh once salted and dried. Some people choose to stretch the hide by nailing it to a board while it dries to ensure there are no missed spots, but I find a rabbit hide lays flat enough that it doesn’t get problem wrinkles or folds when laid on a flat surface.
Pickling the Hide.
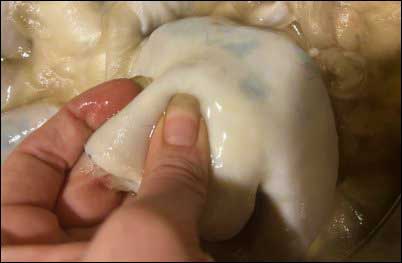
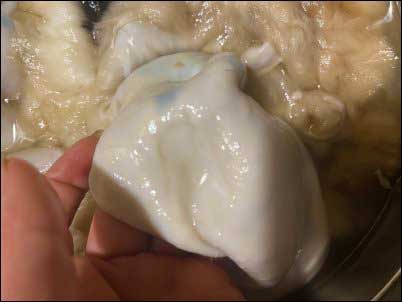
After two days, brush off the salt into a large bowl, and it’s time to pickle the hide. Create a solution in the bowl with salt using 1/2 gallon vinegar, 1/2 gallon water, and 1 pound of salt. Place a rock or kitchen strainer on the hide to hold it under the solution. The pickle helps alter the hide’s pH and protein structure, preparing it to absorb the tanning agents and destroying any bacteria that could cause the hair to slip. Skipping this step can result in a hide that degrades quickly over time. Let the hide soak in the solution for 2-3 days, depending on its thickness, and monitor the pH daily using test strips (1.0-2.0 is ideal). Inspect the hide daily and peel away any missed flesh, it will become obvious once the hide has absorbed the pickle. Press a thumbnail into the flesh each day and if the impression stays, it is done.


Wash the Hide.
With a basic shampoo or dish soap, wash the hide and get any impurities off. This step is sometimes called “degreasing” because the fat from the animal can sometimes coat the fur and make a dirty appearance once fully dried.
Neutralizing the Hide.
Once your hide is properly pickled and washed, it’s time to neutralize it. Mix a tablespoon of baking soda in a gallon of water and soak the hide for 24 hours. This step prevents the hide from becoming too stiff or brittle during the drying process and stops the pickle from breaking down the fibers. I use the strainer or rock to hold the hide under the solution as well.
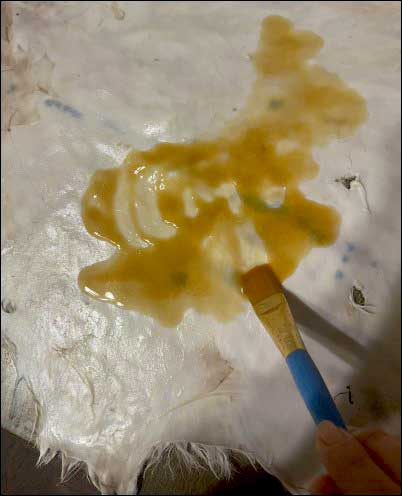
Applying the Tanning Solution.
After neutralizing, rinse and wring out the hide gently. Rather than twisting the hide to wring, squeeze the hide repeatedly until the fur is damp but not dripping. Apply the tanning solution to the flesh side evenly. Fold the hide flesh-to-flesh and let it sit on a screen or baby gate for two days to allow the solution to soak in. One bottle can do about 9 rabbit hides. Setting the wet hides on a solid surface can cause the hair to fall out.
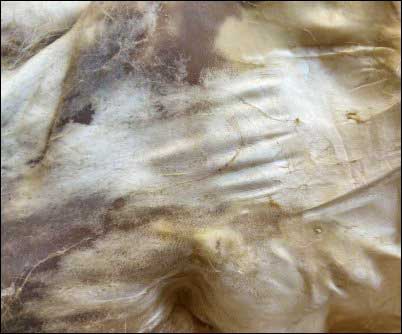
Stretching and Breaking the Hide
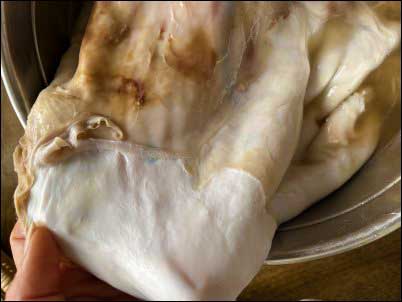
Stretch and “break” the hide as it dries. This means pulling the hide in all directions to soften the leather. A two-by-four or the edge of a table works well for this. Depending on how thick the hide and fur are, you may need to spend 2-3 days working on it until it dries fully. You must stretch it couple of hours until the hide is no longer cold when you press it to your cheek. The hide will be completely white once finished. (In this picture the hide is only partially stretched as it’s not fully white.)
Connect with Nature and Gain a Skill
A few notes before I close this out, these instructions for tanning a rabbit’s hide can be applied to any animal hide. You simply make enough pickling solution and neutralizing solution to ensure whichever hide you do is fully submerged. You can also use these instructions and simply swap out which tanning solution you use for example, instead of using “Deer Hunter’s and Trapper’s Hide Tanning Formula” during step 6, you can swap that product out for EZ-100, egg yolks, or brains. Tanning hides is a skill that improves with practice. Many seasoned tanners still rip a hole in the hide now and then, especially during the fleshing or skinning process.

Don’t get discouraged if your first few hides aren’t perfect. I ruined nine rabbit hides during my learning process, the hides all had slippage which means the hair fell out of the hide. Once I figured the process out, I sewed together a muskrat headband and gained a real appreciation for the time and care that early furriers put into making their clothes. Home tanning is an invaluable skill that connects us with the outdoors and the natural world. As we look for more sustainable, self-reliant ways of living, learning the art of hide tanning offers a practical way to make use of every part of the animals we harvest. While the process requires patience and practice, the rewards are worth it—a beautiful, one-of-a-kind leather hide that tells a story of craftsmanship, tradition, and a deeper connection to the land. Together we can continue to pass on this timeless skill, ensuring that it remains a part of our outdoor heritage for generations to come.