

Are you like me, a crafter who gathers new skills and crafts like a dragon hoards gold? Or are you a fiber artist who wants to learn how to make your own woolen yarns? Or perhaps you’re a farmer who raises sheep and wants to learn to utilize the wool that they provide? Then you may be interested in spinning wool with a spindle.
You may be familiar with the concept of spinning wool with a spinning wheel, and you may have even had the privilege of watching someone spin wool using a wheel. When I first learned about homesteading, I wanted to learn all the skills I could, including spinning wool. Unfortunately, a little digging told me that spinning wheels are expensive! A good spinning wheel can be priced from $300 to $1,000 or more—far beyond my tiny budget. And as I dug deeper, I learned that spinning wheels are only 500-1,500 years old. This may seem ancient by our modern standards, but the humble spindle is older still.

The spindle is as old as civilization itself. Remnants of spindles have been found in almost every important archeological site across the world. Spinning wool (and other fibers) was almost always a woman’s job, and spindles were very important to the women who used them. Though often dismissed by archaeologists as of little importance, spindles were often ornately carved or decorated, and a woman would often be buried with her spindles.
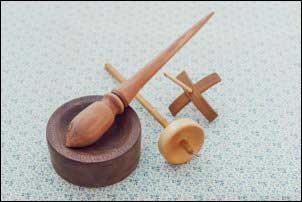
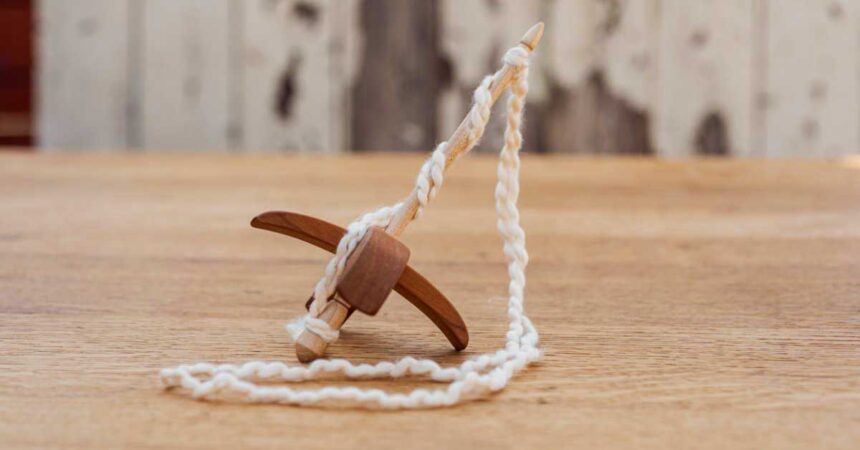
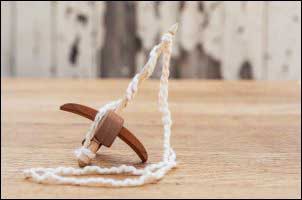
Many different types of spindles exist, but they are simply a stick with a weight. In this case, the long center part (the stick) is known as the shaft, and the weight is known as the whorl. The principle is just like a spinning top, the whorl makes the stick spin faster and for longer. There are two primary families of spindles: drop spindles and supported spindles. Supported spindles are spun with the bottom tip resting on a surface such as a table or a special bowl, hence the name supported spindles. Drop spindles are spun while suspended in the air, hanging by the thread that it is spinning. Today, I will be talking about drop spindles and, more specifically, Turkish spindles.
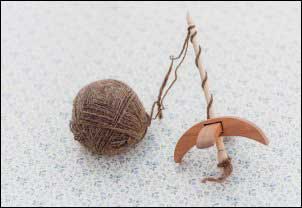
A Turkish spindle is a drop spindle made of three pieces: the shaft and two cross pieces that form the whorl. I prefer Turkish spindles over any other type of spindle because they are a great beginner’s spindle and they make plying wool very easy (which I will talk about later). However, if you have a different type of spindle, most of my advice here will still be helpful to someone who is learning to spin.
In order to begin spinning wool, you need prepared wool. I may write another article in the future about cleaning wool and preparing it for spinning, but for beginners, buying pre-prepared wool is best. Wool for spinning can be bought in several forms, such as roving, batting, and rolags, but any of these will work well for spinning with a drop spindle.
Once you have prepared wool and a spindle, you can begin to learn to spin. It is difficult to explain such a detailed process in words, so my explanation may make spinning seem hard until you give it a try. But of course, the best way to learn is to watch someone experienced. If you know someone who knows how to spin, ask them to show you. YouTube videos are also a great resource. But despite how complex it may seem, spinning wool is super easy once you get the hang of it.
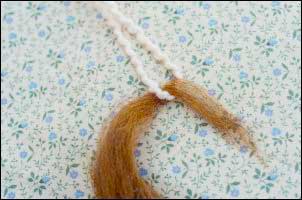
In preparation, cut some string or yarn to a length of 2-3 feet. This piece is called a leader and helps you attach your wool to the spindle before you begin spinning. Tie both ends of the leader to the shaft of the spindle, below the cross pieces of a Turkish spindle, if that’s what you’re using. Spiral the leader around the shaft of the spindle up to the top and secure the leader with a half hitch. This is as simple as making a loop in the leader and slipping it over the top of the shaft. If this doesn’t work, try twisting the loop the opposite way. It took me a while to get the hang of this one, but now it comes naturally to me. Some types of spindles have a metal hook at the top of the shaft that makes attaching the leader easier, running the leader through the hook instead of hitching it to the shaft.
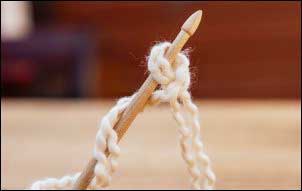
Now, if you’ve done everything correctly, when you hold the leader, your spindle should hang evenly and spin freely. Practice spinning your spindle by holding the leader with one hand and flicking the shaft of the spindle with the thumb, forefinger, and index finger of the other hand. You will see how your leader gets twisted, and may begin to twist up on itself. Try spinning the spindle the opposite way as well (clockwise and counterclockwise).
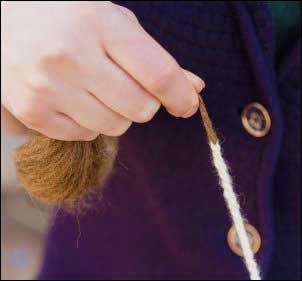
Once you are comfortable spinning, you can practice drafting, which is pulling out wool fibers from your wool to get it to the thickness of the yarn you want to spin. Grab your wool with one hand and pinch a bit of wool at the end with the other hand. Slowly tug out the wool until the bit you pinched comes free from the rest of the wool. The length of the fibers you removed is called the staple length. A longer staple length is easier to spin for beginners, but you can learn to spin with any wool. Now practice again pinching and pulling the wool out, not all the way, but into a thin “snake” that is about 5 inches long and still connected to the rest of your wool. This is what you will use to begin spinning.
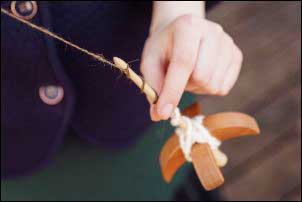
Begin while sitting down, holding the spindle between your knees. This is the proper position for the technique called “park and draft,” which is the method used by those new to spinning with a spindle. Pull the tip of the woolen “snake” you created through the loop of the leader attached to the spindle, and fold it back up towards yourself. You should now be able to release the spindle and let it hang while holding the woolen loop you just made. Begin to spin the spindle as you practiced before, until the leader and the loop of wool are quite tight and twisty, and twist up on themselves when given some slack. At this point, your spindle will not want to spin much farther and will start to spin in the opposite direction. Don’t let it do that; instead, park the spindle between your knees again.
Now slide the fingers that are pinching the wool loop up along your wool snake, allowing the twistiness to travel up the snake with your fingers. However, don’t let the twist reach your main rolag, batt, or roving. If you allow twist into your wool supply, the twist will “glue up” your wool so you can’t easily draft from it. Keep in mind, twist is like glue that holds yarn together. If your yarn is falling apart, it hasn’t been twisted tightly enough; if it is hard to manage and always twisting up on itself, it may have been spun too tightly.
Release the spindle and spin it until your wool and leader are well twisted again. Be sure that you are spinning in the same direction as you were previously. Park the spindle again, and try drafting. With your free hand, grasp your wool supply and gently pull it until you have thinned the wool supply near where you are pinching your yarn, making a new “snake” that you can again allow the twist into. Give your spindle another spin, making the yarn as twisted as you would like your finished yarn to be.
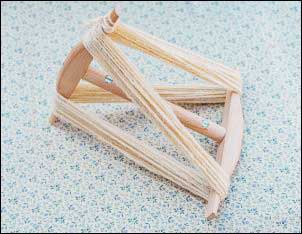
Your working yarn will be fairly long by now, so park your spindle and unhitch the leader from the top of your spindle. Now you can wind the leader and yarn you made onto the spindle. For a Turkish spindle, wind the leader and yarn through the cross beams: over two legs, under one leg, over two, under one. Then spiral the remaining yarn around the shaft and hitch it at the top as before. Now you can continue parking, drafting, and spinning.
Every time the yarn length you’re working with gets too long to manage, wind it onto your spindle. This will start to add weight to your spindle, making it easier to spin with. Once I’ve gotten a length that I want to wind onto my spindle, I usually wind the yarn in a figure eight around the thumb and forefinger of the hand that was holding the wool, which makes the yarn more manageable as I wind it onto my spindle.

With practice, your yarn will get more even, but at first it may be very wonky. And like the name suggests, you are likely to drop your drop spindles more than a few times before you get the hang of drafting evenly. Once you are very comfortable spinning park and draft style, you could try drafting while spinning. I don’t spin park-and-draft style anymore, because I can comfortably manage keeping the spindle in motion and drafting at the same time. Now I usually spin while standing up, and sometimes I take my spindle with me on walks and spin while I walk!
You might notice that store-bought yarns appear to have multiple strands of yarn wrapped around each other. Each of these strands is called a single, and combining singles is a process called plying. You may find yarn labeled as 2-ply (two singles), 3-ply (three singles), or 4-ply (four singles). I usually just make 2-ply yarn since that’s easiest, so that’s what I’ll explain how to do.
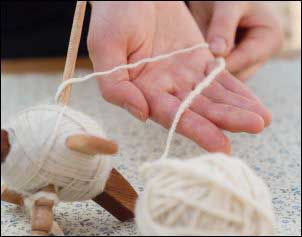
To ply with the average drop spindle, you must have at least three spindles, two to hold a single each, and one with which to ply the singles together. If you are using a Turkish spindle, plying is a lot easier, and you only need one spindle. Simply untie the leader from the bottom of the spindle, slide the whole cop (the ball of yarn on your spindle) up off the shaft, and pull the cross pieces out. You now have a center-pull ball, which is a ball of yarn that you can easily access the beginning and end of your yarn. Now pull the leader out of the base of the ball and cut it off. Put your spindle back together and tie both ends of your yarn single to the bottom of the spindle. Now, spiral the singles up the shaft and hitch them to the top just as you did before. Now you are ready to ply.
Whether the single was spun clockwise (known as Z twist) or counterclockwise (known as S twist), when plying, you must spin the opposite way. If you allow the spindle to hang from the two ends of the single, it will naturally start to spin in the opposite direction from how you spun the single originally. This is the direction that you now need to spin. So, if your singles are spun with S twist, you ply them with Z twist, and vice versa. Plying is just like normal spinning except without drafting, but you also have to work your keep your singles from tangling. Once you finish spinning the whole single, congratulations, you have some completely spun yarn!
The final step of spinning is washing your new yarn to “set” the twist. If you have a niddy-noddy (a helpful tool for spinning), you can use it to wind your yarn into a skein. If you don’t have one, simply wind your yarn around your forearm as if you were winding an extension cord. Tie the yarn in several places and submerge it in lukewarm, soapy water. After letting it soak for thirty minutes, wring the skein and let it air-dry. Your yarn is now ready for use in your next project.

I hope this will inspire you to try spinning wool with a spindle. I love spinning my own yarn to use in my projects; I bring my spindles almost anywhere I go! Spinning is a peaceful and rewarding hobby or pastime and is a great way to connect to the many who have come before us. It’s amazing to think that just a handful of generations ago, many of my ancestors were constantly employed making yarn and string, and now this is a skill that is almost forgotten. Join me in bringing this beautiful pastime back to life and in preserving this skill for generations to come.