


The garlic is all dug and on bread racks for the drying process. In just a few days it will be ready to head to the markets to be purchased by hungry garlic lovers. But how did I get to this point? Well, here in central Illinois, I begin my garlic growing process in the fall. Garlic is simple to grow, as long as you follow a few easy steps.
Growing Garlic Starts in Fall
Garlic is best planted in the fall. While there are some folks that begin this process in the spring, it is best to give the garlic a nice push from winter elements (which they like) to produce larger, stronger bulbs.
Soil preparation is important. Garlic prefers well-drained soil with a good amount of organic matter added. A sunny location is also preferred. It is important that the soil drains well as garlic does not like living in a moist environment.
October is a good month for planting garlic but a good rule of thumb is to plant it about 6 to 8 weeks before a frost. With all the weather changes going on these days it is not out of the question to plant your garlic in November in many locales. Just try to get it in before that first anticipated hard frost and you will be fine. Please do not set your cloves in too early, however. You do not want to get any emerging shoots before winter sets in. Plants will be easily damaged or destroyed if you do so. Good timing with fall growing periods is a must. No emerging green before winter!

We’ll talk more about varieties of garlic in a bit so for now let’s say you have your bulbs already peeled from the main stem of the garlic. At this stage of the game, the planting is the easy part.
You will want to plant the largest of the cloves that you have. Eat the smaller ones. The larger cloves will produce stronger and larger bulbs. Plant the cloves about two inches deep, the chubby end down with the smaller pointy end to the top, much like planting an onion set. Depending on how much space you have to offer for growing garlic seed, spacing can be from four to eight inches apart. I tighten mine up a bit and keep them about five inches apart in rows about a foot apart.
It seems I can’t get enough of growing garlic and keep expanding my beds every year. What was once about 50 bulbs has now turned into three or four hundred. I prefer to plant mine in short beds of three or four wide as opposed to long rows. I do not believe there is any advantage to this just the eye appeal of having nice little compact beds.
Keep in mind that you need to plant enough for needed consumption as well as seed for the following year’s crop. Don’t let the idea of what to keep for planting cloud your thoughts. Just put the larger heads in a cool dry spot and label as “new crop” and the smaller ones just store in your garlic croc for addition to all your favorite dishes.
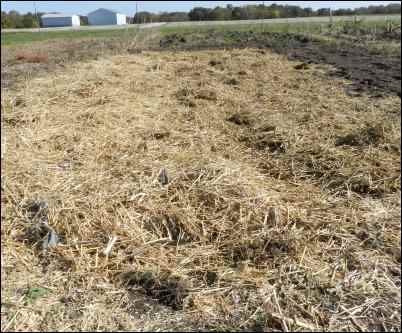
Once you have your cloves in the ground you will want to put a nice layer of mulch over them. I use straw, but chopped leaves and hay are also good. The mulch will help protect the cloves from hard winter weather. If you are in a warmer climate then you could skip the mulching part until spring, when you can then mulch to help protect against weeds.
At this point, your fall planting of garlic has been a success. Now all you have to do is wait until spring when you can then tend to your garlic to help ensure of another great summer harvest.
Growing Garlic in Spring
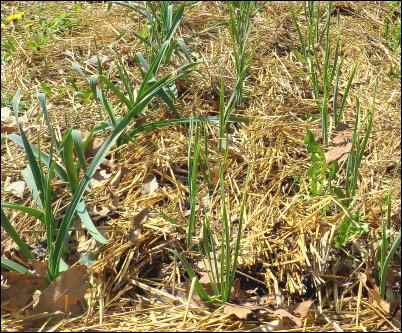
It’s early spring now and conditions are changing; all danger of a hard frost has passed. This is the time when you can pull back your mulch just a bit to allow the emerging green shoots the freedom to grow. If the mulch is too heavy it could smother out the new shoots. You do not need to remove all the mulch, just lighten it up a bit in your garlic rows. The mulch is still needed for weed protection. Once you start seeing the green shoots, you can tighten the mulch again.
Once the shoots are five or six inches tall, then I will add even more mulch in between the rows. Garlic can tolerate some weeds but not too many. Plus the fact that your garlic bed is not as attractive with weeds growing in it.
You can water your garlic a little. I have found that garlic likes things a little dry but some watering in the early growing process is ok. This is where the well-drained soil sets in.
Once the plant begins to set its center stalk, watering is no longer needed, just let nature take it from there.
Growing Garlic in Summer
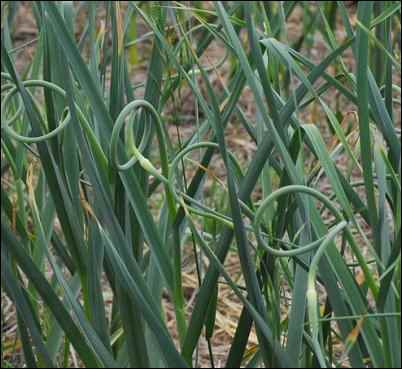
The garlic has grown well and has now set a wonderful center stalk called a scape (hardneck varieties). Scapes are edible and have a wonderful garlic flavor. You can use them in many of your garlic dishes or they can be eaten by themselves.
Growing Garlic Scapes
Once the scape begins to curl over at the top, I will cut them off where they connect to the top set of leaves. Cutting the scape off will help put more growing energy into the bulb as it nears its final growing stages.
I have always cut the scape off and it has served me well, but I am hearing new evidence that now suggests that cutting the scape is not necessary. I tried an experiment on my Polish Hardneck variety this year and left a few scapes on. Maybe it was just a coincidence but I found those bulbs to be smaller than the ones with the scapes cut off. Therefore, I will keep it safe and keep cutting the scapes off.
Soon the leaves will begin to brown at the top, telling you the garlic is nearing time to be harvested. Once the tops are all brown, but still with a little green on the stem (don’t wait until the plant is entirely brown), it is ready to harvest. Typically this will occur in mid to late July, especially here in Illinois.
Garlic can be dug with a potato fork or even a spade. Just insert your tool of choice four or five inches from the plant and just lift the soil a little. Then you will want to pull at the base of the plant and lift the garlic. There is no need to dig up the plant. Try to get your garlic out during a nice dry spell so that “mud” digging is not necessary.
Once the plant is lifted from the ground then gently shake off excess dirt from the bulb-root and place it in your hauling container. Keep in mind that garlic is fragile at this time and can be easily bruised.
Once picked, the garlic is now ready for its curing stage. This stage is very important to give you the best taste and longest storage potential in your garlic. Garlic needs to cure for about two weeks, but conditions must be met to ensure quality.
Garlic needs to be cured in an airy, covered area where it will receive good airflow. Do not allow the garlic to get wet! There are many ways to cure (dry) garlic. I actually lay mine in layers in old, plastic bread racks making sure that there is ample room for all the garlic to breathe. I keep them under the awning under the front porch. You could also rig up some wire mesh baskets and hang from rafters with an overhang or even tie a handful of garlic together and hang as well. I do not like to cure in a barn or garage as there is little, if any, airflow.
After about two weeks the garlic will develop a papery outer jacket or wrapper and the garlic is hard to the touch, it is now ready. Now you have some trimming to do. With my hardneck variety, I will trim the main stem off about an inch ahead of the bulb. Then trim off any excess root stems and dirt. Now, it is time to sell or store.
Much of mine is sold but I do keep plenty for myself that will last for some time. Under ideal conditions garlic is best stored at a temperature around 40 degrees with low humidity; however, that can be hard for many of us.
I just keep a handful of bulbs in a bowl on the kitchen counter, away from direct light from a window. I have never tried one of those garlic crocs made for storage but I hear they are wonderful. You can keep it in the fridge for a spell but it is too cold for long term storage unless, of course, you keep your fridge at 40 degrees.
There are several varieties of garlic on the market today and I could never grow them all. I grow a Polish variety and am happy with that so I stay with that variety consistently. I also grow with organic methods.
Garlic comes in either a hardneck or a softneck variety. Both have good and bad points (if “bad” even applies):
Hardneck Garlic
- Has the stiff central stem, called the scape. The scape is very delicious and can be used in many dishes or eaten on its own.
- Thrives in colder climates, which is why I prefer it over softneck.
- More garlic flavor than softneck varieties.
- Four to six-month shelf-life (less than softneck varieties)
- Larger bulbs than softneck.
- Easy to peel.
Softneck Garlic
- More suited for warmer climates.
- Does not have the central stem/scape.
- Milder flavor than hardneck.
- More cloves per bulb than hardneck despite a smaller bulb.
- Harder to peel due to each individual clove in its own tight skin. However, this very fact allows the softneck to have longer storage times than hardneck.
There you have it. Growing garlic is indeed easy and simple. I should also point out that I left out any talk about pests or diseases only because I have never had a problem. I have been growing garlic for a number of years now and have never had any issues. I believe if you follow a few simple rules, you will have the same results.

White Bean and Garlic Scape Dip
- 1/3 cup sliced garlic scapes (3 to 4)
- 1 tablespoon freshly squeezed lemon juice, more to taste
- 1/2 teaspoon coarse sea salt, more to taste
- Ground black pepper to taste
- 1 can (15 ounces) cannellini beans, rinsed and drained
- 1/4 cup extra virgin olive oil, more for drizzling.
1. In a food processor, process garlic scapes with lemon juice, salt, and pepper until finely chopped. Add cannellini beans and process to a rough purée.
2. With motor running, slowly drizzle olive oil through feed tube and process until fairly smooth. Pulse in 2 or 3 tablespoons water, or more, until mixture is the consistency of a dip. Add more salt, pepper and/or lemon juice, if desired.
3. Spread out dip on a plate, drizzle with olive oil, and sprinkle with more salt.