


When I got married, like many young women, I was “showered” with many gifts to help with setting up my kitchen and home. I was blessed to receive several shiny, new, non-stick skillets. Of course, like most young brides, I was tickled pink with the gifts and began using my new cookware regularly. I loved the way that the food just slid right out of the pans and that clean-up was very easy.
After several months of use, I noticed that the non-stick coating in my pans was getting scratched off, despite my careful use of non-metal tools when cooking with them. About a year after my wedding, I had to replace some of my cookware because I worried about the flakes of non-stick coating that were now getting mixed in with our food. Of course, studies said that the coating was not harmful, but I wasn’t so sure. I just bought new non-stick pans to replace the old ones.
And so it went. Every year or so, I had to replace my non-stick pans. It didn’t matter if I paid more money for higher-quality pans. After a while, the coating would degrade, and I would have to buy one more.
Several years ago, from the back of the cabinet, I dug out a pile of old cast-iron pans that I had inherited from my grandmother. When I thought back, I never remember my grandmother cycling through cookware at the rate that I had. Although these pans were very heavy and not quite as “cute” as the painted metal pans that I had been buying, I wondered if maybe they were the solution to my cookware problem.
I did a little research and found that cast iron cookware had many more advantages than I had ever imagined. That was about six or seven years ago. In that time, I’ve discarded all of my other non-stick skillets and have been completely won over by the benefits of using cast iron cookware.
Benefits of Cast Iron Cookware
The biggest benefit that I have found to using cast iron cookware is durability. Most of the pans that I own belonged to my grandmother at least thirty years ago. Cookware fads come and go, but cast iron has been in use for hundreds of years. You can pay less than thirty or forty dollars for a cast iron pan and use it for more than fifty years if you take care of it. In that time you would probably have bought several other pans of more flimsy materials.
Cast iron is also relatively inexpensive for a high-quality type of cookware. High-quality cookware can cost several hundred dollars, but buying a complete set of cast iron cookware can set you back as little as 75 to 100 dollars.
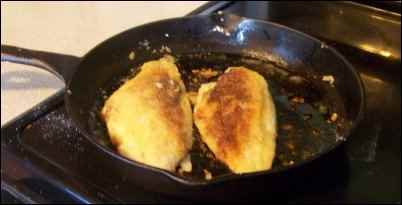
Cast iron cooking pieces are perennial favorites because the heaviness of the pan means that they cook very evenly. Even professional chefs love using cast iron in their kitchens. You can fry chicken in these pans without having to rotate the food to keep it cooking evenly.
Cast iron also can contribute to your health. Foods cooked in cast iron have higher iron contents than food cooked in other types of pans.
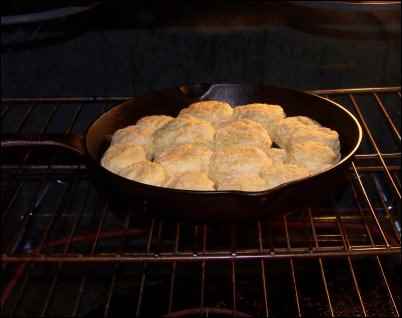
Very few other cookware types are as versatile as cast iron. It can be used on the stovetop, on the grill, or over a campfire. You can even grill indoors on a cold, snowy day using your stovetop if you have a cast-iron grill pan. You can even bake mouthwatering biscuits and cornbread in a cast-iron skillet in the oven.
Disadvantages of Cast Iron Cookware
However, there are some drawbacks to cast iron. The first thing that many notice when using these pans is the weight. A ten-inch cast iron frying pan can weigh up to ten pounds. If you have little arm or hand strength, cooking in a large cast-iron pan will be difficult. Trying to cook in a heavy pan with weak hands and wrists can be dangerous since you could easily spill hot food all over yourself.
Another problem is that many glass and smooth-top stove manufacturers do not recommend the use of cast iron cookware on their stovetops. Personally, I have a glass-topped stove, and I use cast iron on it almost every day. However, I am very careful to gently set the pans on the cooking surface to avoid cracking the top. I also try to avoid sliding the pan on the top of the stove, since this can lead to scratches. I would be less than honest, however, if I didn’t tell you that my stovetop looks pretty rough. I don’t think that all of the scratching on the surface is from my cast iron cookware, since I do other things on it that are forbidden by the stove manufacturer, like can vegetables. I know many other people with glass-topped stoves use cast iron too, but they are careful. If you are very concerned with keeping your glass-topped stove in pristine condition, you may not want to attempt to cook with cast iron.
The handles of a cast iron pan are made from the same metal that the pan is. This means that when a pan is hot, you will have to use a potholder to lift and move the pan. Again, if you have weak hands or arms, this could be difficult.
Cast iron is also prone to rust. This type of cookware must be washed and dried immediately. You can’t just leave it sitting around with water in it or soaking in the sink. If you are not careful to keep it dry, it will develop rusty spots.
Seasoning Cast Iron Cookware
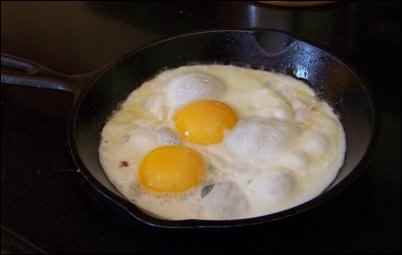
Many people have used cast iron in the past and have been frustrated with food sticking to the pan. However, the hidden trick to using cast iron cookware is properly seasoning the pan. A properly seasoned cast iron pan will have food, even eggs, sliding right off of the surface.
If you look at a new piece of cast iron cookware under a microscope, you will find that the surface is covered with tiny pores and is quite rough. The seasoning process fills these tiny openings with baked-on grease and smoothes out the surface so that it is slick. Food can’t stick to such a smooth, slippery surface.
However, getting the pan to that point takes a little work. Even if your pan is labeled as pre-seasoned, you will still want to do some seasoning yourself to get the best cooking surface. Before you season the pan, you will want to wash it well in hot, soapy water. Dry the pan completely with a clean dishcloth, and preheat your oven to 400 degrees.
Next, using clean paper towels, smear a coating of shortening, lard or canola oil on every surface of your pan. Get the outside of the pan and the handles too. If your pan has a lid, do this to the lid as well. The oil will help keep your pan from rusting, so cover the whole thing with fat.
Place a cookie sheet or a layer of aluminum foil in the bottom of your oven. If you don’t do this, your oven will get very messy when the melted fat drips off of the cookware into the bottom of your oven.
Place the cookware on the rack in the center of the oven, closing the door. Let the cookware bake for about 15 minutes. Then, use a paper towel to wipe up any puddles of oil or grease on the cookware. Return the cookware to the oven, and allow it to bake for another hour. Turn off the oven, and allow the oven and the cookware to cool.
Your pan should begin to get a dark look to it. A new, unseasoned pan will be a dull gray. After it has become well seasoned, it will be a glassy black. However, it may take several seasoning cycles to get the black coating on your pan. You need to simply repeat the above steps. Don’t try to save time by making one thick coat of grease on the pan. It is kind of like painting, in that several thin layers are better than one thick layer. Take your time and repeat the seasoning process, and your non-stick seasoning will be a dream on which you can cook. From time to time, as you cook with your cast iron, you may need to re-season your cookware if food begins to stick to it. Simply follow the above steps to do so.
Cast iron pans are good for a lifetime of use if you take care of them. Fortunately, the care and maintenance of cast iron is pretty simple once you get the hang of it.
When you begin to cook with a cast iron pan, you will want to allow it to heat up before you place the food in it. If you are going to fry foods in the pan, you will want to add your fat and allow it to heat before you place the food in the pan. It takes a longer amount of time to heat a cast-iron skillet than other lighter-weight pans, but the pan holds the heat for a longer amount of time.
If you are using a cast iron pan for the first time, you will likely want to cook something that needs additional oil. Frying is perfect for those first few uses, as the extra oil will help season the surface just a little bit more.
When choosing utensils with which to cook in your cast iron, you should use caution. Metal spatulas with rounded edges are good, as are wooden and plastic implements. You don’t want to use anything with a sharp edge on your pan, since the sharpness can gouge off the seasoning. When using metal spatulas, use care to not scrape at the pan’s surface.
When you are finished cooking, you should allow the pan to cool before you try to clean it. Placing a hot pan in cool water will make it crack or warp. You will have the best results if you wait until the pan is just barely warm. Scrape any leftover food bits out of the pan with a plastic pan scraper. You can blot up any leftover oil or grease with a paper towel, too.
Some people don’t use soap on their cast iron, but just wipe out the grease. I prefer to give my pans a quick dunk in a slightly soapy water solution. Never, ever soak your cast iron, as doing so can lift the seasoning right off of the pan. If food is stuck to it, use a plastic pot scrubber or scraper to gently work the food off of the pan. Never use steel wool, as it will scrape off your lovely seasoning.
You should never store food in your cast iron pans. Remove the food, and clean the pan after you have eaten. Storing food in the pan can give your food a metallic flavor. Additionally, storing acidic foods in your pan will strip the seasoning right off of the pan.
After washing, dry your pan completely with a clean dishtowel. Some cast iron fans place the pan on a hot stove eye or in a heated oven for a few minutes to make sure that the pan is completely dry.
When you store your cast iron pieces, keep in mind that the seasoning can be scratched if you stack other pans or pots on top of it. You may want to place dishtowels between stacked pans to keep them from scratching one another. Also, you should remember that a heavy pan could be very painful if it happened to fall out of a cupboard onto your foot. Stack these pans in a secure place to keep accidents from happening. If your pan has a lid, don’t store the pan with the lid on it. Store it separately, as humidity trapped in the cookware can cause your pan or pot to rust.
Despite your best care, sometimes you may end up with a spot of rust on your pan. To fix this, you should scour the rusty spot with steel wool to remove the rust. Then you should re-season the pan using the previously described method.
Where to Get Cast Iron Cookware
Many discount and kitchen stores stock cast iron pans. However, these pans are created with inferior processes than those used in the past. Up until about 50 years ago, manufacturers made pans with much smoother surfaces than the ones that are marketed today. A cast-iron pan from 40 or 50 years ago will likely be of better quality than more modern pans. If you must buy a new pan, you will want to season it well before you use it.
I have several pans from my grandmother and one pan that I bought in the last ten years. My favorites are the pans that were passed down to me, and this is not only because I am sentimental. The old pans have a smoother surface, and I can simply wipe them out in the sink. Sometimes my newer pan needs a more vigorous scrubbing to get the food out.
If you are not lucky enough to have a family heirloom cast iron pan, you may want to scour thrift stores, flea markets or garage sales for a well-seasoned pan. You may be able to find one for just a few dollars at these places.
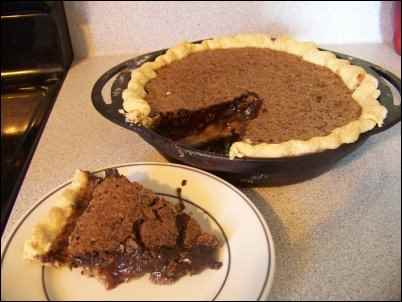
Cast iron is the best cookware that I have ever used. I have several pieces that I love. I use my eight-inch skillet every morning to fry my breakfast eggs. I regularly use my ten-inch pan for frying food and browning ground beef. Last Christmas, my husband bought me a cast iron pie pan that bakes tasty, tender pies. The bottom crust is always perfectly cooked in that pan. I think it is safe to say that I have paid for the last cookware that I will ever buy. Unless I decide to add to my collection…
Skillet Cornbread
Baking quick breads in cast iron yields amazing results. I’ve found that the best biscuits I’ve ever put in my mouth were cooked in my cast iron skillet. The heavy pan allows quick breads to have a slightly crisp exterior, while still keeping the inside moist and fluffy.
Old fashioned, southern cornbread must always be cooked in a cast-iron skillet. My family likes slightly sweet cornbread, but if you don’t, simply omit the sugar. Cooking this in a well-oiled, cast iron pan gives the cornbread an amazingly tasty crust.

Ingredients:
- ½ cup cornmeal (yellow is prettiest)
- ½ cup flour
- ¼ tsp. salt
- 2 tsp. baking powder
- ¼ cup sugar
- ½ cup buttermilk
- 1 egg
- 2 tablespoons oil
- 2 tablespoons oil for greasing the cast iron skillet
Preheat oven to 425 degrees. As the oven is heating, pour 2 tablespoons of vegetable oil into an 8 to 9 inch cast iron skillet. Set the pan in the oven so that the oil can heat while you are mixing up the cornbread.
Mix the dry ingredients in a bowl with a fork. Add the egg and buttermilk. Stir it all together gently, leaving some lumps. If you over-mix, it is not as good.
Once the oven and oil in the pan are hot, pour the batter into the pan. Bake for 15-20 minutes or till golden brown. I find that the bread comes out of the pan best if I allow it to sit on the stovetop for 5 or 10 minutes.
Fried Catfish
Fried foods do very well in cast iron. If your pan is well seasoned and your pan and oil have been preheated, you should not have trouble with food sticking to the pan. One of my family’s absolute favorites is fried catfish. I cook my fish in my 10-inch cast-iron skillet, my most versatile piece.
Ingredients:
- 2 lbs. catfish fillets
- ½ cup yellow cornmeal (white works fine too, but yellow is prettier)
- Salt
- Pepper
- Oil for Frying
Preheat the pan on the stovetop to medium heat. Pour about ¼ cup oil into the pan. Allow the oil to heat until it is very runny and sizzles if you flick a drop of water into it.
As you are heating the oil, bread the catfish. On a dinner plate, mix the cornmeal, ¼ tsp. Salt and ¼ tsp. pepper with a fork. Roll your fish fillets in the cornmeal mixture until all surfaces are coated.
Once the oil is hot, gently drop the fillets into the oil. Allow them to cook for 4-5 minutes, or until the breading is golden brown on the underside. Flip with a metal spatula, and cook the other side for 4-5 more minutes. The fish should flake easily with a fork. If not, cook it a bit longer.
Remove the fish from the pan and drain on paper towels. This fish is best piping hot. If you can’t serve it right away, set the fillets on a plate, uncovered in a warm oven. It won’t be very good if you try to reheat it in the microwave.