If you are new to, or interested in, beekeeping, you will eventually find yourself posing the question, “Where do I get some bees?” If you are lucky enough to have a friend who is a beekeeper and can hook you up with some bees, free of charge, from their own apiary then lucky you. This is obviously an excellent way of getting bees as you know their full history and have a handy O’bee Wan Kenobee on hand to give advice. However, if you’re reading this article, I doubt that it the case. As such, the first solution to present itself is to buy them. Any search on the internet will provide a whole host of suppliers ready, willing, and able to take your money in exchanges for bees. The main purchase options are:
1. Buy a nuc. A nucleus (or nuc) is essentially a small hive. A conventional, framed beehive will have 10-12 frames of bees. A nuc will probably have around 5 frames, on which there will be bees in various states of development. There will be eggs, larvae, capped brood (when the larva is metamorphosing into an adult bee). There will be a spread of bees of different ages, and, of course, the Queen herself. It will have a little bit of honey already stored, and have some bees which are foraging and others feeding larvae. This is a starter hive which is—given the right conditions, and provided the queen lays well—capable of growing and thriving. This is also the most expensive option. Prices for nucs vary dramatically but hover around the £250 ($380) mark depending if you are buying a particular strain of bee. A nuc for a genetically pure bee strain is most expensive.
2. Buy a package of bees. Yes, this is exactly what it sounds like. A package of bees literally arrives in the post. This is much cheaper option than the nuc. Package bees are certainly more popular in the United States than they are in Europe and there are a number of things that need to be considered with packages that don’t with nucs.
First, this is just a box of bees. There is no new generation in egg, larvae, and capped brood form to keep a constant rolling population of bees on the go. There is no comb, or drawn out foundation for the bees to store nectar and pollen in, or a queen to lay eggs in. In fact, most importantly, there is NO QUEEN.
You can purchase a queen along with your bee package, but it is not the queen the bees were laid from. This means the queen needs to very carefully and correctly introduced to the large box of bees that your mailman just nervously delivered. The queen will be in small cage to protect her until the bees get used to her smell, but if the bees and the queen are not properly introduced then the package bees will kill the queen. Obviously, you do not want this to happen.
It is essential that the bees are fed when they arrive as they will not have any stores available to them and will have spent some time in transit during which they were unable to forage. Also, the more they are disturbed the more likely they are to reject the queen so you have to leave them bee (sorry).
These are perfectly legitimate ways of starting out and most new beekeepers will choose one of these options. In my opinion, these options have two inherent flaws. One being the bees you are buying are not well acclimatized to your local area; by this I mean they are not used to the seasonal weather, and they have not adjusted to the locally available food sources. The other reason is simply why, oh why, oh why would you pay for bees when you can get them for free? Bees that are not only locally acclimatised, but ready, willing, and driven to develop and build up a new bee colony. I am, of course, talking about swarms!
A swarm isn’t just a group of bees, it is the reproductive unit of a hive. In spring, when the food is coming in, and the bee population is swelling, the hive may collectively make the decision to swarm. Swarm season is usually from April to June, depending on the weather, but can extend out into late July. Eggs are selected to be made into new queens and, when they are capped and ready to go, a large portion of the bees along with the current queen up and leave en mass. This is the “prime swarm”. They gorge themselves on honey before they go which leaves them able to rapidly build new comb when they arrive at their new home. The queen is already able to lay, so things progress pretty rapidly.
Meanwhile, in the old hive, depending on how many new queens manage to hatch, one or more “cast swarms” may result, where a unmated or “virgin” queen along with a few more bees leave to find a new home. A cast swarm takes more time to establish as there are considerably less bees, and the queen cannot lay any eggs until she has mated. If she fails to mate, the colony fails.
Collecting bee swarms, in my opinion, is the best way of starting a hive. These bees have made the decision as a colony to set up a new home. They are motivated and pre-programmed to provide you exactly what you want to start a new colony, in a new hive, in a new place. All you have to do now is catch one!
You can literally head out and catch yourself a swarm. You will need a bee-suit, although it is possible to do this without a bee suit. Swarms are not predisposed to stinging as they have gorged themselves on honey and are pretty blissed out. They are also singularly focused on finding a new place to live and setting up the hive. Any sting would reduce resources available by resulting in the death of the bee. Stinging is also a mechanism developed to defend the hive itself. At this stage there is no hive, so, no defense! Having said that, this is not a perfect world, and if you’re reading this you have probably not done this before, so suit up. You will also need:
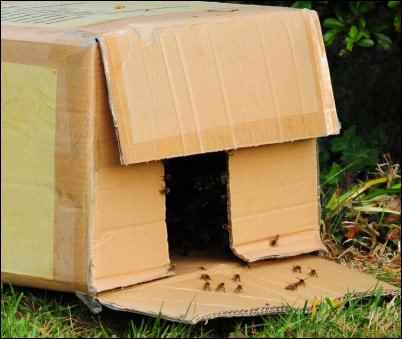
- A box: this can be a (small) hive, a wicker basket, or literally a cardboard box.
- A water mister: not essential, but spraying a fine mist on the bees can stop them taking to the air and keeps them together. Useful if they have settled on something you can’t move. Some people will also use, or prefer the use of, a smoker.
- Secateurs: Again not necessarily essential, but bee swarms can settle anywhere. Being able to remove some of the foliage around a bee swarm to give you better access is very useful. You can even use it to just cut off the entire branch the swarm and settled on and put it in your box.
Now you need to spread the word you interested in a bee swarm. Tell your friends, put cards in the local shop. There are often online registers where you can provide your contact information which is then made available to anyone seeking a swarm collector.
Next step…wait… and wait… and wait.
When you finally get a call, I would recommend first ascertaining whether or not this is a genuine bee “swarm”. Make sure they are not bumble bees or wasps, but also that they are not an established colony. If they have already found a place to call home and accepted it as their hive do not get involved. Remember you are new to this and the removal and transplant of an established colony is very different from collecting a bee swarm. When collecting a swarm of bees, practically consider that you are providing them with a service of finding them a home without them having to find it for themselves. When moving an established colony, they believe you are attacking their hive and tearing them home apart.
Once you have established there is a swarm go as soon as you can. Swarms do not settle for long and will be driven to finding a new place to live. When you get there, don’t be a hero. If the swarm isn’t reachable leave it alone. If they have settled nicely on the branch of a tree place your box underneath the swarm and give the branch a firm, sharp shake. The majority of the bees will fall directly into the box, many will take to the air. Get as many off as you can at this point.
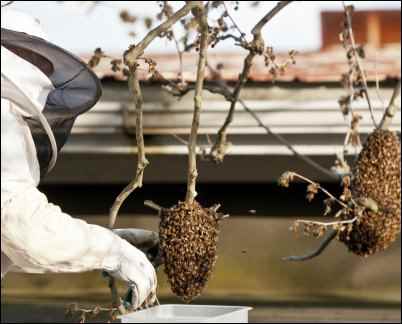
However, if they are on a solid object such as a fence post, a door frame, car tire, or anything else you can’t just shake off you need a different approach. Very lightly mist the bees with water and then gently, very, very gently brush the bees into your box. You can buy long thin bee brushes with extremely soft bristles (usually pig or horse hair) to do this. Alternatively, a goose feather works well. I have seen this done using a gloved hand but there is a danger that you will damage the queen this way so I do not recommend it.
Then place the box on the ground under where the swarm was and cover it leaving an entrance for the bees. Within a few minutes the flying bees will either start to accumulate back on the swarm site, in which case you didn’t get the queen, or start to move into the box in which case you did. Some may return to the swarm site initially anyway as it will still smell a little of their queen. What you hope to see on and around the entrance of your box is “fanning”. Fanning involved a number of bees tilting their abdomens in air and using their wings without taking off. This sends a homing smell to all the bees in the air to allow them to target in on their new home. If you have been successful they will move in fairly quickly.
You can now leave the swarm till the evening, when it cools down, to settle. To install the swarm in your hive can be as easy as taking them to the hive in the early evening and providing a ramp up to the hive entrance. When poured out onto sheet under the ramp the bees will form a procession up the ramp and into the hive.
Bees for Free
 Another way of catching swarms is by letting them come to you. “Swarm traps” or “bait-hives” are by far my preferred way of doing things. It allows you to do things to your own timetable so you don’t have to drop everything and head out at a moment’s notice. This basically involves providing an attractive hive option. The scout bees which are sent out from a swarm will then find your bait hive and consider it a good new place to live.
This does mean you are going to have to build some stuff. The type of bait-hive you use can vary dramatically depending on the type of hive you want to use in the long term. If you are using a warré hive, you could use two of the boxes which will form part of the hive. For conventional hive types such as Nationals and Langstroth, a single brood box or homemade nuc works just fine. If you are doing a top bar hive, you could use pretty much anything the right size which will take your top bars across the top. Once occupied these top bars or frames can simply be transferred into your hive (if it is not already occupied, it is always worth setting up your actual hive as a bait hive as well).
These options have the distinct advantage that once the bees settle in and start building comb they are less likely to leave it. In cases where you remove the bees from the bait hive and place them somewhere else there is a much greater chance of them absconding. Not to mention the waste of resources if they have built comb and the queen begun laying.
The basic requirements for a bait-hive are:
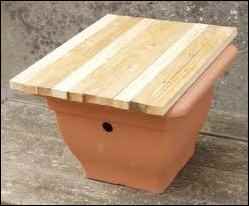
- A volume of about 40 litres: 20-60 litres seem to be successful. If you are using a Kenyan or Tanzanian top-bar hive this is approx. 10 bars across a roughly 30cm-deep container. For warré hives, this is two warré boxes. For conventional framed hives this usually equates to a brood box. Some people simply use two plant pots stuck together.

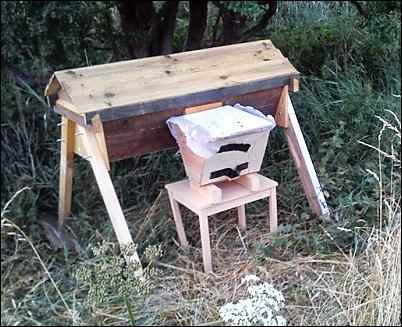
Example of a plant pot converted to be used as a bait-hive for a top-bar hive. - Weather-proof: Ply-wood, political signage, or even a plastic bag. Anything you can use to keep the wind and rain out. Full hive roofs and floors can be used but are not necessary for trapping.
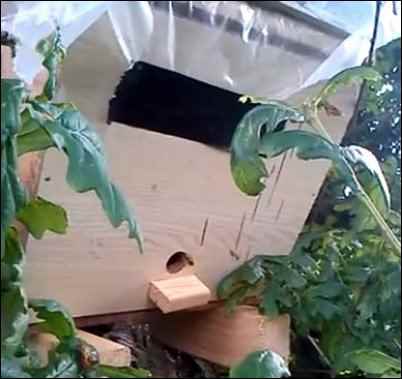
- An entrance: Not too big, a drilled round entrance of ½ inch to 1 inch works just fine and can be blocked with a wine or champagne cork when you need to move it.
When you build your bait-hive, rub all around the inside on the hive with beeswax. You can buy this fairly cheaply online and it makes the inside smell like a hive making it more attractive. If you can get hold of a piece of old comb from another beekeeper (whose apiary you know is disease-free) or the wood already coated with propolis (a weatherproofing substance that bees produce for the inside of their hives) then that is much better.
To further increase your chances of catching a swarm you can buy some lemongrass oil, which, again, is fairly cheap and readily available. Put a cotton or wool ball with the lemongrass oil on it in a Ziplock bag, left only slightly open (this reduces the speed at which the lemongrass oil evaporates) and place it inside the bait-hive. Then place a few drops on the entrance. Now all you have to do is site your bait-hive. The best places are:
- Near established colonies: If you already see honey bees in the area then you certainly have a good chance. Please, please, please don’t go and put one of these outside the house of another beekeeper and tell them I told you to do it. You should always have the permission of the landowner to site a bait-hive on their land. Expect a few to get stolen, too. I always write on my bait hive what they are and my telephone number in case there is a problem.
- Near resources: Bees (especially prime swarms) prefer somewhere that fills the boxes on their house-hunting checklist. Good forage nearby, a water supply, some resinous trees for propolis production.
- Not too exposed: The bees will prefer a trap that is sheltered from the worst the weather can throw at it. In the UK, this mostly means wind and rain, but in hot climates, shelter from the worst of the afternoon sun is a must for them.
- South facing entrance: This appears to be a preference.
- Elevated position: They seem to like being off of the ground, probably in order to reduce the chance of a badger breaking in. There is a balance to be struck between elevation for the bees’ sake and access to you to retrieve the trap. It is one thing placing an empty trap 10 feet up a tree using a ladder. It is another thing entirely taking it down when it is full of bees, and perhaps comb, and hopefully honey. Five-six feet off of the ground appears to be a good balance. Using the flat roofs of sheds and garages is ideal. Having the trap elevated also makes it less likely for people to come in contact with the bees and be stung.
Once your traps are sited, you only need to look in on them once a week or so. Try to go at the same time of day when the bees will be out flying and active so you can tell if the trap is occupied. If it appears empty then put another drop of lemongrass oil on the entrance and leave it alone. You can try knocking on it to see if it sounds empty, or weighing with luggage scales, you can even put a stethoscope on the side and hive a listen for buzzing.
Whatever you do, try not to open it until you are sure it is occupied. Sometimes a few scout bees might be investigating the trap or even spending the night. If you disturb them by opening it up they will not come back. It is important to approach the hive from the side and not in direct flying-line of the entrance. If your face is in the way of a bee flying out they will make their displeasure known. If the trap is a hive of activity (again, sorry) then next you need to move them to the hive location.
Wait until nighttime, plug up the entrance (preferably ensuring they have ventilation) and move them. If you are moving them more than two miles you should be fine. If you are moving less than two miles there may be problems with the bees going back to the original trap site. Plugging the entrance hole with some grass and putting some branches over it causes them to reorient, reducing the loss of these foragers. You can also take another trap to the original location the following evening to collect any that have clustered there and bring them back to the hive location. They will usually just walk in the same as the swarm hiving.
Do try and get another trap out near the same location soon after because there is a very good chance you will catch a cast swarm there. It’s a good idea to site a number of bait-hives. The more you have, the greater your chance of catching something. If you are particularly successful and end up with more colonies than hives you can either combine several small colonies to make them stronger, or even sell them to recoup any investment in materials you have made. Ultimately, though, once you have the bees all you have to do is “keep” them.